Australian War Memorial Logo
Search

Donate Today

  • Collection Open Information Close Information
    • Official Histories & Unit Diaries
    • Understanding the Collection
    • Research at the Memorial
    • Donating to the Collection
    • National Collection Loans
    • Projects
  • People
  • Visit
  • Commemorate Open Information Close Information
    • Last Post Ceremony
    • Honour Rolls
    • Anzac Day
    • Remembrance Day
    • Customs & Ceremony
    • Speeches
  • Learn Open Information Close Information
    • Schools & Teachers
    • Memorial Articles
    • Encyclopedia
    • Understanding Military Structure
    • Podcasts
    • Glossary
    • Magazine
  • Get Involved Open Information Close Information
    • Donations & Bequests
    • Corporate Partnership
    • Employment Opportunities
    • Volunteer at the Memorial
    • Friends of the Memorial
    • eMemorial Newsletter
    • Grants, Scholarships & Residencies
    • Research Papers
  • Shop Open Information Close Information
    • Memorial Shop
    • Images, film and sound
    • Lone Pine Seedlings

Breadcrumb

  1. Home
  2. Visit
  3. Exhibitions
  4. Fifty Australians
  5. Fifty Australians - Braces Bracegirdle

Main navigation

  • Other Exhibitions
  • Current Exhibitions
  • Past Exhibitions
  • Touring Exhibitions
  • Online Exhibitions

Fifty Australians - Braces Bracegirdle

An officer from a distinguished Australian naval family. Warwick Bracegirdle saw extensive service in both the Second World War and the Korean War and was awarded the Distinguished Service Cross on three occasions.

Commander Warwick Seymour Bracegirdle, DSC (and two Bars) (1911–1993)

Warwick Bracegirdle seemed destined for a naval career. His father, Rear Admiral Sir Leighton Bracegirdle (1881–1970), had been an officer in the NSW Naval Brigade and later the Royal Australian Navy (RAN). By the time he was 21 he had fought in the Boxer Rebellion and the Boer War; in the First World War he served in the Australian Naval and Military Expeditionary Force, and in 1915 was appointed to command the Australian Naval Bridging Train. Following in this tradition, young Warwick entered the RAN College, where, in 1928, he received the King’s Medal.

During the Second World War Warwick Bracegirdle was in the Mediterranean in HMAS Perth, and was often under air attack. At Piraeus, near Athens, he was almost killed when the ammunition ship Clan Fraser exploded while he was trying to tow a lighter clear during a bombing raid. For “his personal courage and determination” in Perth Bracegirdle was awarded the Distinguished Service Cross (DSC).

From 1942 to 1945 he was gunnery officer in HMAS Shropshire. Always “a cool thinker in action”, he received another DSC for his “gallantry and skill” at Leyte Gulf in October 1944. He was twice mentioned in despatches.

During the Korean War Bracegirdle commanded HMAS Bataan and in 1952 was awarded a further DSC. Bataan and Warramunga were the two Australian ships most heavily involved in the war. On one occasion, after Bataan was under fire, Bracegirdle returned to his cabin to find a shell had penetrated it. To his annoyance, and others’ amusement, his dress uniform had been hit.

For service in Korean waters, Bracegirdle also received the US Legion of Merit. He was later posted to Britain and retired from the RAN in 1957. His son, also a naval officer, served in the Royal Navy.

Collection Item C1115075

Accession Number: 306829A

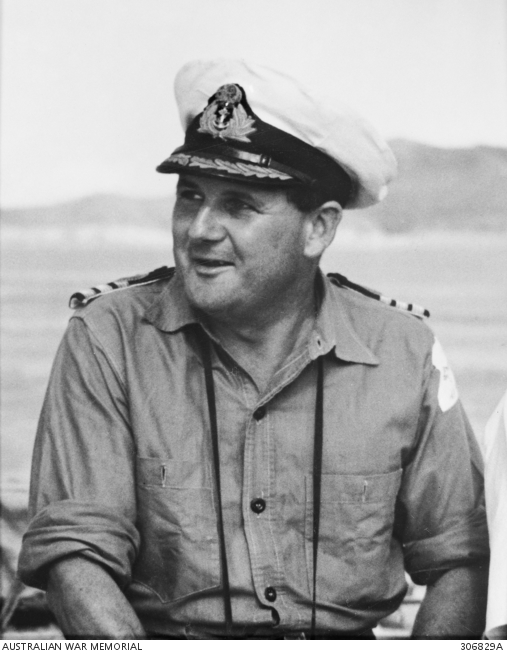
Commander Warwick Bracegirdle on the bridge of HMAS Bataan in Korean waters

Collection Item C380073

Accession Number: 005237/02

Lieutenant Bracegirdle on the bridge of HMAS Perth in October 1940.

Collection Item C358752

Accession Number: 017672

Gunnery Officer of HMAS Shropshire, Lieutenant Commander Bracegirdle, with Commodore Henry Showers, in 1944.
 

  • Home
  • Previous: Bob Bage
  • Next: Maurice Buckley

Last updated: 10 February 2020

1 The Donations and bequests

Donations & Bequests

Your generous donation will be used to ensure the memory of our Defence Forces and what they have done for us, and what they continue to do for our freedom remains – today and into the future.

Find out more
2 Visit Transcribe.awm.gov.au

Transcribe

Help preserve Australia's history by transcribing records from the National Collection. Enhance accessibility and discoverability for all Australians.

Find out more
The placesofpride

Places of Pride

Places of Pride, the National Register of War Memorials, is a new initiative designed to record the locations and photographs of every publicly accessible memorial across Australia.

Find out more
Visit the Australian War Memorial

Visit the Australian War Memorial

The Australian War Memorial is open for visitors as we work to expand our galleries. Entry is free and tickets are not required.

Find out more
Canberra Highlands in Grayscale

ACKNOWLEDGEMENT OF
TRADITIONAL CUSTODIANS

The Australian War Memorial acknowledges the traditional custodians of country throughout Australia. We recognise their continuing connection to land, sea and waters. We pay our respects to elders past and present.
Location map of The Australian War Memorial
The Australian War Memorial building

The Australian War Memorial

Fairbairn Avenue
Campbell ACT 2612
Australia
View on Google Maps (opens in new window)
Google Map data ©2025 Google
Australian War Memorial Logo
  • Go to AWM Facebook
  • Go to AWM Trip Advisor
  • Go to AWM Instagram
  • Go to AWM Youtube

Footer

  • About
  • Contact
  • Venue Hire
  • Media
  • WM Magazine
  • Donate Today

The Australian War Memorial

Fairbairn Avenue

Campbell ACT 2612

Australia


Opening Hours

10 am to 4 pm daily (except Christmas Day)


In preparation for the daily Last Post Ceremony,

galleries are progressively closed from 3:40 pm.


Public entrance via Fairbairn Avenue, Campbell ACT 2612

Sign up to our newsletter

Subscribe

Legal

  • Copyright
  • Disclaimer
  • Privacy Policy
  • Accessibility
  • Freedom of information

Copyright 2025 Australian War Memorial, Canberra. All rights reserved