‘Bardia or Bust!’
This year marks the 80th anniversary of the battle of Bardia, which took place from 3 to 5 January 1941. It was the first battle fought by Australian troops in the Second World War.

On 3 January 1941 at 5.30 am, the 6th Division of the Australian Imperial Force (AIF) launched an attack against Bardia, a fortress-village on the Libyan coast near the Egyptian–Libyan border. At the time, Bardia was being held by the Italian XXIII Corps of about 40,000 soldiers, under the command of the experienced Lieutenant General Annibale Bergonzoli.

Bardia was the second battle fought during Operation Compass, the first British military operation of the Western Desert Campaign. The Italian Army had previously been pushed out of Egypt by Commonwealth troops following the Battle of Sidi Barrani in December 1940. The same month, Mussolini had contacted Bergonzoli to stress the importance of Bardia to Italy, to which Bergonzoli had replied: “In Bardia we are and here we stay.” (3DRL/2529).
Although Bardia was a baptism of fire for most of the Australians troops, what features in their correspondence is their confidence, determination and impatience after weeks of training in Palestine and Egypt. Major Henry Marshall described the challenge facing the 6th Division:
”The Italians had spent a number of years developing Bardia and they considered it impregnable. They had made the terrain inside and outside the wire as bald as a billiard ball and had constructed concrete posts along the wire in two rows – each post being about 300 yards apart. It was impossible to use any cover as there wasn't any.“ (PR03058)

This photograph by Damien Parer was taken during the flight of Prime Minister Menzies over the Western Desert in February 1941.
The 6th Division, under the command of Major General Iven Mackay, was made up of 16,000 men, and was assisted by the 7th Royal Tank Regiment and artillery. The 6th Division was under-equipped, manned by many inexperienced (and in the eyes of some senior officers) under-trained soldiers. There were tensions in command arising from the perceived lack of experience of Lieutenant General Stanley Savige and his 17th Infantry Brigade. The 6th Division would also soon discover that the number of Italian troops defending Bardia had been underestimated by Allied intelligence.
The collections held by the Australian War Memorial show how carefully and thoroughly the attack had been planned. Supported by air raids and naval bombardments, the 16th, 17th and 19th Brigades, the 2/6th Battalion and the 7th Armoured Division all played a key role.
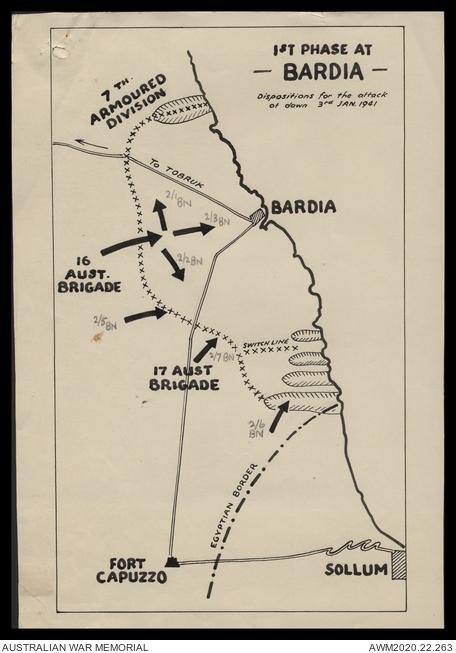
First phase at Bardia – Dispositions for the attack at dawn, 3 January 1941
The 6th Division captured Bardia on 4 January 1941. The Italians, however, only surrendered the following day after heavy fighting in the southern part of their defensive perimeter. This was where the 2/6th Battalion encountered most resistance. In his correspondence, Lance Corporal Alexander James Llewellyn described the battle as ”hell on earth” (PR90/112). Post 11 had become the main point of opposition and had been stubbornly defended by the Italian forces. The reality of the combat for Post 11 has been represented by Ivor Hele in his painting Bardia (action leading to the fall of Post 11).

With about 36,000 of its soldiers captured and 1,000 killed, the battle was a disaster for the Italian Army. Already shaken by their heavy defeat at Sidi Barrani, Bardia had a major impact on Italian morale in North Africa. Witnesses of the battle repeatedly reported that the Italian Army was disorganised and fought with often limited, ageing and faulty artillery and tanks, and stressed how quickly many Italian soldiers consequently surrendered.
This was confirmed by Giacomo (later John) Rizello, an Italian soldier who was captured at Bardia. In an interview recorded by the Memorial in 2007, Rizello offered a unique insight into the battle from the Italian perspective (S04342). The 6th Division captured large quantities of equipment and military stores, and was rapidly overwhelmed by the number of Italian prisoners.

Some of the thousands of Italian prisoners captured during the Bardia action.
Photograph by Frank Hurley.
130 Australians were killed and 326 wounded during the battle. The modern and effective British tanks had played a key role in the battle and, despite the unfavourable odds, it was an indisputable victory and a success for the 6th Division:
“The first fruits of victory almost constituted an embarrassment of riches. Prisoners were everywhere – 45,000 of them, from Corps Commanders to cook assistants.… In addition to the prisoners we took some 462 guns, 130 light and medium tanks, hundreds of machine guns and anti-tank guns, vast quantities of equipment, two splendidly fitted field hospitals, 700 motor trucks, many motor cycles, and even a few good horses.” (Lieutenant General Sir Frank Horton Berryman, PR84/370)

Italian ‘Carro Armato’ M13/40 medium tank captured at Bardia and taken over by the AIF. Photograph by Frank Hurley
After the battle, the Australian troops celebrated, and the news of their victory quickly spread throughout the world. Prime Minister Robert Menzies gave the troops “three cheers”, while General Wavell sent his “warmest congratulations” to Percy Spender, Minister for the Army, for an action which added “yet another to many great feats of arms by Australian troops.” (EXDOC063). The Washington Times Herald called Mackay’s men the “world’s finest” and “shock troops”.
Bardia would remain a hot spot in the area over the following months. The victory played a major role in boosting the confidence of the AIF and the Battle of Bardia would soon be followed by another major victory at Tobruk (21–22 January 1941).

Leather jerkin or ‘Bardia Jacket’ worn by Australian troops at the battle of Bardia to protect them against the cold and barbed wire
The battle of Bardia was considered one of the greatest achievements of Australia’s military history until that time. The reality and significance of the battle were perfectly summed up by Lieutenant Colonel John David Rogers a week after the battle:
”The story of Bardia, in actual results an almost incredible achievement, is a story of a carefully planned operation, of the excellent coordination of all arms and services, of a resolute attack followed by active exploitation and of the complete subjugation of a well-entrenched and well-equipped enemy fighting force numerically many times greater than our own.“ (PR84/370)

Two soldiers from the battle of Bardia reading accounts of the battle in the papers
Photograph by George Silk
The Australian War Memorial holds several collections relating to the battle of Bardia, which offer a range of personal and official perspectives on the battle, from ordinary soldiers to senior officers. Please refer to the list below for further information on collections referenced in this article and recently digitised collections relating to the battle of Bardia:
3DRL/2529 - Savige, Sir Stanley George, KBE, CB, CBE, MC, DSO (Lieutenant General, b.1890 - d.1954)
3DRL/4142 - Allen, Arthur Samuel 'Tubby' (Major General, b.1894 - d.1959)
EXDOC063 - Wavell, Sir Archibald (General, Commander in Chief, Middle East, b.1883 - d.1950)
MSS1656 - Hurst, Philip John (Private, b: 1918)
MSS2290 - Matthews, Allan Ernest (Corporal, b.1920)
PR84/370 - Berryman, Sir Frank Horton (Lieutenant General, KCVO, CB, CBE, DSO, GHQ SWPA, GOC East (Md), b.1894 - d.1981)
PR87/167 - Robertson, Sir Horace C H 'Red Robbie' (Lieutenant General), 1894-1960, KBE, CBE, DSO
PR88/072 - Long, Gavin Merrick (General Editor - Australia in the War of 1939-45, War Correspondent b.1901 - d.1968)
PR90/112 - Llewellyn, Alexander James (Lance Corporal, b.1913 - d.1979)
PR01034 - Neeman, Thomas Richard "Tom" (Corporal)
PR01035 - Clark, George William Edward (Gunner, b.1914)
PR03058 - Marshall, Henry Charles David, DSO, ED and bar, (Major, b.1905 - d.?)
PR04741 - McDonald, Albert James (Lieutenant, b.1920 - d.1943)
PR06252 - Lewtas, Keith Lindsay (Warrant Officer Class I, b.1909 - d.1984)
S04342 - Giacomo (John) Rizello as a prisoner of war (Italian Army) in Cowra POW Camp and later on release as a farm labourer in Wellington NSW, 1941-1946, interviewed by Terry Colhoun
Further reading
Bardia: Myth, reality and the heirs of Anzac, Craig Stockings
How Bardia was won, Craig Stockings
Leaders in battle: The battle of Bardia, Peter Burness
Loyalty and courage at Bardia, Julie Padanyi-Ryan
Not as a duty only: an infantryman’s war, Henry Gullett
The battle of Bardia, Craig Stockings
The proud 6th: an illustrated history of the 6th Australian Division, 1939–45, Mark Johnston