Sydney Harbour’s Safety Net – The Harbour Defence System during the Second World War
Having committed to helping Britain, by early 1941 Australia had sent three infantry divisions and substantial air and naval resources to the Mediterranean and European theatres. When Japan entered the war, much of Australia's armed forces were heavily engaged elsewhere.
As the Japanese swept southward crushing Allied armies, Australia was not well-placed to defend itself. The first air raid on Darwin on 19 February 1942 – just days after the fall of Singapore – shocked the nation and increased the sense of vulnerability to enemy attack.
Scrambling to sandbag government buildings, string barbed wire on beaches, build trenches and air raid shelters, and dim street lights, Australia appeared increasingly vulnerable. Construction of a harbour defence system, a boom incorporating gates across Sydney Harbour began in January 1942. Other harbour defences included a small arsenal of anti-submarine vessels, minesweepers and unarmed patrol boats, searchlights, and anti-aircraft gun batteries installed on cliffs and headlands; and indicator loops capable of detecting metal and recording movement in or out of the harbour laid on the ocean floor.

Sydney 1945. The boom net after completion. The curved boom gate on the centre right had not been fitted by 31 May. The pile light on the right of the curve marks the site where the midget submarine became entangled.
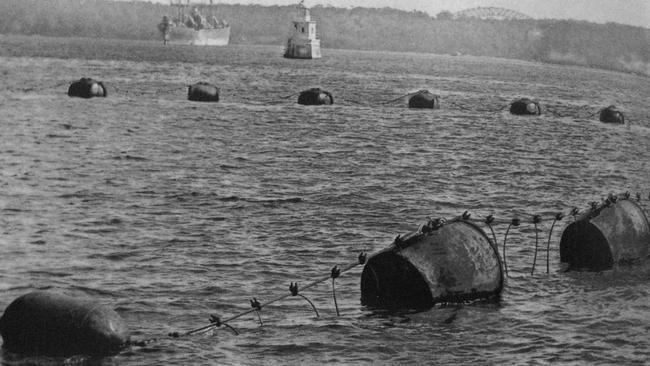
The boom consisted of some 49 clusters of piles to suspend the net. The Green Point section of the net to the east was slung from buoys. The Harbour Bridge is visible in the background. Image courtesy of navyhistory.org.au
Sydney’s submarine defences were constructed in a hurry. Floating punts with a steam plant and pile driver worked every daylight hour to build the boom. Marine piles were driven deep into the sea bed to form a robust stable base and pyramids were constructed, 6 metres apart, to support the heavy rope hawser and anti-submarine net. Many of the timber piles were infected with sea termite and at least 100 fell over within six months. They had to be replaced with worm-resistant turpentine gum. This delay meant the project had to start again.
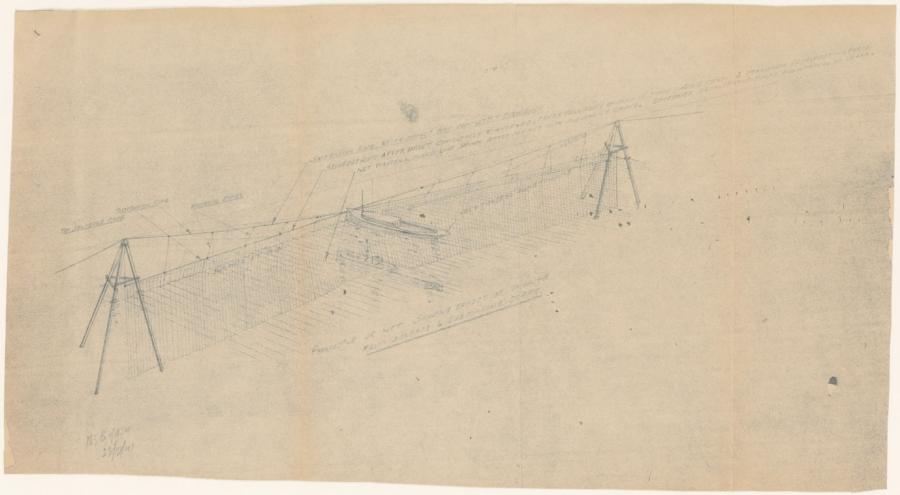
Sketch of the proposed Sydney Harbour Protection Net showing how the net would stop a surface vessel and a submarine, December 1941. The net was designed by E. Griffin of the Maritime Service Board. New South Wales State Archives NRS20011 (18/1716.2)
Meanwhile, another essential part of the boom, - the net to stretch across the harbour - began construction on Garden Island on 10 May 1942. Made of wire and interlocking woven tungsten steel 450mm-diameter rings, the net was woven in panels. A crane lifted the nets up so that the hawser could be threaded through. Though the nets were rust-proof, kelp grew on them, and tidal flows created strain on the net which required ongoing upkeep.


The boom net was 1,480 metres long. While its main fixed central section had been completed, the boom gates across the east and west shipping channels were unfinished, leaving two openings for ships. A 121 metre opening at the Western Channel allowed the passage of large vessels requiring deeper and straighter water. The second gate or Eastern Channel had an opening of 91 metres. This gate was the most frequently used of the two, allowing for ferries, yachts and small boats. It was opened using ‘hauling back’ dolphin winches housed on Green Point.

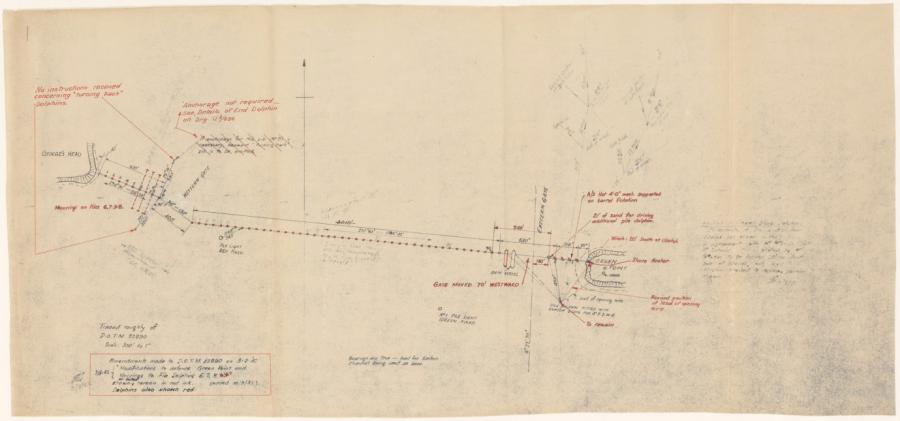
A plan of the Harbour Protection Net shows the arrangement of the boom, 22 April 1942. New South Wales State Archives NRS20011 (18/1716.2)
The Midget Submarine Attack on Sydney Harbour
On the night of 31 May 1942 three Japanese midget submarines entered Sydney Harbour. Having made several reconnaissance flights over the harbour, Japanese intelligence produced a telegraphic order attack plan which stated
“there are no indications of any special harbour defences apart from the boom net and owing to the frequent passage of enemy vessels it is presumed that there is an opening. There is no indication that enemy patrol boats are patrolling the entrance”
Japanese intelligence was correct: the floating boom gates were not in place, leaving two large openings.
The first of the two-man submarines entered the harbour at 8 pm, and became entangled in the central section of an anti-torpedo boom net stretching from Georges Head to Green Point.
A Maritime Services Board overnight caretaker stationed on a punt heard a disturbance and rowed out to investigate. He saw a domed metallic structure - the bow of a midget submarine – sticking out of the water and, believing it to be a mine, got back into his boat. Some time later there was a huge explosion: having made repeated unsuccessful attempts to break free from the net, the crew destroyed themselves and their craft by detonating a scuttling charge.

A floating crane raised the Japanese midget submarine which became trapped in the boom net.
The two other submarines slipped past the boom net and created mayhem. One of the submarines fired torpedoes at the cruiser USS Chicago, both missing the target. One torpedo ran ashore at Garden Island and failed to explode, the other exploded beneath the ferry Kuttabul, which was being used as a Royal Australian Navy depot ship; 19 Australians and two Britons were killed. It was the first time Sydney had come under direct attack during the war. Though the attack failed to cause large scale loss of life or shipping it demonstrated that Australia was not safe.
Coastal Defences
Although Sydney had multiple effective coastal batteries and fortifications, there were no off-shore patrols. This allowed large I-class mother submarines to operate close to the heads, carry out reconnaissance and launch their midgets unhindered. Australia’s largest city was underprepared and vulnerable.
While dozens of Australian coastal batteries swung into service, other cities showed greater urgency: Darwin’s harbour defence, the world’s largest anti-submarine boom net, was planned from 1938 and fully operational by January 1942.
In Western Australia, anti-submarine and anti-torpedo boom nets were installed across Fremantle Harbour in 1941; an indicator loop was laid between Rottnest Island and the mainland.
Anti-submarine nets were built at Trinity Bay, Cairns, and at Brisbane both net and indicator loop were installed to detect enemy submarines entering the Brisbane River.
Lake Macquarie had a submarine and small boat defence boom to protect RAAF Rathmines’ flying boat base nearby. North of Sydney, Pittwater had two anti-submarine boom nets (to protect the Hawkesbury River Railway Bridge) in service by March 1942.
After the midget submarine attack, Sydney congratulated itself on its vigilance and defences and likely breathed a huge sigh of relief that the strike had been largely unsuccessful. The harbour boom was quickly finished, and for the next three years of war, all ships including ferries and fishing boats passed through one of the gates in the boom.
Soon after the cessation of the Pacific War, on 13 September 1945, the Maritime Service Board began dismantling the boom and by early 1946 all except the large dolphin winches had been removed.
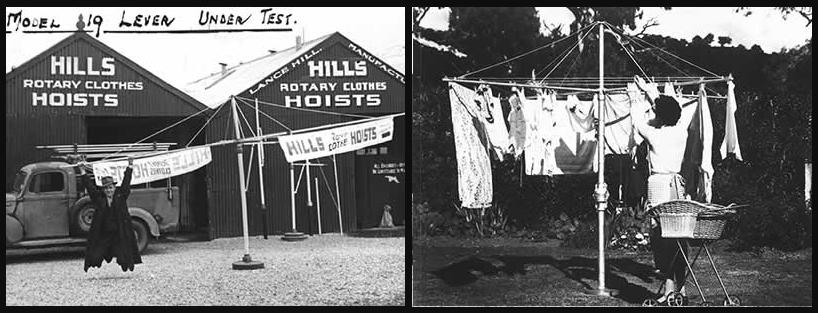
Synonymous with clothes lines, the Hills Hoist is one of Australia’s most recognisable icons. Image courtesy of Hillshome.com.au
In an interesting post-script, Lance Hills returned home from war service and saw a market for a revolutionary new rotary clothesline. The first batch of Hills Hoists were made with tubing salvaged from the frame of the underwater boom from the harbour defence net used to protect Sydney during the Second World War.