Mephisto
On the morning of 24 April 1918, 13 German A7V tanks in three groups left the town of Marcelcave to attack the British lines in and between the towns of Villers-Bretonneux and Cachy. This was the largest number of A7Vs ever deployed in the one operation in the First World War. Supporting regiments of two German divisions, the attack was mostly successful, though by the following dawn Villers-Bretonneux was in Australian hands. On a day which saw the first ever tank versus tank action, 10 of the 13 A7Vs made it back to the start line.
Of the three which failed to return, one was the German participant in the tank battle, No. 561 Nixe. Damaged in the battle it almost made it back before being stopped by engine failure. Perhaps believing it was unlikely to be salvaged it was blown up that night.

An extensively damaged A7V tank near Villers-Bretonneux. This is apparently tank No. 561 Nixe. 24 April 1918. P01726.002
The other two fell victim to holes in the ground, highlighting just how poor the A7V was on rough ground. One was No. 542 Elfreide which fell on its side in a sandpit, to be recovered by British tanks and French infantry in May.

German tank, with the name Elfriede lying on its side. P09689.007
The other was No. 506 Mephisto. At the start of the attack a fuel blockage stopped the engines and while this was being repaired the battle moved on. Getting underway again, it may have been heading back towards Marcelcave when it became stuck in a shell hole. There it stayed for about three months, in the ruins of an orchard called Monument Wood. For most of that time it was in German territory, just behind the German trenches which ran to the north of the wood and attached farm.
After the successful battle of Hamel on 4 July a similar sized operation was planned to the south of Villers-Bretonneux with the similar objective of removing a dangerous German salient. After assessing the German positions and strength, permission was sought by the commander of the 7th Australian Infantry Brigade, Brig. Evan Alexander Wisdom, to attempt to remove the salient by way of small attacks and raids. In what became known as ‘peaceful penetration’ operations, these tactics proved highly successful and the salient was effectively removed. On 9 July, the 28th Battalion took the trenches to north of Monument Wood. On 14 July, the 26th Battalion took 'Syria Trench' to the south and Mephisto was now in Australian hands.

An Australian soldier climbs on Mephisto soon after it was recovered on 14 July 1918 by the 26th Battalion and 1st Gun Carrier Company. Evidence of this recovery can be seen by the metal tow cables still attached to the front of Mephisto and looped around the Nordenfeldt 57mm gun. July 1918. P01445.001
The commander of the 26th Battalion, Lt. Col. James Alexander Robinson, was determined to recover Mephisto for a trophy. A salvage plan was formulated and the help of the 1st Gun Carrier Company was enlisted, reconnaissance being undertaken with them on both 19 and 21 July. On the night of 23/24 July, under the cover of British artillery fire and low-flying aircraft, about a dozen men of the 26th Battalion along with two gun carrier tanks and their crews moved to Mephisto. The recovery was both assisted and complicated by the Germans themselves who subject the area to a heavy barrage with gas shells. Though this provided more cover, it also hampered the work and likely caused everyone involved to be evacuated as gas casualties soon after. A steel cable was then attached and Mephisto was dragged out of the hole and into the cover of Bois l’Abbe behind Villers-Bretonneux.
Soon afterwards Mephisto was moved to the headquarters of the 5th Brigade, Tank Corps, on the outskirts of the village of Vaux-en-Amienois, a short distance north of Amiens. This place was also a training ground where the infantry and the Tank Corps worked hard to develop the cooperative techniques that would be used to great success from August until the armistice in November. When men were not training some inevitably explored their surroundings. Mephisto was found next to a wood and became the object of curiosity and scrutiny. Pte. John Abel Steley, 25th Battalion, wrote in his diary on 31 July:
"Saw Hun tank which 26th had captured at Monument Wood, clumsy looking. Scratched my name on it."
Diary of John Abel Steley, 31 July 1918 [collection held privately]

At the 5th Tank Brigade demonstration ground, Vaux-en-Amienois, France, Australian soldiers inspect Mephisto, a German A7V tank. 4 August 1918. E02935
He was not alone. With a gusto worthy of the most enthusiastic modern graffiti practitioners men wrote and scratched their names and other details until Mephisto resembled a modern train carriage or factory wall. Images show how at one time it was emblazoned with names, badges and even counter-propaganda. The image of the British Lion with its paw on an A7V is a direct counter to Mephisto's own emblem of Mephistopheles carrying off a British tank.

The right side of Mephisto after some time at Vaux-en-Amiénois. Graffiti now includes the 'Rising Sun' badge and the colour patch for the 26th Battalion. [Image courtesy of National Archives and Records Administration].
The right side of Mephisto’s hull had the units responsible for his salvage from the battlefield. Yet more names and art work are added to this side, including the colour patch of the 26th Battalion and an AIF 'Rising Sun' badge, as well as warnings such as ‘keep outside’.
The names on Mephisto
Long since faded away, a few of the names that can be read in these photos are listed here.

Original image E02935
"F Currie 57 Batt" (depicted beneath the lion’s leg)
3631 Pte. Francis Charles Eric "Frank" Currie, 57th Battalion. Almost 19 when he enlists in November 1917, Currie followed his father to war who was serving with 3 Field Ambulance. Coincidently, he joined the 57th Battalion on the day that Mephisto was salvaged. Only a week later, on 1 August, the Battalion does their tank training. Frank survives the battles of 1918 and is evacuated with bronchitis on 10 October 1918.
"M Saxby" (depicted next to the lion’s tail)
Likely 6383 Pte. William Arnold Morton Saxby, 26th Battalion. He was a member of the 26th Battalion at the time, but was likely not involved in the salvage operation. Saxby sustained shrapnel wounds to his legs and thigh on 3 October 1918 and returned to Australia.

Original image E02876
"M A Mills 54 Bn AIF" (depicted below and to the left of the German 'Black Cross' or Schwarzes Kreuz)
3154 Pte. Manuel Alexander Mills, 54th Battalion. Initially serving with the 54th Battalion, Mills is transferred for a time to the Australian Corps School and the 3rd Squadron, Australian Flying Corps, before returning to the 54th Battalion in June 1918. The Battalion also undertakes their tank training on 1 August.
"A Ramsay, Beaufort." (depicted under the machine gun port)
3224 Pte. Albert Arthur Ramsay, 57th Battalion. A farm labourer from Beaufort near Ballarat, Ramsay enlisted in August 1914 (originally allocated the service number 119 and allotted to the 8th Battalion). He served at Gallipoli where he was shot in the chest in July 1915 and returned to Australia to be discharged that October. Ramsay re-enlisted in May 1916 and joined the 57th Battalion on the Western Front in May 1917. Apart from a brief period of illness, he survived the rest of the war without further wounds.
"26 Batt M Saxby" (depicted front right, below main gun)
Perhaps concerned nobody would see his name on the rear, the soldier we believe to be 6383 Pte. William Arnold Morton Saxby also makes his mark on the front of the hull.

Original image E02877
After some time at Vaux, Mephisto is loaded onto a train and sent to the Tank Corps Gunnery school at Poulainville on the coast. This presented some men with the opportunity to use tools to carve their names into the tank with a hammer and punch. Long after the forces of weather and other elements have wiped the names of chalk and paint from Mephisto, there are 13 names still easily read and these are now the most direct link with its life as a war trophy. Of this baker’s dozen, five are positively identified.

"R. Aldrich, Bathurst NSW"
1776 Sgt. Robert Aldrich, was an engine driver from Bathurst. He enlisted on 9 March 1917 at the age of 39, married to Emily Jane Aldrich. He served with several railway units, ultimately serving with the 5th Australian Broad Gauge Railway Operating Company (ABGROC).
"H Scaddon"
This name is a puzzle as there were no enlistments in the AIF with the surname Scaddon. There were however, four men with the surname Scaddan. One of these is 5782 Spr. Herbert Scaddan. Claiming to be 18 when he enlisted in March 1916, he was initially allotted to the 11th Battalion, but in the UK was discovered to be underage and transferred out of the infantry. He spends time in Ordnance before serving with several railway units, ultimately joining his brother James Eliott Scaddan in the 5th ABGROC.

"A. Wallace, WA"
853 CSM Alexander Wallace, was a 33-year-old station master in Collie, WA, at the time of his enlistment. He also served in various railway units, including the 5th ABGROC.
"TJR"
Possibly 1126 Sgt. Thomas Joseph Reardon. He was 40 when he enlisted and was also a station master in his civilian life. Reardon enlisted in October 1917 and also served with the 5th ABGROC.
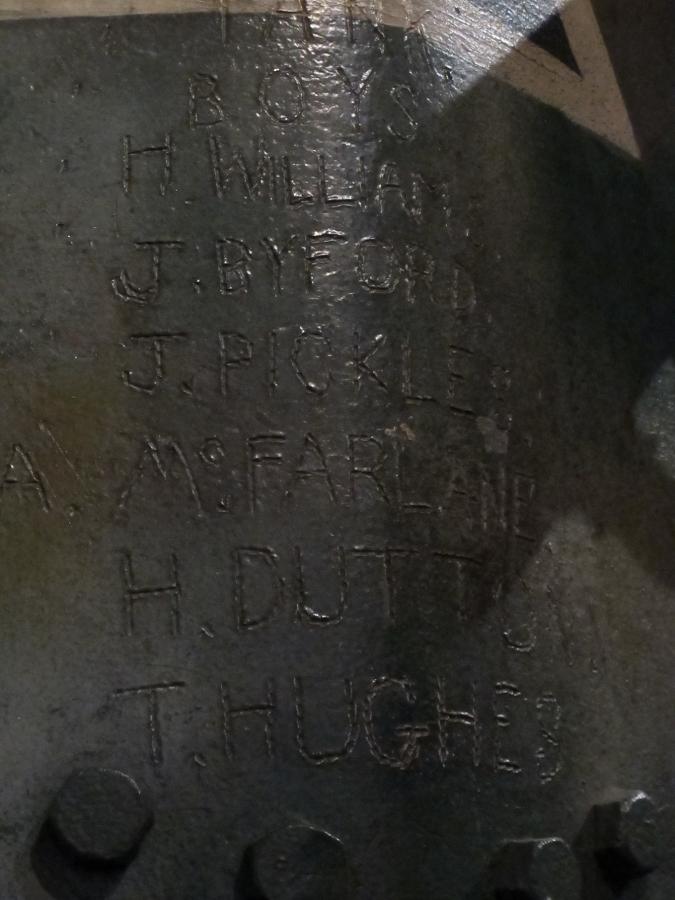
In many ways the most intriguing group are the “Tank Boys.”
H Williams
J Byford
J Pickles
A Mc Farlane
H Dutton
T Hughes
There is such symmetry and similarity to the lettering that these names must have at least been etched at the same time, if not by the same hand. It looks exactly like how men of the 26th Battalion involved in the salvage of Mephisto would want to identify themselves. Sadly though, none of these names were members of the Battalion during the crucial period of July – November 1918. That leaves the 1st Gun Carrier Company, Tank Corps, a British unit. Unfortunately, the British records are not as easy to search as those for the AIF and crucial gaps in some that do have created further frustration, but using sources such as the medal roll I have at least been able to confirm that all of six of these names are on strength of the Tank Corps in the latter part of 1918. I look forward to further details.