'They told us it would be exciting'

Moss Berryman was just 18 years old when he took part in Operation Jaywick.
It was the longest 30 minutes of Moss Berryman’s life. Armed with a machine-gun and a cyanide pill, he crouched down low in a small, Japanese fishing boat and thought he was going to die.
It was October 1943, and Berryman and his crew mates were deep inside Japanese territory as part of Z Special Unit’s Operation Jaywick. They were disguised as Malay fishermen and had just completed one of the most daring raids of the Second World War, a mine attack on enemy shipping in Japanese-occupied Singapore harbour.
Seven Japanese ships had been sunk or disabled during the raid, and the 14 men responsible were heading back to Australia through the Lombok Strait aboard a small wooden fishing boat, MV Krait.
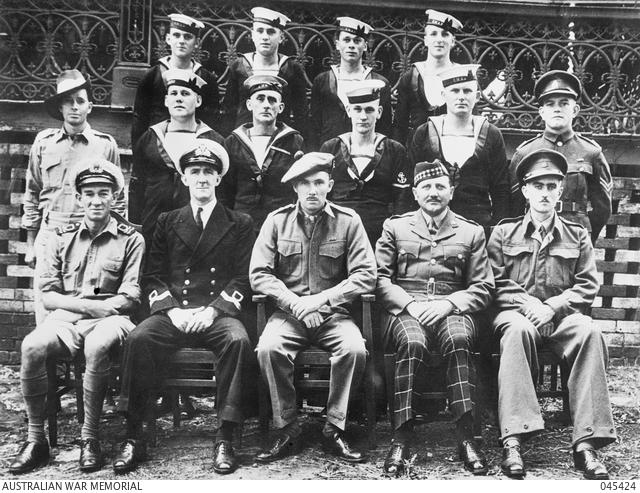
A group portrait taken after the completion of Operation Jaywick. Back row, left to right: Able Seaman (AB) Mostyn Berryman; AB Frederick Walter Lota Marsh; AB Arthur Walter Jones; AB Andrew William George Huston. Centre row: Corporal Andrew Anthony Crilly, 2nd AIF; Acting Leading Seaman Kevin Patrick Cain, RAN; Leading Stoker James Patrick McDowell; Leading Telegraphist Horace Stewart Young; AB Walter Gordon Falls, RAN; Cpl R.G. Morris, RAMC; Front row from left to right : Lieutenant Hubert Edward Carse; Lt Donald Montague Noel Davidson; Major Ivan Lyon of the Gordon Highlanders, the commanding officer of Operation Jaywick; Maj Herbert Alan Campbell, of the King's Own Scottish Borderers (who did not accompany the expedition); and Lieutenant Robert Charles Page, 2nd AIF.
The operation had been the brainchild of Major Ivan Lyon, of the Gordon Highlanders, who devised the plan with Major Jock Campbell of the King’s Own Scottish Borderers after they escaped the Japanese invasion of Singapore in 1942.
Lyon and his men used mines and collapsible canoes to carry out the attack in September 1943, but it almost ended in disaster when they were approached by a fast moving Japanese warship. On board the Krait that night were three other British soldiers as well as 11 Australian soldiers and navy personnel.
“If we were caught, we knew what would happen to us … so we had cyanide tablets,” Berryman said. “Our skipper said, ‘I’ll hand these out very quickly and you just pop it in your mouth and bite it and sit down quietly in the corner and you’ll be gone in about ten seconds.’ That was a bit frightening. And we had them come out once or twice.
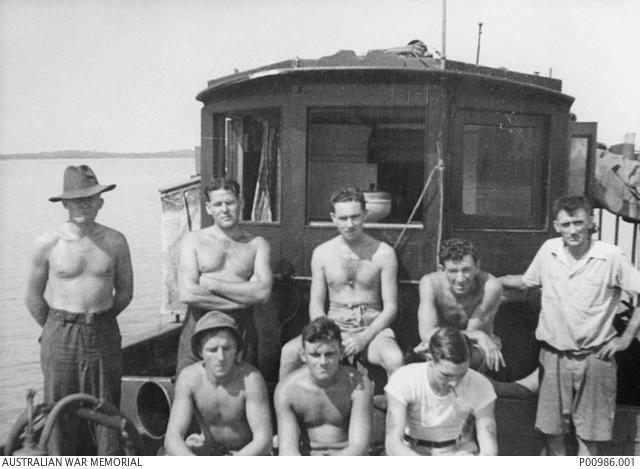
A group on board MV Krait en route to the Singapore area during Operation Jaywick. Back row, left to right: Able Seaman Walter Gordon Falls; Acting Leading Seaman Kevin Patrick Cain; Major Ivan Lyon; Lieutenant Hubert Edward Carse; and Leading Stoker James Patrick McDowell. Front row, AB Andrew William George Huston; AB Mostyn Berryman; and Leading Telegraphist Horace Stewart Young.
“We were coming down this strait at about half past 11 at night, and … at about 20 to 12, I was sound asleep, and somebody grabbed me and said, ‘Get your machine gun, we’ve got a visitor coming … keep your head down low.’
“Well, it turned out to be a ship, quite a sizeable Japanese warship, and it came alongside us, and so we thought, this is going to be fun, he’s either going to put a light on us, and hail us, or … well, we weren’t sure what he was going to do. We knew that these straits were closed to all shipping going in and out, and here we were going out…
“Sitting on top of the wireless operator’s equipment was a great big box of the very high explosives. Our idea was, if we were stopped … we were going to put this box up near our bow, and we would turn, and put our nose alongside his engine room, and blow him and us into a million pieces. But of course it never happened …
“He sat there for quite a few minutes, looking at us in the dark – he never put a light on us, and he never challenged us in any way – and then up around midnight he just turned and zoomed off into the distance, and we thought, oh beauty, he’s gone … and we put the box [of high explosives back] where it was before.”
Berryman will never forget the relief he felt as the Japanese ship disappeared into the night.
“We couldn’t all stand up and cheer like fury,” he said with a laugh. “But we spent the next couple of days as we went further and further out into the Indian Ocean on our backsides, with binoculars, looking for an aeroplane or somebody that might come out looking for us.”

Two men prepare to enter the water with a two-man canoe. It was an experimental canoe made by Lt Donald Montague Noel Davidson and AB Frederick Walter Lota Marsh to fill in time at Refuge Bay camp on the Hawkesbury River while waiting for MV Krait to arrive. It was hard to manoeuvre and it was christened 'HMAS Lyon' as a joke.
Mostyn Berryman was just 18 years old at the time. He had been a clerk in Adelaide before the war and was training at a naval depot outside Melbourne when he was told that two British officers were looking for volunteers to go on a trip.
“They told us it was going to be exciting – not dangerous – and that it wouldn’t be forever … so a friend and I said, ‘Oh well, we’ll give it a go and see how exciting it’s going to be,’ and it was exciting,” he said with a laugh.
“A few days later, we were told to pack our bags, we were leaving the navy depot, and we were going to a commando school at Frankston. They taught us a few things that they teach commandos and then at the end of a few weeks, our leader … picked out about 15 out of that mob … and we found ourselves on the Sydney express that night.
“We were taken out to the Hawkesbury River to a quiet little bay, Refuge Bay, and we landed on the beach there amongst a great heap of tents and camp stretchers … and cooking utensils. Our instructions were to get all this stuff up to the top of this dirty great big cliff. We were told the quicker you get the tent up, and the quicker you get your bed made, the quicker you can have a feed and go to bed…
“We learnt how to paddle a canoe properly, and how to travel many, many miles in a canoe … but we had no idea really what was going on. All we could do was run a mile in good time or break somebody’s arm if need be … but we did more training and after another few weeks, our skipper called us together and picked out five of us to be part of his group.”

The Japanese fishing boat was renamed MV Krait after a small, but deadly, fighting snake. After the fall of Singapore it was used to rescue refugees and was later chosen for Operation Jaywick.
A few days later, they caught their first glimpse of the wooden boat that would eventually take them to Singapore and back.
“One morning, this dirty looking craft came into our bay, and our skipper said, ‘Righto boys, go out and have a look at it, that’s going to be your home for the next few months.’ This turned out to be the old Japanese fishing boat… and dear oh dear, what a craft… There was nothing on there at all. There were no beds. No bunks. No nothing … It was as plain as a baby’s backside.”
The Kofuku Maru had been seized by the British authorities in Singapore when Japan entered the war and was renamed MV Krait after a small but deadly fighting snake.
When they left the Hawkesbury and went out to sea, heading for the American submarine base at Exmouth Gulf in Western Australia, they still had no idea where they were going or what they would be doing.
“We’d never even heard of Exmouth Gulf in those days,” Berryman said with a laugh.
“But once we left Exmouth and went out to sea … our skipper unfolded the whole story. He said, ‘You’ve probably been wondering where we are going,’ but we’d been more than wondering.”
They couldn’t believe it when they were told they were going to Singapore “to blow up a few ships”.
“Well, that was a bit of a surprise,” Berryman said. “We can read a map, we can read the papers, and Singapore is a long way from Australia. Well, it turns out it’s about 3,500 miles, and once we got to Bali we were in enemy territory because at that stage … the Japanese were in complete control. They were in control of Singapore, the Malay Straits, the whole of Indonesia, Borneo, Philippines – you name it – and they were sitting up there on the Kokoda Track looking at the top of Australia, and we said, ‘Singapore? Break it down.’
“Of course, we young ones, we thought we were indestructible, just like they do today, but if Captain Lyon thought we were down in the dumps a bit he would remind us, ‘Now this is not a dangerous trip, it’s an experience,’ just to take our minds off it.
“Once we got towards Bali, we hoisted our Australian flag down and hoisted up the Japanese flag. It was made in Sydney, I suppose, and we jumped on that a few times, and dirtied it up a bit with oil, and hoisted it up, because once we hit Bali we were amongst them…
“We had these drums of medium brown dye and we used to paint ourselves every few days because if it rained, and you stood out in the rain, it would wash off. Of course, it would wear off naturally off your hands and your face nearly daily, so you had to touch yourself up with this dye to look like the local fishermen… and terrible, horrible, smelling stuff it was too.

An informal portrait taken after Operation Jaywick.
“Occasionally a small Japanese plane would fly over us and occasionally the pilot would wave to us, and we’d wave back…
“But we never stopped at all. We felt that if we stopped, somebody was going to come out and ask us: Who are you? Are you a fishing boat? Can we buy some fish? So we just moved along slowly day after day after day.
“You forgot about sleeping. We just slept where you were on the ground, or on the deck, and we lost a lot of sleep…
“We carried quite a few of these 44 gallon drums of oil for the engine … just in case … and they were a jolly nuisance: half the time, you had to sit on them or lay on them… We had nowhere else. There were no bunks, no beds or anything, and there was only a small area where we used to congregate all day.”
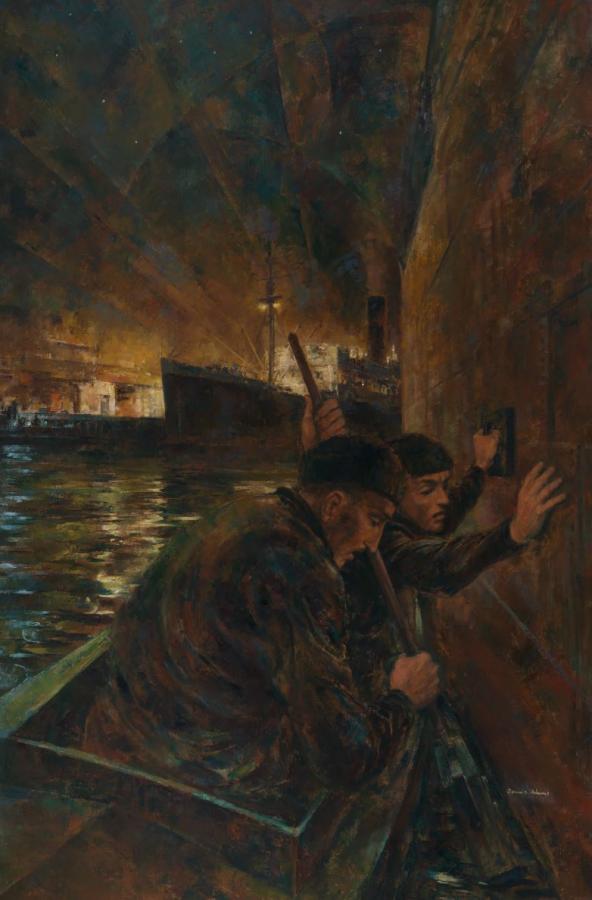
A study for Australian commandos attacking Japanese shipping in Singapore Harbour, 1943, by Dennis Adams. The Z Special Unit operatives paddled collapsible canoes into Singapore Harbour and placed delayed action limpet mines on the hulls of Japanese ships.
Three and a half weeks after leaving Australia, they launched three two-man collapsible canoes, known as folboats, and Lyon and five others paddled off into the darkness and into Singapore harbour.
Berryman and one of his mates were told to stay behind to look after the boat with rest of the crew.
“Of course, we put on a bit of a turn, and we said, ‘We’ve done all the training, sir, why can’t we be in it? And he said, nope, you two are going to be baby sitters and look after them…
“We went back out to sea for a few miles, and went around and around in circles for a fortnight, but they were on their own. There was no radio contact and the instructions were to come back to an island that was 50 miles out of Singapore, the island of Pompong, which we’d decided was the pick-up point. Our captain had said, ‘On the 14th night, come back, pick us up and we’ll go home, and if we’re not there, go without us, because we’ve been caught, or drowned or something.’”
But when they returned to the rendezvous point at the beginning of October, only one canoe came out of the darkness. “We talked about it, and talked about it, and being good old Australians, we decided we’d break the law, we’d go back in two nights’ time,” Berryman said. “So we went back on the 16th night and the other two canoes came out, and we dragged them aboard, and so we said, ‘Oh, well, thank goodness for that,’ and we then turned around and headed for home.
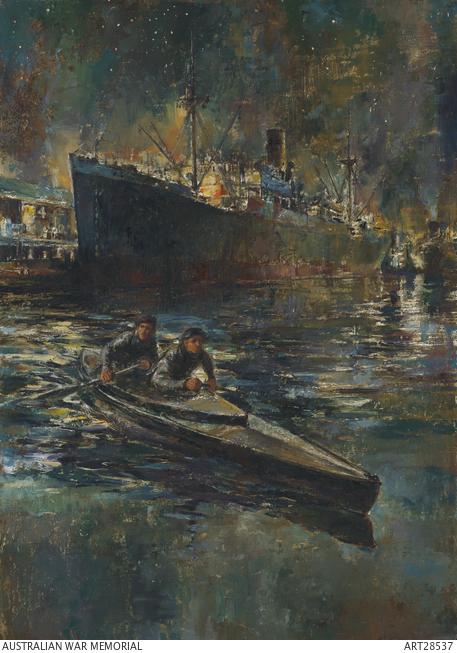
Australian commandos attacking Japanese shipping in Singapore Harbour, 1943, by Dennis Adams.
ART27649
“It’s been written that … we broke a world record. Nobody in the history of all wars has ever travelled that far inside enemy territory… and nobody had ever sunk seven ships in about an hour and a half, so we made our own claim, that that was another world record…
“The Japanese did not have any idea who blew up seven ships in Singapore harbour: they had not the slightest idea, and of course, in Singapore, they had been so sure of themselves. The place was ablaze with lights and we could see the Singapore lights from a long way before we ever got there. They thought they were as safe there as the people in Port Adelaide, or people in Hobart …
“But sometimes I feel that we shouldn’t have done it because they murdered untold number of people trying to find out who did it.”
Seventy-five years on, Berryman is the last surviving member of Operation Jaywick. Now 95, he still considers himself lucky to have survived.
Read more about Operation Jaywick here.
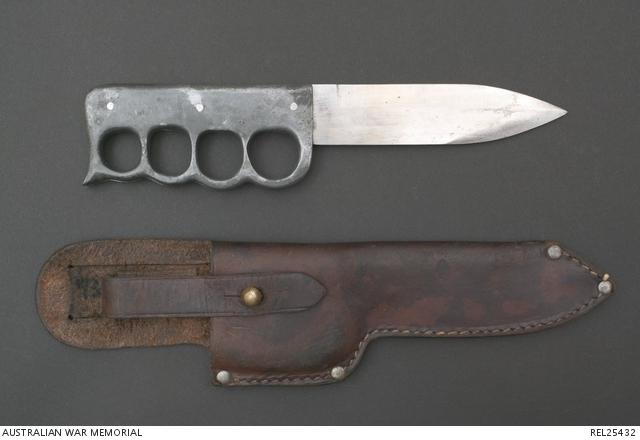
Moss Berryman's knife is on display at the Memorial. These knives were issued to the operatives on board the M.V. Krait during Operation Jaywick.