Who shot Prince Friedrich?
Prince Friedrich Karl of Prussia was forced to land his green Albatros D1 after being attacked by a Royal Flying Corps aircraft in March 1917. His subsequent shooting and capture sparked a war of words between two Australian units, both of which took credit for his capture.
Prince Tassilo Wilhelm Humbert Leopold Friedrich Karl of Prussia (usually known as Prince Friedrich Karl or Frederick Charles) was born on 6 April 1893. He was an all-round sportsman, competing in football, tennis, and athletics. He took part in English tennis tournaments under the pseudonym F Karl, and was an accomplished rider, winning a bronze medal for show jumping with the German men's equestrian team at the 1912 Olympics in Stockholm, Sweden.
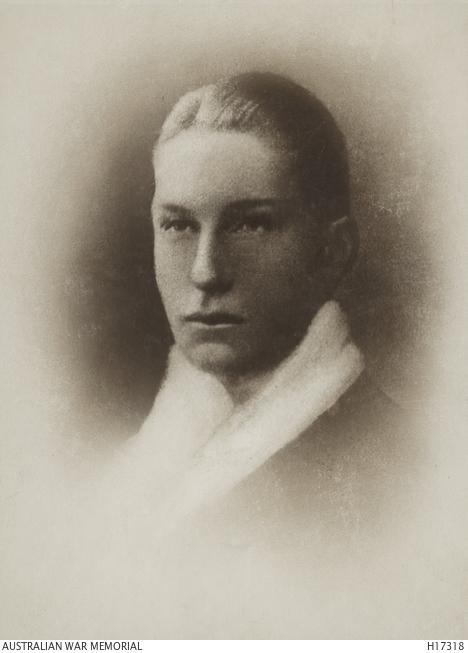
Portrait of Prince Friedrich Karl kept by Robert Tuff, 13 Light Horse Regiment.
During the First World War, Prince Friedrich commanded and flew with Fliegerabteillung (Artillerie) 258, an artillery observation unit. He was not allowed to join a fighter squadron but did manage to fly with one, Jasta 2 (also called Jasta Boelcke) on occasion. On 21 March he was flying with Jasta 2 near Lagnicourt, over the Australian lines when he became separated from the other aircraft in the squadron. He was attacked by Lieutenant Charles Edward Murray Pickthorn, a pilot with 32 Squadron Royal Flying Corps. Although his engine was shot through and he was wounded in the foot he managed to land in no man's land about 200 metres in front of the Australian front line.
Prince Friedrich tried to run across no man’s land to the German lines, but unfortunately for him, members of B Squadron, 13th Light Horse Regiment were patrolling on foot in the area, and men of the 26th Infantry Battalion were in forward posts nearby. Realising they could not catch him, the Australians opened fire. He was shot in the back and fell into a shallow trench before being captured and taken away by stretcher for treatment.
Both the 13th Light Horse Regiment and the 26th Infantry Battalion laid claim to capturing the prince and even today there is no agreement on who shot and captured Prince Friedrich.
The 13th Light Horse Regiment’s account
The 13th Light Horse Regiment claimed that Sergeant Robert Henry Tuff was responsible. Tuff recorded his experiences in letters to his family, which were later published in Australian newspapers. Tuff claimed he shot the fleeing German in the back before following him out into no man’s land. Although other Australians were still firing, Tuff continued to advance and found the German lying in a shallow trench.
Tuff remained with him until a stretcher arrived and took a statement where the German revealed his identity. While they waited, Tuff recalled Prince Friedrich gripping his hand tightly due to the pain and that the prince feared being further wounded by shells bursting nearby. When the stretcher arrived, Tuff handed the prince over to a major from the 26th Battalion and returned to his patrol.
In 1919 Tuff was awarded the Meritorious Service Medal for his work during the Bapaume operations in March 1917 and his work in September 1918. The former includes the period when the prince was wounded. Firmly believing he shot and captured the prince, and recognising its potential significance, Tuff handed his rifle in to the Australian War Records Section in December 1917 so that it could be added to the National Collection. In the late 1920s he donated a photograph of Prince Friedrich he acquired as a reminder of the events of that day.
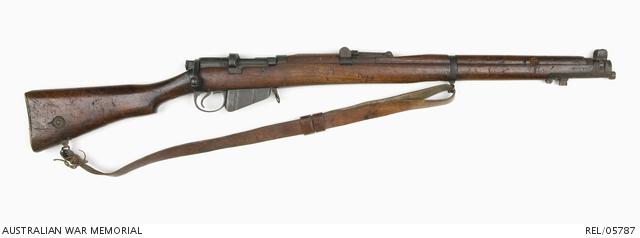
Robert Tuff’s Short Magazine Lee-Enfield No 1 Mk III used on 21 March 1917.
The 26th Battalion’s account
Concerned that the 13th Light Horse was receiving the glory for capturing a German prince, the 26th Battalion sent their account of events to Australian official war correspondent C.E.W. Bean. They claimed that Corporal Edward Powell had shot the prince and that Private Clare Hall had captured him. Interestingly, while Tuff makes no mention of another soldier remaining with him and the prince while waiting for the stretcher, Hall’s account does mention an unnamed light horseman being present through much of the event (Tuff), although Hall is adamant that he reached the prince first and captured him, not “the light horseman”.
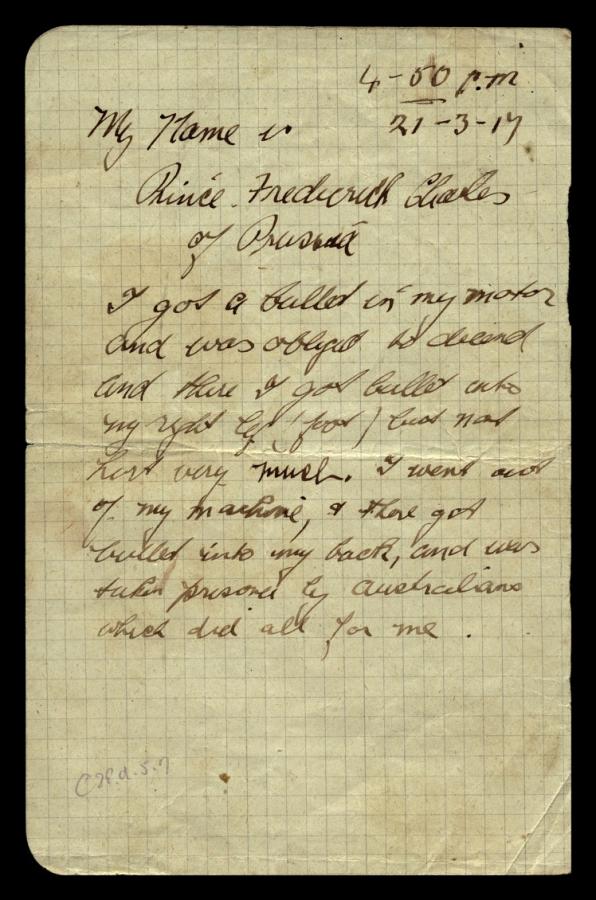
Statement given by Prince Friedrich Karl. The wording differs from that recorded in Tuff’s later accounts and may be another statement taken when the prince arrived in the 26th Battalion lines.
After greeting the wounded German, Hall took his hat and gloves and, when Tuff arrived, left the prince in his care while Hall walked a few metres away to “pump ship” (urinate). Hall did not believe Tuff when he said the prisoner was a prince and replied that "No matter what he is, he is a Fritz & the S.bs. [stretcher bearers] are coming & will take him in if worthwhile", which they eventually did.
The 26th Battalion’s account gained currency with Bean and he used it when writing about the event in the Australian official histories of the war.
The prince in captivity
Prince Friedrich’s aircraft was dragged back behind a small copse during the evening and the next day was handed to 32nd Squadron Royal Flying Corps, who dismantled it and took it away.
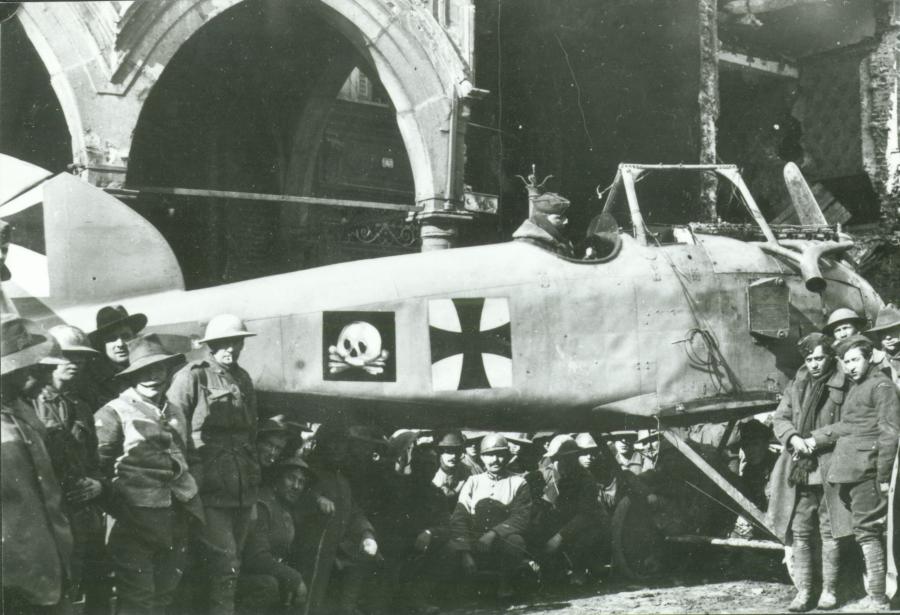
Prince Friedrich’s Albatros after it was moved behind the lines, surrounded by Australian, French, and British troops (image courtesy of C. Owers).
Although badly wounded, the prince was courteous and friendly throughout his captivity and the general opinion of the medical staff and Tuff was that he was a "good sort". This opinion was repeated in the press when the news of his capture was reported.
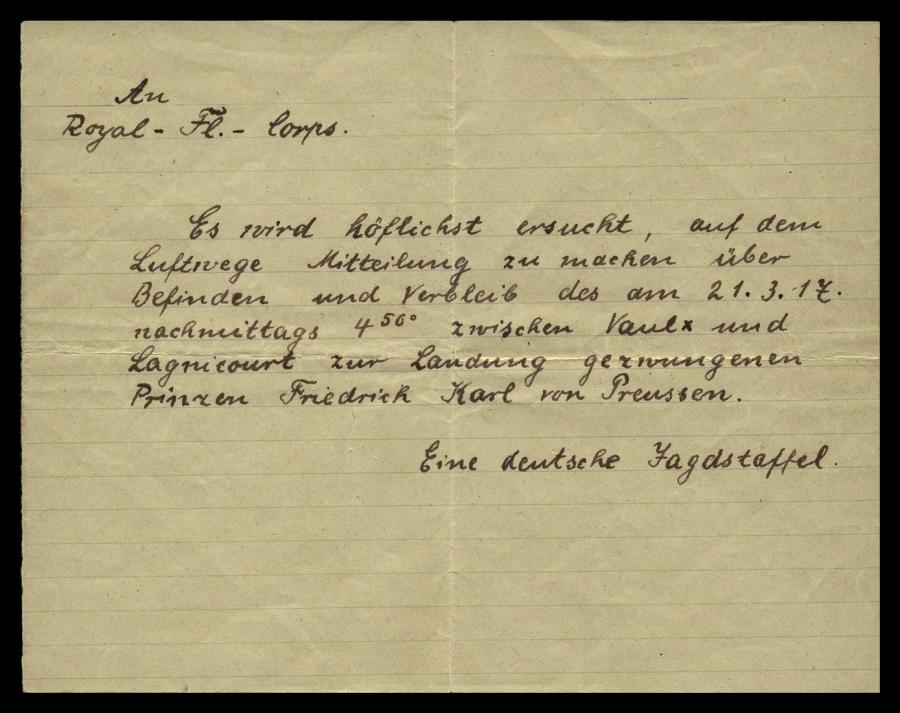
Note dropped by a German aircraft over the Australian lines near Lagnicourt enquiring after the prince’s wellbeing.
The prince was initially treated for his wounds at a British casualty clearing station at Edgehill, where he was operated on by the 5th Army Consulting Surgeon, Sidney Maynard Smith. He appeared to be healing but a week later suffered a secondary haemorrhage from his kidney and was operated on again and later evacuated to Rouen to continue recovering.
However, he did not recover and on his 24th birthday on 6 April 1917, Prince Friedrich Karl of Prussia died of his wounds at the military hospital at Saint-Etienne-du-Rouvray and was buried nearby. Attempts were soon made from Germany, via a neutral nation (possibly Spain, as the Spanish king was keeping Prince Friedrich’s family updated on his condition), to return his remains to Germany. This was deemed impossible at the time, but was one of the issues raised during the Armistice Commission’s negotiations in 1919. His body was later exhumed and reburied at the family cemetery at Schloss Glienicke, Potsdam, where it remains today.
Sources
AWM41 1084 - [Personal Narratives] Prince Frederick of Prussia, Karl
AWM38 3DRL 606/77/1 - April - May 1917, pages 30 – 35 - Diaries CEW Bean (April –May) 26 Battalion
1DRL/0301 - Friedrich Karl von Preussen (Prince of Prussia, German Air Service). Written sworn statements taken on 31 March 1917 describing the capture of Prince Friedrich Karl by 26th Battalion, AIF.
AWM4 23/43/20, page 4 – War diary 26th Battalion
AWM4 23/43/20, page 58 - War diary 26th Battalion intelligence summary Appendix 22 – 22 March 1917
EXDOC005 – Prince Friedrich’s statement
EXDOC006 – Note dropped by Germans over the Australian lines
Bean, CEW, Official History Volume IV, Chapter VI, scanned pages 48 – 49.
Newspapers via Trove, including:
‘The Kaiser’s nephew: the man who captured him’, Swan Hill Guardian and Lake Boga Advocate Thursday 2 August 1917 Page 4
‘The man who shot the Prince’, The Express and Telegraph (Adelaide SA) Monday 28 May 1917 page 4
‘German Prince’s Capture’, Geraldton Express Wednesday 4 July 1917 Page 3
‘Prince Karl his body asked for not yet given up’, The Advertiser (Adelaide SA), Saturday 28 April 1917 Page 10
‘The Captor of a German Prince’, Shepparton News (Vic), Monday 28 May 1917, Page 1