The Battles for Bullecourt
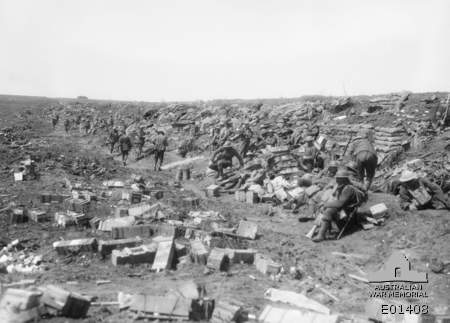
Sentries of the 8th Battalion in the Hindenburg Line (OGI Trench), captured in the fighting for Bullecourt. Identified nearest to camera is Lieutenant W. D. Joynt who would go on to win the Victoria Cross the following year back on the Somme near Peronne.
Overview
Four experienced Australian divisions of I ANZAC Corps were part of the British 5th Army under Sir Hubert Gough. The general wanted to attack at Bullecourt to support an important offensive by the adjoining British 3rd Army to the north and the French Army further to the south. Relatively young, Gough was an energetic commander. However his aggressive spirit coupled with poor planning resulted in heavy losses. His attack launched at Bullecourt on 11 April 1917 was a disaster. Despite this a further attack across the same ground was ordered for 3 May. The Australians broke into and took part of the Hindenburg Line but no important strategic advantage was ever gained; in the two battles the AIF lost 10,000 men.
Basic Map: Bullecourt from the Official History Vol IV, p 310
Download planned objectives for First Bullecourt map (PDF file)
Download situation at Bullecourt map, 12 May (PDF file)
'Such success as the (Australians) achieved had been won by troops persisting through the sheer quality of their mettle, in the face of errors'.
Charles Bean, official historian
First Bullecourt (April)
General Gough planned to use the 4th Australian Division and the 62nd British Division to attack the Hindenburg Line near the village of Bullecourt. Rather than wait until he had sufficient artillery resources he decided to employ a dozen tanks to lead the troops through the enemy’s barbed-wire. An attack set for 10 April was suddenly abandoned when the tanks did not arrive. It went ahead the next morning with disastrous results. Exposed to murderous machine-gun and artillery fire the Australians were forced back to their own lines while tanks stood burning on the battlefield. The Australians had 3,000 men killed or wounded; many survivors remained bitter about such a futile waste.
'Bullecourt, more than any other battle, shook the confidence of Australian soldiers in the capacity of the British command; the errors, especially on April 10th and 11th, were obvious to almost everyone'.
Charles Bean, Official Historian.
Officer of the 22nd Machine Gun Company (AIF) observing artillery fire on the German wire before the Hindenburg Line at Bullecourt, 23 April 1917.
Australian troops in the second line of the trenches before Riencourt in May 1917,cleaning their rifles in readiness for an attack on Bullecourt.
In the Hindenburg Line near Bullecourt,8 May 1917. Men of the 2nd Australian Light Trench Mortar Battery with a Stokes mortar (covered by ground sheet).
8 May 1917. The railway embankment which ran parallel to the Hindenburg Line south east of Bullecourt. The tank shown in the distance broke down during the first assault on 11 April 1917.
Aerial photo of trenches and roads south east of Bullecourt, after bombardment on 25 May.
Second Bullecourt (May)
Despite the failure of the first attack on 11 April 1917, a few weeks later General Gough once again tried to break the Hindenburg Line at Bullecourt. On 3 May 1917 the 2nd Australian Division attacked with the British alongside. Although the brigade on the right faltered under deadly machine-gun fire, the 6th Brigade got into the enemy’s trenches and, despite heavy shellfire and counter attacks, bravely held on. The 1st Division relieved the 2nd, and soon the 5th Division took its turn. Finally, after more than a week, the Germans gave up these blood-soaked fields. Then the depleted Australian battalions were withdrawn to recover. The furious fighting, which in the end only advanced the line a kilometre or so, had been at the heavy cost of another 7,000 Australian casualties.
'The Second Bullecourt (battle) was, in some ways, the stoutest achievement of the Australian soldier in France'.
Charles Bean, official historian.
German officers with a British Mark II female tank captured near Bullecourt on 11 April 1917 (AWM G01534J).
The tanks
The British had introduced tanks into battle during the previous year on the Somme where they had only limited success. Those available were primitive and unreliable Mark I and II types. When a dozen were provided to General Gough’s Fifth Army he immediately thought to use them to overcome his lack of artillery at Bullecourt. In the battle of 11 April the large and slow-moving tanks were soon hit or broke down leaving the Australian attackers exposed and vulnerable. Many later blamed the tanks for their heavy losses. The Australians maintained a strong mistrust of tanks that was not finally overcome until their success in the Battle of Hamel more than a year later.
Read more about the battles of Bullecourt:
The battles for Bullecourt - a 6 page article by Peter Burness, originally published in Wartime: the official magazine of the Australian War Memorial, Issue 18, 2002, pp 24-29.


