Australian War Memorial Logo
Search

Donate Today

  • Collection Open Information Close Information
    • Official Histories & Unit Diaries
    • Understanding the Collection
    • Research at the Memorial
    • Donating to the Collection
    • National Collection Loans
    • Projects
  • People
  • Visit
  • Commemorate Open Information Close Information
    • Last Post Ceremony
    • Honour Rolls
    • Anzac Day
    • Remembrance Day
    • Customs & Ceremony
    • Speeches
  • Learn Open Information Close Information
    • Schools & Teachers
    • Memorial Articles
    • Encyclopedia
    • Understanding Military Structure
    • Podcasts
    • Glossary
    • Magazine
  • Get Involved Open Information Close Information
    • Donations & Bequests
    • Corporate Partnership
    • Employment Opportunities
    • Volunteer at the Memorial
    • Friends of the Memorial
    • eMemorial Newsletter
    • Grants, Scholarships & Residencies
    • Research Papers
  • Shop Open Information Close Information
    • Memorial Shop
    • Images, film and sound
    • Lone Pine Seedlings

Breadcrumb

  1. Home
  2. Memorial Articles
  3. blog
  4. Messines - Tunnellers and Mines

Main navigation

  • Our People
  • Our Work
  • Our Organisation
  • Media Centre
  • Memorial Articles
    • Australians and Peacekeeping
    • Australians at war
    • Gulf War 1990-1991
    • Journal of the Australian War Memorial
    • Korean War 1950 - 1953
    • NAIDOC Week
    • RAAF Centenary
    • Victory in the Pacific Day
  • Speeches

Messines - Tunnellers and Mines

Craig Tibbitts

25 May 2007

Tunnellers – Hill 60

The Battle of Messines was fought along a wide frontage. Australian infantry fought on the southern end of this line near Messines village, while to the north at Hill 60 near Ypres Australian tunnellers played a vital role in the detonation of part of a series of huge mines beneath the enemy’s trenches. The 1st Australian Tunnelling Company had worked there since November 1916, extending shafts for the mines while sometimes encountering German underground works. Finally, along the whole British front, 19 mines were exploded with a devastating effect and an impact that some said they felt in London. Many of the enemy were killed, and the survivors demoralised, even before the infantry attacked.

Read more on the mines at Hill 60, Messines (PDF - 10 pages)

Read more: 'Phantom soldiers: Australian tunnellers on the Western Front, 1916-1918' by Roy MacLeod

Miners of the 1st Australian Tunnelling Company excavating dug-outs in the Ypres sector.

Miners of the 1st Australian Tunnelling Company excavating dug-outs in the Ypres sector.   C54987

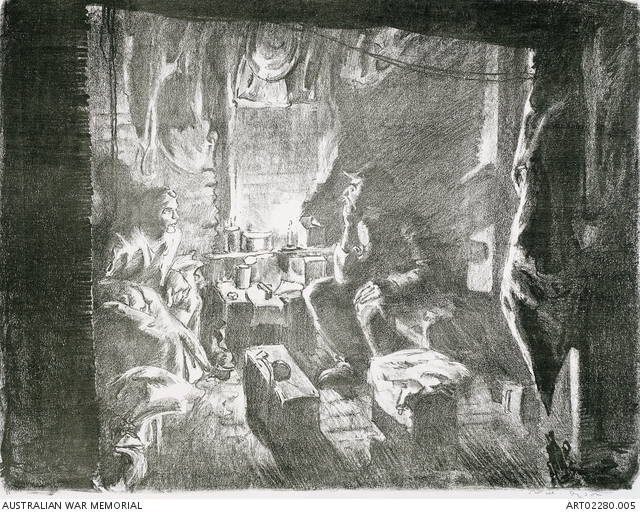
Australian Official War Artist Will Dyson visited Hill 60 where the 1st Australian Tunnelling Company had already operated for months counter-mining German tunnellers, prior to the opening of the Battle of Messines. Below are some of his impressions of that visit in drawings and lithographs.

'Battery Commander's dug-out, Hill 60' by Will Dyson'

'Battery Commander's dug-out, Hill 60' by Will Dyson.  C155740

'The dynamo, Hill 60' by Will Dyson

'The dynamo, Hill 60' by Will Dyson.  C155742

'Dead beat, the tunnel, Hill 60' by Will Dyson

'Dead beat, the tunnel, Hill 60' by Will Dyson.  C169773

'Home comforts in the tunnels, Hill 60' by Will Dyson

'Home comforts in the tunnels, Hill 60' by Will Dyson.  C155729

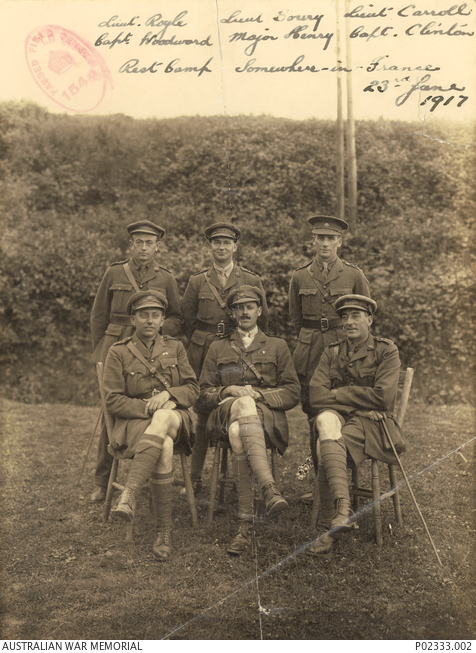
Officers from the 1st Australian Tunnelling Company who fired the mine under Hill 60

Officers from the 1st Australian Tunnelling Company who fired the mine under Hill 60.  C309451

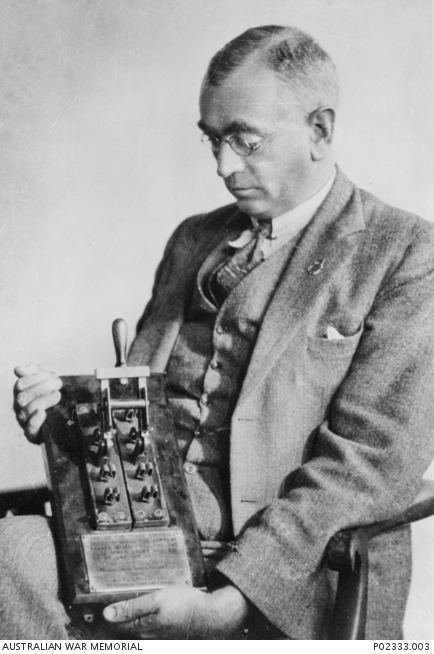
John MacDiarmid Royle in 1934.  In the photo above he is seen as a young lieutenant in the back row at left.  In this photo he holds one of the electrical switches he used to detonate the mine under Hill 60, seventeen years before.

John MacDiarmid Royle in 1934. In the photo above he is seen as a young lieutenant in the back row at left. In this photo he holds one of the electrical switches he used to detonate the mine under Hill 60, seventeen years before.  C309452

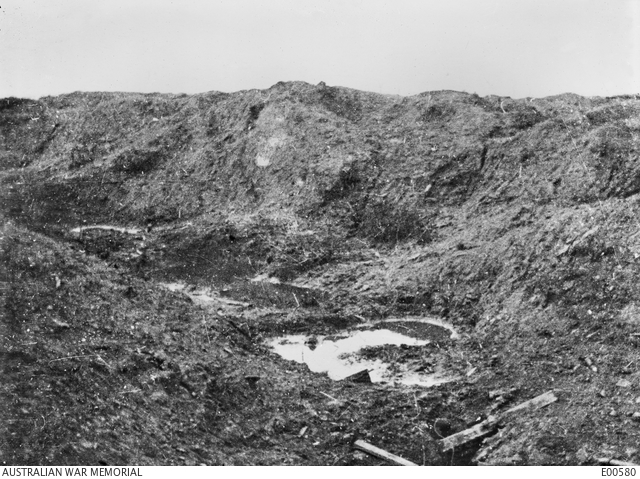
A huge crater on Hill 60 in Belgium

A huge crater on Hill 60 in Belgium.  C387950

The result was particularly deadly, for the mine was stated by the Germans to have taken up with it a whole company of Wurtumbergers...

Looking from an old crater on the north side of Hill 60, over the shell pitted ground towards Zillebeke Lake.

Looking from an old crater on the north side of Hill 60, over the shell pitted ground towards Zillebeke Lake.  C43242

The ground round about was strewn with pieces of iron, timber, concrete and wire ... rifles, equipment and ammunition were scattered about. The unburied bodies, rags and human bones, told tales of a series of battles... (Frank Hurley, Official Photographer)

A German pillbox which was overturned by the explosion of a mine, opposite the front, on the early morning of 7 June, just prior to the attack which opened the Battle of Messines. The soldier on the right, carrying what appears to be the Kodak Pocket Camera case over his left shoulder, is 2585 Corporal Ernest Lionel Bailey, 51st Battalion and Australian Corps Salvage AIF, who was accidentally killed in France on 17 May 1918 while gathering exhibits for the Australian War Records Section.

A German pillbox which was overturned by the explosion of a mine, opposite the front, on the early morning of 7 June, just prior to the attack which opened the Battle of Messines. The soldier on the right, carrying what appears to be the Kodak Pocket Camera case over his left shoulder, is 2585 Corporal Ernest Lionel Bailey, 51st Battalion and Australian Corps Salvage AIF, who was accidentally killed in France on 17 May 1918 while gathering exhibits for the Australian War Records Section.  C194596

Read article on Ernest Bailey

Wytschaete crater.  A soldier standing next to a water filled mine crater near Wytschaete, which was blown up by Australian Engineers at the commencement of the Battle of Messines .

Wytschaete crater.  A soldier standing next to a water filled mine crater near Wytschaete, which was blown up by Australian Engineers at the commencement of the Battle of Messines.  C1004395

Author

Craig Tibbitts

Last updated: 30 March 2021

  • Back to Articles
1 The Donations and bequests

Donations & Bequests

Your generous donation will be used to ensure the memory of our Defence Forces and what they have done for us, and what they continue to do for our freedom remains – today and into the future.

Find out more
2 Visit Transcribe.awm.gov.au

Transcribe

Help preserve Australia's history by transcribing records from the National Collection. Enhance accessibility and discoverability for all Australians.

Find out more
The placesofpride

Places of Pride

Places of Pride, the National Register of War Memorials, is a new initiative designed to record the locations and photographs of every publicly accessible memorial across Australia.

Find out more
Visit the Australian War Memorial

Visit the Australian War Memorial

The Australian War Memorial is open for visitors as we work to expand our galleries. Entry is free and tickets are not required.

Find out more
Canberra Highlands in Grayscale

ACKNOWLEDGEMENT OF
TRADITIONAL CUSTODIANS

The Australian War Memorial acknowledges the traditional custodians of country throughout Australia. We recognise their continuing connection to land, sea and waters. We pay our respects to elders past and present.
Location map of The Australian War Memorial
The Australian War Memorial building

The Australian War Memorial

Fairbairn Avenue
Campbell ACT 2612
Australia
View on Google Maps (opens in new window)
Google Map data ©2025 Google
Australian War Memorial Logo
  • Go to AWM Facebook
  • Go to AWM Trip Advisor
  • Go to AWM Instagram
  • Go to AWM Youtube

Footer

  • About
  • Contact
  • Venue Hire
  • Media
  • WM Magazine
  • Donate Today

The Australian War Memorial

Fairbairn Avenue

Campbell ACT 2612

Australia


Opening Hours

10 am to 4 pm daily (except Christmas Day)


In preparation for the daily Last Post Ceremony,

galleries are progressively closed from 3:40 pm.


Public entrance via Fairbairn Avenue, Campbell ACT 2612

Sign up to our newsletter

Subscribe

Legal

  • Copyright
  • Disclaimer
  • Privacy Policy
  • Accessibility
  • Freedom of information

Copyright 2025 Australian War Memorial, Canberra. All rights reserved