Australian War Memorial Logo
Search

Donate Today

  • Collection Open Information Close Information
    • Official Histories & Unit Diaries
    • Understanding the Collection
    • Research at the Memorial
    • Donating to the Collection
    • National Collection Loans
    • Projects
  • People
  • Visit
  • Commemorate Open Information Close Information
    • Last Post Ceremony
    • Honour Rolls
    • Anzac Day
    • Remembrance Day
    • Customs & Ceremony
    • Speeches
  • Learn Open Information Close Information
    • Schools & Teachers
    • Memorial Articles
    • Encyclopedia
    • Understanding Military Structure
    • Podcasts
    • Glossary
    • Magazine
  • Get Involved Open Information Close Information
    • Donations & Bequests
    • Corporate Partnership
    • Employment Opportunities
    • Volunteer at the Memorial
    • Friends of the Memorial
    • eMemorial Newsletter
    • Grants, Scholarships & Residencies
    • Research Papers
  • Shop Open Information Close Information
    • Memorial Shop
    • Images, film and sound
    • Lone Pine Seedlings

Breadcrumb

  1. Home
  2. Memorial Articles
  3. blog
  4. Surrender at Ziza 28 September, 1918

Main navigation

  • Our People
  • Our Work
  • Our Organisation
  • Media Centre
  • Memorial Articles
    • Australians and Peacekeeping
    • Australians at war
    • Gulf War 1990-1991
    • Journal of the Australian War Memorial
    • Korean War 1950 - 1953
    • NAIDOC Week
    • RAAF Centenary
    • Victory in the Pacific Day
  • Speeches

Surrender at Ziza 28 September, 1918

Robyn Van Dyk

04 May 2007

A force of nearly 5,000 from the Turkish Maan garrison was encountered by elements of the 5th Australian Light Horse Regiment at Ziza on 29 September 1918. This dramatic painting, Ziza by H. Septimus Power, depicts the unique event where members the Australian Light Horse for one night shared food and fire with soldiers of the Turkish Army and joined forces with the Turks against Arabs from the Beni Sakhr tribes.

Collection Item C173324

Accession Number: ART12673

C173324, H Septimus Power’s Ziza 1935 oil on canvas

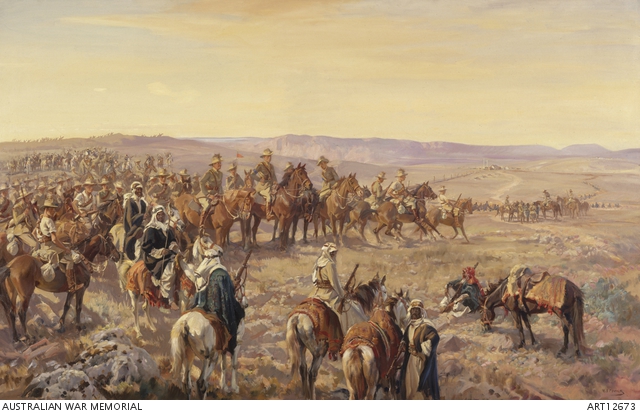
Major General Chaytor’s successful campaign east of the Jordan. The Maan garrison was hopelessly cut off and had been fleeing northwards to Amman. On the morning of the 29 September 1918, their hasty defensive position at Ziza station was contacted by two squadrons of the 5th Light Horse Regiment under Lieutenant Colonel Donald Cameron. Thousands of Beni Sakhr tribesmen had gathered in the hills surrounding the Turkish Garrison, threatening to strike against them. The Turkish commander wanted to surrender but was unwilling to lay down their arms to the small Australian force since that might mean their annihilation by the Arabs. General Chaytor himself came forward late in the afternoon to consult with Cameron about the situation and decided that the Turks should remain in their trenches and keep their arms until stronger reinforcements arrived the following morning. The 7th Light Horse Regiment assisted in the defence of the position overnight and this unlikely coupling of Turkish and Australian troops stood guard until daylight. By the next morning the New Zealand Mounted Rifle Brigade had arrived and it was safe to disarm the Turks and formally take them prisoner.

Ziza surrender document signed by Ottoman Company Commander Ali Housain

Ziza surrender document signed by Ottoman Company Commander Ali Housain

The original official surrender document, signed by “Ottoman Company Commander at Djezir, Ali Housain,” Commander of the Ziza Garrison, ceding troops, guns and other stores to the Australian Forces, is held at the Australian War Memorial and will be on display in the exhibition.

A detailed narrative account of the surrender at Ziza written by Donald Cameron can be read in the appendices of the war diaries for the 5th Australian Light Horse here. Cameron notes in the war diary that the Turkish forces, although having great superiority of numbers, were terrified of the Bedouins and seemed "worn out".

Further reading:

Damien Fenton, 'Standoff at Ziza' Wartime, 2003, Issue 24.

View PDF file here. (2.11 MB)


H S Gullett, The Australian Imperial Force in Sinai and Palestine, 1914–1918 Volume VII – (10th edition, 1941). .

PDF file - 19 pages. Chapter 42, pp 724-727

Author

Robyn Van Dyk

Last updated: 30 March 2021

  • Back to Articles
1 The Donations and bequests

Donations & Bequests

Your generous donation will be used to ensure the memory of our Defence Forces and what they have done for us, and what they continue to do for our freedom remains – today and into the future.

Find out more
2 Visit Transcribe.awm.gov.au

Transcribe

Help preserve Australia's history by transcribing records from the National Collection. Enhance accessibility and discoverability for all Australians.

Find out more
The placesofpride

Places of Pride

Places of Pride, the National Register of War Memorials, is a new initiative designed to record the locations and photographs of every publicly accessible memorial across Australia.

Find out more
Visit the Australian War Memorial

Visit the Australian War Memorial

The Australian War Memorial is open for visitors as we work to expand our galleries. Entry is free and tickets are not required.

Find out more
Canberra Highlands in Grayscale

ACKNOWLEDGEMENT OF
TRADITIONAL CUSTODIANS

The Australian War Memorial acknowledges the traditional custodians of country throughout Australia. We recognise their continuing connection to land, sea and waters. We pay our respects to elders past and present.
Location map of The Australian War Memorial
The Australian War Memorial building

The Australian War Memorial

Fairbairn Avenue
Campbell ACT 2612
Australia
View on Google Maps (opens in new window)
Google Map data ©2025 Google
Australian War Memorial Logo
  • Go to AWM Facebook
  • Go to AWM Trip Advisor
  • Go to AWM Instagram
  • Go to AWM Youtube

Footer

  • About
  • Contact
  • Venue Hire
  • Media
  • WM Magazine
  • Donate Today

The Australian War Memorial

Fairbairn Avenue

Campbell ACT 2612

Australia


Opening Hours

10 am to 4 pm daily (except Christmas Day)


In preparation for the daily Last Post Ceremony,

galleries are progressively closed from 3:40 pm.


Public entrance via Fairbairn Avenue, Campbell ACT 2612

Sign up to our newsletter

Subscribe

Legal

  • Copyright
  • Disclaimer
  • Privacy Policy
  • Accessibility
  • Freedom of information

Copyright 2025 Australian War Memorial, Canberra. All rights reserved