The Hindenburg Line: Breaking the Hindenburg Line
- 1918: Australians in France
- Battles
- The Hindenburg Line
The Aim
The Hindenburg Line- the last and strongest of the German army's defence - consisted of three well-defended trench systems, established in 1917. Throughout September 1918, Australian forces had helped the British army to secure positions from which an attack on the Hindenburg Line could be launched. Planning began for a major attack at the end of the month. It was hoped that this attack would finally break the power of the German army.
The First Attack

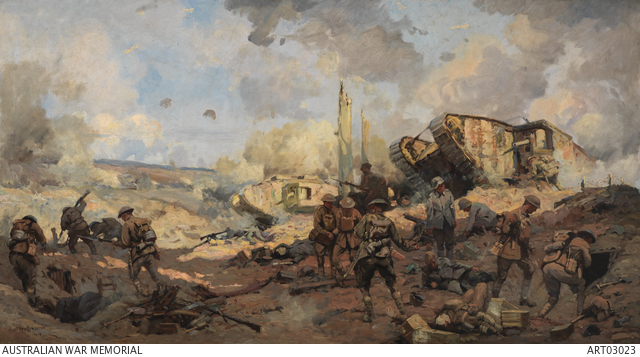
The first battle on 18 September, showing the 45th Battalion overlooking Ascension Gully, in front of the outpost line of the Hindenburg trench system
On 18 September 1918, a preliminary attack was launched when Lieutenant General Sir John Monash's troops reached the first part of the Hindenburg Line. At 5.20 am, Monash's troops, supported by huge artillery barrages, attacked the heavily fortified German defences and machine-gun posts. Using only eight tanks (as well as dummy tanks to distract the Germans), they broke through German positions and took 4,300 prisoners. Although there were 1,000 dead or wounded, this cost was fairly slim compared to the losses of the German forces.
The Second Attack
On 29 September, the line was finally broken. Australian and US troops spearheaded this battle, given the task of breaking defences in the centre. They attacked a strongly defended sector at Bellicourt with tanks, artillery, and aircraft working in concert. Advances were made, but it was a struggle between the two forces. The fighting lasted four days and resulted in heavy losses.

American bodies from the fighting on 29 September, near Gillemont Farm, when men from the 27th American Division attacked over the main Hindenburg Line.
Gunner J.R. Armitage wrote:
As we went over the ridge we found ourselves in the midst of the most wonderful and impressive battle field scene imaginable. It was a scene never to be forgotten with infantry, tanks, guns, everything in action in a sort of inferno of smoke and shell bursts.
Eventually, the Allies broke through the third and final stage of the Hindenburg Line, and the Germans were forced to fall back. Private Albert Golding wrote after the battle that he and some fellow diggers slept that night in an abandoned German trench and ate a hearty breakfast from hastily abandoned German supplies!

Some Australian soldiers from the 46th Battalion in a German trench in the Hindenburg Line.
In this attack, troops captured the entrance to the St Quentin canal tunnel. Inside was a kitchen where German bodies were found – one of them in a cooking cauldron. There were wild claims that the enemy was boiling down the dead, and this was exploited by the allies’ propaganda system. Anti-German sentiment was so strong that it was widely believed. An investigation soon proved that, during the fighting, a shell had exploded in an improvised kitchen, killing the unfortunate Germans and throwing one into a pot.

Among the items recovered from the 'Devil's Kitchen' was this cooking dixie, used to transport hot food to the front-line troops
A chap came along and told us there was a corpse factory half a mile away. Harry Carroll said, "You’re a liar. I’ve lived with Germans in South Australia and they are human beings like us and wouldn’t do it."
"Alright," said the chap, "Go and see for yourself."
When they returned I said to Harry, "Well what is it?" He said, "My eyes tell me it is one, but my intelligence won’t let me believe."
Sapper Harry W. Dadswell, MM, 5th Division Signal Company
The Last Australian Fight- the Capture of Montbrehain
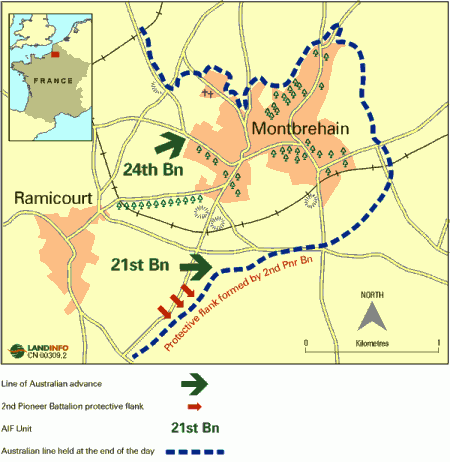
Map showing the capture of Montbrehain, from Wartime, No. 4, Summer 1998- the official magazine of the Australian War Memorial.
An attack on 5 October was to be the last in which Australian troops would take part. The last brigade fought and took Montbrehain village, and with that, the Hindenburg Line was completely broken. The defence of this sector was then handed over to Americans troops, while the Australians, exhausted and depleted, were withdrawn for a rest.
By this time, most Australian troops had been fighting for six months without a break, 11 out of 60 battalions were disbanded because there were so few men left in them, and 27,000 men had been killed or wounded since the Battle of Amiens. The troops were worn and war weary.
Captain Francis Fairweather wrote in late September:
Unless one understands the position it would seem that the Australians are being worked to death as we have been going continuously since 27th March but they are the only troops that would have the initiative for this type of warfare.
Some Australian units continued to support British and US forces until early November, and the Australian Flying Corps (which had remained an independent force, even though small compared with the Royal Air Force) also stayed in action until the war's end.