HMAS Voyager wrecked and burning at Betano Bay
In December 1945 official war artist Charles Bush found himself sketching in the crashing surf of Betano Bay, Timor, recording the rusting hulk of HMAS Voyager. More than three years previously this bay had been the site of dramatic events that ultimately ended with the scuttling of the ship. Charles Bush was following in the traditions of the Official War Art Scheme established during the First World War to record and reconstruct paintings of historic military events. A series of works of HMAS Voyager that followed illustrates the artistic working process of Charles Bush, reconstructing events that he had not witnessed.
When the Japanese invasion force swept across Timor in February 1942 the defenders of the island outpost were quickly overwhelmed by the rapid Japanese attack. However, the men of the 2/2nd Independent Company melted into the mountains to wage an effective guerrilla war against the occupying Japanese.
The isolated Australians were able to re-establish contact with Darwin on 20 April 1942 by constructing a radio dubbed “Winnie the War Winner”. Back in Australia the decision was made to maintain the harassing guerrilla force on Timor, and a regular program to resupply the troops was established. It was recognised that fresh troops were required to continue the fight and HMAS Voyager was tasked with inserting 600 members of the 2/4th Independent Company and supplies into Timor while evacuating 400 men of the original force.
HMAS Voyager arrived in Betano Bay and anchored half an hour before sunset on 23 September 1942. To make the most of the fading light, the troops were ordered to disembark immediately. This would prove to be a fatal mistake for the Voyager; within minutes it was realised that a strong tidal current was pushing the ship parallel to the shore. The collapsible boats, made from canvas and plywood, were rapidly filling with troops directly above the portside propeller. Captain Robison urgently needed to manoeuvre the ship into deeper water using the port engine, but he waited 17 minutes for the troops to get clear, as he feared if the port engine were to start it would suck the men into the propeller. Once the engines were started Voyager had nowhere to move, and within a minute was stuck fast on the beach. From anchoring to the eventual grounding of HMAS Voyager, only 23 minutes had elapsed.
The rest of the night and the following morning were taken up with frantic attempts to dislodge the ship, but to no avail. The decision was taken at noon to abandon all attempts to free the ship, as by this time sand had surrounded the propeller and ship’s hull.
The efforts of the independent companies and Voyager’s crew were now diverted to emptying the ship of all supplies and anything else that could prove useful. This operation was hampered by a number of Japanese air raids. Voyager was stripped of all supplies by 8 pm on 24 September and demolition charges were laid in the engine room, blowing holes in each side of the hull.
Early the next morning Captain Robison and a member of the crew set fire to the ship, burning its remains. It was this dramatic act that artist Charles Bush would ultimately record for posterity through his work. Voyager burned throughout the day, with the ship’s magazines intermittently exploding. That evening HMAS Warrnambool and HMAS Kalgoorlie evacuated the stranded Voyager crew along with a number of the wounded from the independent companies.
More than three years after the burning of HMAS Voyager Charles Bush made a pilgrimage to where it had foundered. Like First World War official artist George Lambert’s expedition to Gallipoli in 1919 to produce sketches of the battlefield and later reconstruct paintings of the campaign, Bush was set a similar task. He was sent with an Australian army military history team to collect material and record the significant battle sites in Timor. Up until Bush’s deployment there was no official artistic record of Australians fighting in Timor, and there was little opportunity to visually document the chaotic HMAS Voyager resupply operation. Only a handful of photographs from this operation are known to have survived.
The Australian army military history section field team arrived in Timor just after the Japanese surrender in 1945. The team included Bush, photographer Keith Davis, and veterans of the 1942–43 Timor campaign to act as guides. The team’s movements around Timor were hampered by climatic conditions, but this did little to dampen Bush’s enthusiasm to record the landscape of Timor:
rain pinned us down here [Dilli] for a while but as these conditions coincided with those of 1942, my colours as well as subjects will be of value in bringing these places back to the memory of those who were there.
Bush also described the heavy going on the expedition to get to the site of HMAS Voyager’s demise:
heavy rain and the jungle having swallowed the tracks, made these places inaccessible, as it was we had to substantially repair 2 bridges to get to Betano, painted the rusty hulk of the Voyager, also a pen sketch of a detail, as we did not want to be cut off here, will rely on the photographs taken for any reconstructions necessary.
Bush’s visit to the wreck was brief, and he completed only two works. Keith Davis photographed the wreck as Bush was completing the ink and oil sketches.


Charles Bush photographed by Keith Davis while painting the wreck of HMAS Voyager, 1945
Bush was mindful of the difficult task of accurately reconstructing events in Timor. While there he wrote to Lieutenant Colonel John Treloar, Officer Commanding the Military History Section and later Director of the Australian War Memorial, stating he wanted to contact as many of the Timor campaign veterans as possible, to gather their recollections to make his paintings as accurate as possible. Upon his return to Australia, Bush met with Major Baldwin from the 2/2nd Independent Company, and “received a good account of the burning (deliberate) HMAS Voyager at Betano”. This meeting gave Bush the final piece of the puzzle required to begin working on the accurate reconstruction of the scuttling of HMAS Voyager.
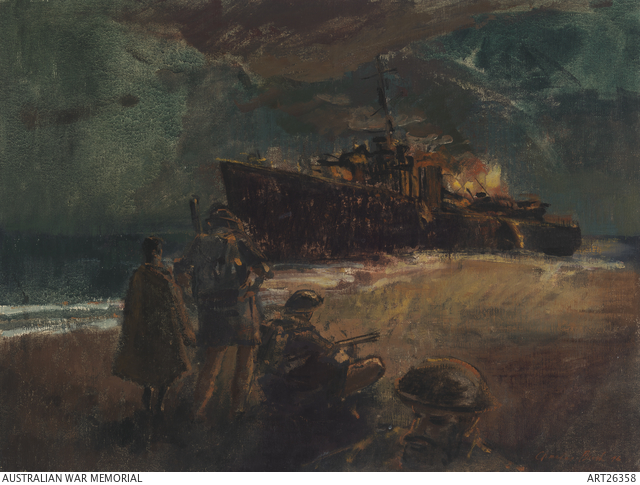

As Bush alluded to in his letters, the composition of the final HMAS Voyager painting was constructed with the assistance of an unattributed photograph taken during the month Voyager was scuttled. This was most likely owing to the fact that by the time Bush sketched the hulk of the Voyager in 1945 the ship had broken into a number of pieces. This photograph along with Bush’s field sketches and his meticulously gathered eyewitness accounts all culminated in informing the final reconstructed composition of the burning of HMAS Voyager.
This series of photographs, sketches, and paintings clearly demonstrates the artistic process Bush went through as a war artist to reconstruct historic events. His work leaves us with a permanent pictorial record of the burning of HMAS Voyager, without which these events may have been recorded only in the pages of history.
Written by Michael Grant.