Australian War Memorial Logo
Search

Donate Today

  • Collection Open Information Close Information
    • Official Histories & Unit Diaries
    • Understanding the Collection
    • Research at the Memorial
    • Donating to the Collection
    • National Collection Loans
    • Projects
  • People
  • Visit
  • Commemorate Open Information Close Information
    • Last Post Ceremony
    • Honour Rolls
    • Anzac Day
    • Remembrance Day
    • Customs & Ceremony
    • Speeches
  • Learn Open Information Close Information
    • Schools & Teachers
    • Memorial Articles
    • Encyclopedia
    • Understanding Military Structure
    • Podcasts
    • Glossary
    • Magazine
  • Get Involved Open Information Close Information
    • Donations & Bequests
    • Corporate Partnership
    • Employment Opportunities
    • Volunteer at the Memorial
    • Friends of the Memorial
    • eMemorial Newsletter
    • Grants, Scholarships & Residencies
    • Research Papers
  • Shop Open Information Close Information
    • Memorial Shop
    • Images, film and sound
    • Lone Pine Seedlings

Breadcrumb

  1. Home
  2. Memorial Articles
  3. blog
  4. Second World War Escape and Evasion compasses

Main navigation

  • Our People
  • Our Work
  • Our Organisation
  • Media Centre
  • Memorial Articles
    • Australians and Peacekeeping
    • Australians at war
    • Gulf War 1990-1991
    • Journal of the Australian War Memorial
    • Korean War 1950 - 1953
    • NAIDOC Week
    • RAAF Centenary
    • Victory in the Pacific Day
  • Speeches

Second World War Escape and Evasion compasses

Dianne Rutherford

09 July 2015

Continuing from the blog about Escape & Evasion maps issued during the Second World War, escape compasses were the next important piece of equipment to be developed by MI9. These compasses were produced in a vast variety and were issued as part of escape kits, hidden in uniforms, in buttons or inside innocent looking everyday items. Below are examples of the main types of escape compasses issued during the Second World War.


Swinger compass

This basic and easy to conceal type of compass came in pairs wrapped in paper. They were small magnetised strips of diamond-shaped steel sheet with 3 small holes, two at one end which were filled with luminous radium paint, enclosed with a spot of varnish on either side (indicating North), with another small hole at the other end. Sometimes the compass would have an ‘N’ to indicate North. It had a larger hole at the centre through which you would tie a piece of string to suspend the compass.

Second World War swinger compass


Early miniature escape rotor compass

1/2 inch (1.2cm) rotor compass. The rotating bezel could have a variety of finishes. The bezel has four holes and North is marked with a dotted line. Made c 1940-1942.


Collection Item C138661

Accession Number: RELAWM24594

Miniature rotor compass.

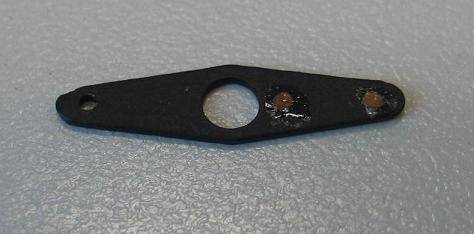
Later miniature escape rotor compass

The bezel was replaced by a star shaped pointer. North is marked by luminous radium paint dots and a red triangle. Made c 1943-1945.

Collection Item C1007749

Accession Number: REL31353

miniature rotor compass.

Rotor compass in plastic pouch

Small rotor compasses were sealed in clear plastic pouches, or’ bubbles’ (now often discoloured) to protect them from humidity in the tropics. The compasses in the small round ‘bubbles’ were usually contained in escape and evasion kits. Others were placed in larger pouches which had cotton tape threaded through the top so the compass could be worn around the neck during operations.

Collection Item C318800

Accession Number: REL25142.004

Rotor compass in plastic bubble from an escape kit.

Collection Item C1001981

Accession Number: REL/18568.003

Compass to wear around neck.

Rotor compass concealed in RAAF buttons

The back of the button unscrews to reveal a small rotor compass. The British / Commonwealth buttons screwed off to reveal the compass. The American buttons had a hinged opening.

Collection Item C119699

Accession Number: REL/21130

Compass hidden in a button.

The stud has a flat white painted glass face that could be scratched away to reveal the compass.

Collection Item C1029259

Accession Number: REL31837

Collar button with hidden compass.

Bakelite button compass

Sometimes called a “Weskit” escape compass button, it has luminous radium paint dots on the reverse, two at one end indicating North, and one at the other indicating South. They were made in black (Air Force) and brown (Army). The magnet was moulded inside the Bakelite. When in use, the compass would be suspended by a piece of thread through the lug. Holding the Bakelite compass in water helped stop the compass swinging.

Collection Item C1178234

Accession Number: REL35610

Black RAAF Bakelite button compass.

Fly button compass

Pair of brass fly buttons. One button has a small spike in the centre and the other has a small indent for sitting on top. The upper button has small luminous radium paint dots to indicate north and south.

Collection Item C1178235

Accession Number: REL35611

Pair of fly button compasses.

Belt buckle with concealed compass

Chrome-plated Royal Air Force belt buckle with sliding teeth to secure a fabric belt on a battlefield blouse. On the central bar a sliding bracket secures a compass needle with luminous radium paint dots. When removed this sits on a small spike on the other side of the buckle, which when not in use folds down along the bar.

Collection Item C1001980

Accession Number: REL/18568.002

Belt buckle compass.

Ad hoc compasses

In addition to specifically manufactured compasses, MI9 also magnetised a variety of everyday metal items to act as compasses by pointing north. The shoe laces of 1943 Pattern escape boots were magnetised, as were razor blades, pencil clips, needles, pen nibs, hacksaws and just about any other small metallic items they could find.


FURTHER READING:

  • Per Ardua Libertas (catalogue of a selection of items made by MI9, published c 1942 for their American counterparts)
  • Official Secret / Clayton Hutton
  • MI9 Escape & Evasion 1939-1945 / MRD Foot & JM Langley
  • Luftwaffe vs. RAF : flying equipment of the air war 1939-45 / Mick J, Prodger
  • Behind Enemy Lines: evasion and escape aids of World war II (exhibition catalogue from the Frazier History Museum, Louisville, Kentucky 2013) / R E Baldwin
  • The Escape Factory: The Story of MIS-X, the Super-Secret U.S. Agency Behind World War II’s Greatest Escapes, St. Martin’s Press / Lloyd Shoemaker

Author

Dianne Rutherford

Last updated: 30 March 2021

  • Back to Articles
1 The Donations and bequests

Donations & Bequests

Your generous donation will be used to ensure the memory of our Defence Forces and what they have done for us, and what they continue to do for our freedom remains – today and into the future.

Find out more
2 Visit Transcribe.awm.gov.au

Transcribe

Help preserve Australia's history by transcribing records from the National Collection. Enhance accessibility and discoverability for all Australians.

Find out more
The placesofpride

Places of Pride

Places of Pride, the National Register of War Memorials, is a new initiative designed to record the locations and photographs of every publicly accessible memorial across Australia.

Find out more
Visit the Australian War Memorial

Visit the Australian War Memorial

The Australian War Memorial is open for visitors as we work to expand our galleries. Entry is free and tickets are not required.

Find out more
Canberra Highlands in Grayscale

ACKNOWLEDGEMENT OF
TRADITIONAL CUSTODIANS

The Australian War Memorial acknowledges the traditional custodians of country throughout Australia. We recognise their continuing connection to land, sea and waters. We pay our respects to elders past and present.
Location map of The Australian War Memorial
The Australian War Memorial building

The Australian War Memorial

Fairbairn Avenue
Campbell ACT 2612
Australia
View on Google Maps (opens in new window)
Google Map data ©2025 Google
Australian War Memorial Logo
  • Go to AWM Facebook
  • Go to AWM Trip Advisor
  • Go to AWM Instagram
  • Go to AWM Youtube

Footer

  • About
  • Contact
  • Venue Hire
  • Media
  • WM Magazine
  • Donate Today

The Australian War Memorial

Fairbairn Avenue

Campbell ACT 2612

Australia


Opening Hours

10 am to 4 pm daily (except Christmas Day)


In preparation for the daily Last Post Ceremony,

galleries are progressively closed from 3:40 pm.


Public entrance via Fairbairn Avenue, Campbell ACT 2612

Sign up to our newsletter

Subscribe

Legal

  • Copyright
  • Disclaimer
  • Privacy Policy
  • Accessibility
  • Freedom of information

Copyright 2025 Australian War Memorial, Canberra. All rights reserved