Australian War Memorial Logo
Search

Donate Today

  • Collection Open Information Close Information
    • Official Histories & Unit Diaries
    • Understanding the Collection
    • Research at the Memorial
    • Donating to the Collection
    • National Collection Loans
    • Projects
  • People
  • Visit
  • Commemorate Open Information Close Information
    • Last Post Ceremony
    • Honour Rolls
    • Anzac Day
    • Remembrance Day
    • Customs & Ceremony
    • Speeches
  • Learn Open Information Close Information
    • Schools & Teachers
    • Memorial Articles
    • Encyclopedia
    • Understanding Military Structure
    • Podcasts
    • Glossary
    • Magazine
  • Get Involved Open Information Close Information
    • Donations & Bequests
    • Corporate Partnership
    • Employment Opportunities
    • Volunteer at the Memorial
    • Friends of the Memorial
    • eMemorial Newsletter
    • Grants, Scholarships & Residencies
    • Research Papers
  • Shop Open Information Close Information
    • Memorial Shop
    • Images, film and sound
    • Lone Pine Seedlings

Breadcrumb

  1. Home
  2. Learn
  3. Schools & Teachers
  4. Classroom Resources
  5. Back to the Source
  6. Beersheba
  7. Sources for the Battle

Main navigation

  • Schools & Teachers
    • School visits
    • Classroom Resources
    • Virtual Excursions
    • Memorial Boxes
    • Publications
    • Education Programs
    • The Simpson Prize
    • Professional Learning
    • Classroom Showcase
  • Understanding Military Structure
  • Australian military history overview
  • Podcasts
  • Glossary
  • Boy soldiers
  • Understanding Military History

Sources for the Battle

In addition to personal accounts, we have some official sources for the Battle.

Source 1: military map

Map of beersheba

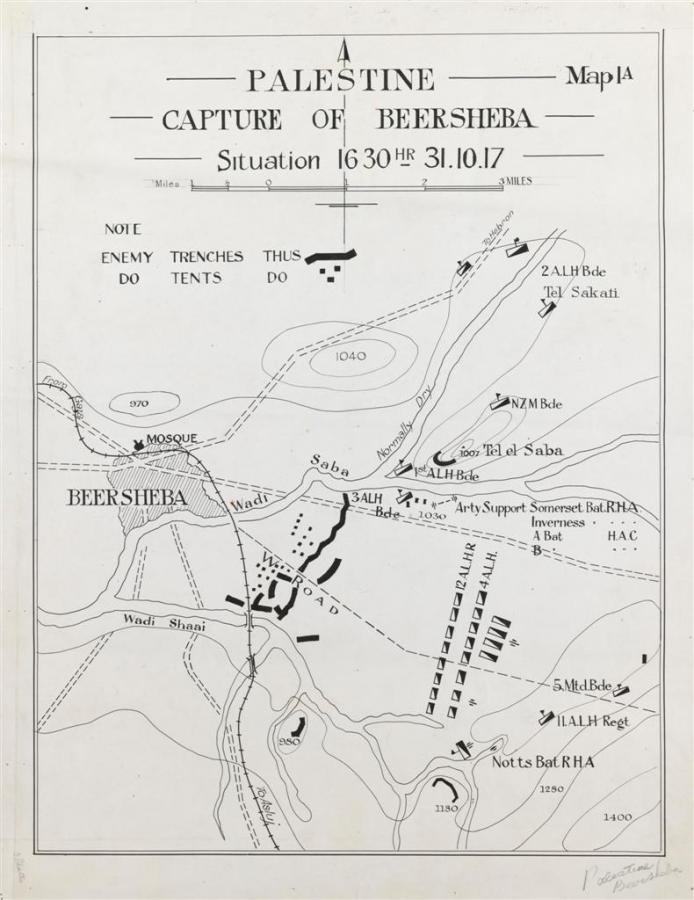
Palestine: Capture of Beersheba (RC055071)

Source 2: after-action report

Lieutenant Colonel Donald Cameron was the Commanding Officer of the 12th Australian Light Horse Regiment. After the battle of Beersheba on 31 October 1917 he wrote his after-action report, extracts of which are transcribed below. You might find this account more meaningful if you can refer to the military map above.

12th Australian Light Horse Regiment
Beersheba Post-Battle Report
31 October 1917

1545 Received orders to saddle up and get ready to move immediately. The Regiment had previously moved into the concentration area of Iswaiwin with the brigade at 1130 and off saddled, fed horses and men.

1600 General Officer Commanding 4th Light Horse Brigade sent for commanding officers and seconds-in-command. Orders were received that the 4th and 12th Light Horse Regiments would attack Beersheba at once.

1630 The 4th and 12th Light Horse Regiments deployed from a point one mile north of Pt 1280. The Regiment moved on Beersheba at the gallop. Heavy enemy rifle and machine gun fire developed on the left flank from the vicinity of 1180. This fire was silenced by artillery. On reaching a point about 100 yards from these trenches one Troop of "A" Squadron dismounted for action, and the remainder of the Squadron galloped on, leaving the trenches on the right. "B" and "C" Squadrons followed this route. The trenches were left to the Troop that dismounted. The Regiment, less 1 troop, kept straight on to Beersheba. "A" and "B" Squadrons less 1 troop entered Beersheba along the Asluj - Beersheba road. Both Squadrons entered Beersheba in a body. A party of 6 men galloped in front General Headquarters (Turkish). The whole rallying in the main body while Captain Jack Rupert Cyril Davis on the northern outskirts turned about and held up the enemy force escaping in a northerly direction. The greater part of the enemy immediately surrendered. 9 Guns attempted to escape but were retaken complete.

Consolidation: All prisoners were rounded up at the railway and counted. Defensive positions were taken up at the pumping station and preparations made for all round defence. Major Eric Montague Hyman consolidated the redoubt east of Beersheba in anticipation of a counter attack from the south-west and held the positions all night. A patrol of 8 men was sent out at 2300 and made a reconnaissance in a south-west direction returning at 0300 bringing in 23 prisoners and reporting "All clear."

In all, 38 Officers and 700 Other Ranks were taken, 9 guns, 3 machine guns and a large quantity of various war material including rolling stock, transport vehicles and animals were captured.

Write

With detailed accounts like this one, it can help to make a summary of the most important details. Pull out the key details and write in one paragraph.

Draw

On the military map (source 1 above), plot the main movements described in this report.

Source 3: photographs

Collection Item C976370

Accession Number: B02020

An aerial view of Beersheba as photographed from an aircraft of No 1 Squadron, Australian Flying Corps.

Collection Item C1056036

Accession Number: J06564

Australian mounted troops at Bir Esani en route to Beersheba.

Collection Item C3453

Accession Number: J03165

Australians draw water from a deep well near Beersheba, while Bedouins look on.

Collection Item C194802

Accession Number: J06574

Australian Light Horse Regiments advancing towards Beersheba, Palestine 1917.

Discuss

  1. Which sources were the most useful?
  2. Which are the most reliable?
  3. Who would they have been made for?
  4. How do the accounts differ in their description/emphasis?

Make

Expand your timeline into a mind map and expand as you learn from each source.

Back   Next

Last updated: 19 January 2021

1 The Donations and bequests

Donations & Bequests

Your generous donation will be used to ensure the memory of our Defence Forces and what they have done for us, and what they continue to do for our freedom remains – today and into the future.

Find out more
2 Visit Transcribe.awm.gov.au

Transcribe

Help preserve Australia's history by transcribing records from the National Collection. Enhance accessibility and discoverability for all Australians.

Find out more
The placesofpride

Places of Pride

Places of Pride, the National Register of War Memorials, is a new initiative designed to record the locations and photographs of every publicly accessible memorial across Australia.

Find out more
Visit the Australian War Memorial

Visit the Australian War Memorial

The Australian War Memorial is open for visitors as we work to expand our galleries. Entry is free and tickets are not required.

Find out more
Canberra Highlands in Grayscale

ACKNOWLEDGEMENT OF
TRADITIONAL CUSTODIANS

The Australian War Memorial acknowledges the traditional custodians of country throughout Australia. We recognise their continuing connection to land, sea and waters. We pay our respects to elders past and present.
Location map of The Australian War Memorial
The Australian War Memorial building

The Australian War Memorial

Fairbairn Avenue
Campbell ACT 2612
Australia
View on Google Maps (opens in new window)
Google Map data ©2025 Google
Australian War Memorial Logo
  • Go to AWM Facebook
  • Go to AWM Trip Advisor
  • Go to AWM Instagram
  • Go to AWM Youtube

Footer

  • About
  • Contact
  • Venue Hire
  • Media
  • WM Magazine
  • Donate Today

The Australian War Memorial

Fairbairn Avenue

Campbell ACT 2612

Australia


Opening Hours

10 am to 4 pm daily (except Christmas Day)


In preparation for the daily Last Post Ceremony,

galleries are progressively closed from 3:40 pm.


Public entrance via Fairbairn Avenue, Campbell ACT 2612

Sign up to our newsletter

Subscribe

Legal

  • Copyright
  • Disclaimer
  • Privacy Policy
  • Accessibility
  • Freedom of information

Copyright 2025 Australian War Memorial, Canberra. All rights reserved