Australian War Memorial Logo
Search

Donate Today

  • Collection Open Information Close Information
    • Official Histories & Unit Diaries
    • Understanding the Collection
    • Research at the Memorial
    • Donating to the Collection
    • National Collection Loans
    • Projects
  • People
  • Visit
  • Commemorate Open Information Close Information
    • Last Post Ceremony
    • Honour Rolls
    • Anzac Day
    • Remembrance Day
    • Customs & Ceremony
    • Speeches
  • Learn Open Information Close Information
    • Schools & Teachers
    • Memorial Articles
    • Encyclopedia
    • Understanding Military Structure
    • Podcasts
    • Glossary
    • Magazine
  • Get Involved Open Information Close Information
    • Donations & Bequests
    • Corporate Partnership
    • Employment Opportunities
    • Volunteer at the Memorial
    • Friends of the Memorial
    • eMemorial Newsletter
    • Grants, Scholarships & Residencies
    • Research Papers
  • Shop Open Information Close Information
    • Memorial Shop
    • Images, film and sound
    • Lone Pine Seedlings

Breadcrumb

  1. Home
  2. Visit
  3. Exhibitions
  4. Mapping Gallipoli
  5. Trench maps
  6. Lone Pine

Main navigation

  • Other Exhibitions
  • Current Exhibitions
  • Past Exhibitions
  • Touring Exhibitions
  • Online Exhibitions

Lone Pine

The Gallipoli map collection


  • Introduction
  • Landing maps
  • Cemetery maps
  • Turkish maps
  • Trench maps
  • References
  • Trench maps
  • Quinn’s Post, Anzac
  • Lone Pine
  • The Nek forming-up plan
  • The Nek objectives map
Lone pine trenches

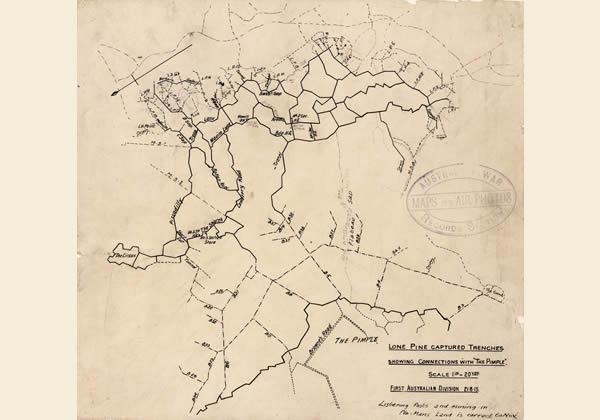
This plan shows the trenches at Lone Pine in late August 1915 and their connection to the position known as “the Pimple”. This copy of the plan has the Australian trenches drawn in black ink. Annotations have been done in pencil, including new trenches and communication saps, along with general corrections. The features drawn in black ink are correct to November 1915. However, the pencilled amendments and corrections may be from a later date.

The plan was drawn by Sapper John Stevenson. Stevenson arrived on Gallipoli on 22 June 1915 as part of the 3rd Field Company Engineers. On his second day at Anzac he felt sick and was evacuated to Egypt with a pain in his left lung and a high temperature. After four weeks recuperating, he returned to Anzac on 25 July.

On 19 August he was ordered, with another sapper, to survey the newly captured trenches at Lone Pine. Although most of the dead had been removed from them, the smell was very strong and the trenches were crowded with soldiers, in case the Turks counter-attacked. Stevenson and his companion had to walk on the soldiers throughout the trenches while they surveyed. The soldiers were so exhausted that as long as Stevenson did not tread on their heads or faces they did not care if they were trodden on.

After working on the plan, Stevenson was commissioned and transferred to the 2nd Field Company Engineers. He supervised further works at Lone Pine and planned to improve the drainage of the trenches for winter. He later worked at Leane’s Trench and Ryrie’s Post before leaving Anzac on 15 December 1915.

Battle of Lone Pine

The attack on the Turkish trenches at Lone Pine began on 6 August. Lone Pine was one of the Turks’ strongest positions. It was heavily entrenched and in places included roofed trenches covered in pine logs. Aerial reconnaissance before the attack did not show the logs. When the Australian reached the front line they had to assess how to get into the Turkish trenches. Some shot into the trenches through gaps in the logs, others dropped into the trenches through larger gaps or ran past the front line into the communication trenches in the rear and advanced from there.

The fighting was vicious, men fought with bayonets bombs and fists. The dead piled three or four high and the reinforcements ran over them to get to the fighting. Seven Australians were awarded the Victoria Crosses, two of them posthumous awards, for their actions in this battle. The main Turkish trench was taken within 20 minutes of the initial charge but the fighting continued for four days, as the Turks counter-attacked.

The Turks were unable to recapture Lone Pine, although they stopped the Australians advancing further. The dead Australians and Turks were either buried, stacked in heaps, thrown over the parapet, or used to block the Turkish communication trenches along with sandbags and soil. By the end of the battle the Australians suffered over 2,000 casualties and the Turks about 7,000, dead or wounded.

Last updated: 3 September 2020

1 The Donations and bequests

Donations & Bequests

Your generous donation will be used to ensure the memory of our Defence Forces and what they have done for us, and what they continue to do for our freedom remains – today and into the future.

Find out more
2 Visit Transcribe.awm.gov.au

Transcribe

Help preserve Australia's history by transcribing records from the National Collection. Enhance accessibility and discoverability for all Australians.

Find out more
The placesofpride

Places of Pride

Places of Pride, the National Register of War Memorials, is a new initiative designed to record the locations and photographs of every publicly accessible memorial across Australia.

Find out more
Visit the Australian War Memorial

Visit the Australian War Memorial

The Australian War Memorial is open for visitors as we work to expand our galleries. Entry is free and tickets are not required.

Find out more
Canberra Highlands in Grayscale

ACKNOWLEDGEMENT OF
TRADITIONAL CUSTODIANS

The Australian War Memorial acknowledges the traditional custodians of country throughout Australia. We recognise their continuing connection to land, sea and waters. We pay our respects to elders past and present.
Location map of The Australian War Memorial
The Australian War Memorial building

The Australian War Memorial

Fairbairn Avenue
Campbell ACT 2612
Australia
View on Google Maps (opens in new window)
Google Map data ©2025 Google
Australian War Memorial Logo
  • Go to AWM Facebook
  • Go to AWM Trip Advisor
  • Go to AWM Instagram
  • Go to AWM Youtube

Footer

  • About
  • Contact
  • Venue Hire
  • Media
  • WM Magazine
  • Donate Today

The Australian War Memorial

Fairbairn Avenue

Campbell ACT 2612

Australia


Opening Hours

10 am to 4 pm daily (except Christmas Day)


In preparation for the daily Last Post Ceremony,

galleries are progressively closed from 3:40 pm.


Public entrance via Fairbairn Avenue, Campbell ACT 2612

Sign up to our newsletter

Subscribe

Legal

  • Copyright
  • Disclaimer
  • Privacy Policy
  • Accessibility
  • Freedom of information

Copyright 2025 Australian War Memorial, Canberra. All rights reserved