Australian War Memorial Logo
Search

Donate Today

  • Collection Open Information Close Information
    • Official Histories & Unit Diaries
    • Understanding the Collection
    • Research at the Memorial
    • Donating to the Collection
    • National Collection Loans
    • Projects
  • People
  • Visit
  • Commemorate Open Information Close Information
    • Last Post Ceremony
    • Honour Rolls
    • Anzac Day
    • Remembrance Day
    • Customs & Ceremony
    • Speeches
  • Learn Open Information Close Information
    • Schools & Teachers
    • Memorial Articles
    • Encyclopedia
    • Understanding Military Structure
    • Podcasts
    • Glossary
    • Magazine
  • Get Involved Open Information Close Information
    • Donations & Bequests
    • Corporate Partnership
    • Employment Opportunities
    • Volunteer at the Memorial
    • Friends of the Memorial
    • eMemorial Newsletter
    • Grants, Scholarships & Residencies
    • Research Papers
  • Shop Open Information Close Information
    • Memorial Shop
    • Images, film and sound
    • Lone Pine Seedlings

Breadcrumb

  1. Home
  2. Visit
  3. Exhibitions
  4. striking
  5. Striking by Night -Crew
  6. Striking by Night - Bomb Aimer

Main navigation

  • Other Exhibitions
  • Current Exhibitions
  • Past Exhibitions
  • Touring Exhibitions
  • Online Exhibitions

Striking by Night - Bomb Aimer

  • Introduction
  • History
  • Planes
  • Crew
  • Weapons

Crew - Bomb Aimer

Physical position in plane

Location of bomb aimer

Location of bomb aimer

After take off the bomb aimer moved from his crash position (behind the wings) into the nose, either lying at the bombsight or manning the nose gun turret above it.

Note: Some bomb aimers never sat in the turret others did. It was very rare for a bomb aimer to use the nose guns as night fighters did not attack from the front.

During the bombing run towards the target the bomb aimer would move to lie or knee in nose compartment with his elbows on a cushion.

On the left hand side of the bomb aimer, a Mark 14, a black suitcase sized box was an early computer into which was fed data on the aircraft's altitude, speed, course, windspeed and direction and the bomb types being carried, from which the data was fed to the gyroscopic bomb sight. That would project an illuminated cross onto the glass 5-10cms wide. The object was to get the aiming point in the centre of the cross.

Also mounted on the right side of the nose was a sixteen switch panel for setting the order and timing of the bomb release (to maintain balance the bombs had to be dropped in the correct sequence).

Responsibilities

  • On the run to target gave directions to the pilot prior to the release time.
  • Select the bomb switches and make certain that they were selected
  • Release the bombs ‘bombs gone’
  • If the target could not be seen, instructed the pilot to go around again, turning back over the target.
  • Trigger the photo flash that fell through a chute in the rear of the fuselage allowing the bomb aimer to take a photograph of the aiming point
  • Selector switched then checked for any ‘hung up ‘ bombs
  • Gave instructions to close the bomb doors
  • From August 1943 onwards the bomb aimer or wireless officer dispersed ‘window’, foil strips to render the German radar ineffective, through the hatch in the floor of the nose
  • Sometimes served as a relief pilot if needed
  • Through much of the flight served as a second pair of eyes and assited map reader for the navigator

Dress

A typical uniform consisted of a helmet, oxygen mask, parachute, boots, shirt, trousers, tie, gloves, a whistle and an escape kit.

Collection Item C262031

Accession Number: UK1214

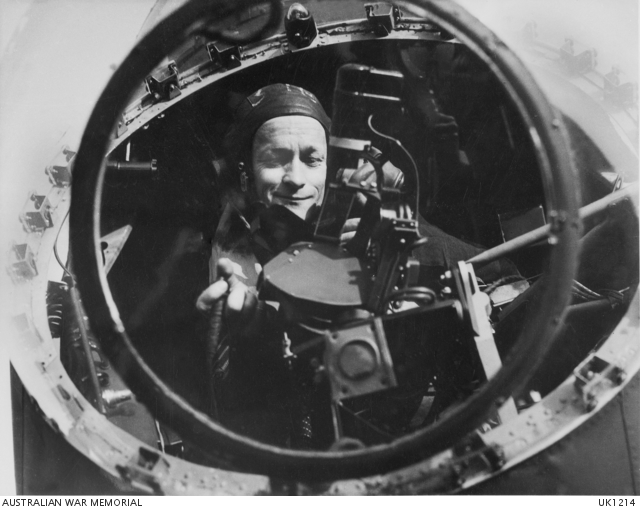
Flight Sergeant L. J. Manning, Nelson Bay, NSW at his bomb-sight in "Whoa Bessie", a Lancasster bomber aircraft of No. 463 Squadron RAAF of Bomber Command.

Crew

  • About bomber crew
  • Pilot
  • Navigator
  • Bomb aimer
  • Flight engineer
  • Mid upper gunner
  • Rear gunner
  • Wireless Operator
  • German night-fighter pilot
  • Uniforms

Last updated: 4 February 2020

1 The Donations and bequests

Donations & Bequests

Your generous donation will be used to ensure the memory of our Defence Forces and what they have done for us, and what they continue to do for our freedom remains – today and into the future.

Find out more
2 Visit Transcribe.awm.gov.au

Transcribe

Help preserve Australia's history by transcribing records from the National Collection. Enhance accessibility and discoverability for all Australians.

Find out more
The placesofpride

Places of Pride

Places of Pride, the National Register of War Memorials, is a new initiative designed to record the locations and photographs of every publicly accessible memorial across Australia.

Find out more
Visit the Australian War Memorial

Visit the Australian War Memorial

The Australian War Memorial is open for visitors as we work to expand our galleries. Entry is free and tickets are not required.

Find out more
Canberra Highlands in Grayscale

ACKNOWLEDGEMENT OF
TRADITIONAL CUSTODIANS

The Australian War Memorial acknowledges the traditional custodians of country throughout Australia. We recognise their continuing connection to land, sea and waters. We pay our respects to elders past and present.
Location map of The Australian War Memorial
The Australian War Memorial building

The Australian War Memorial

Fairbairn Avenue
Campbell ACT 2612
Australia
View on Google Maps (opens in new window)
Google Map data ©2025 Google
Australian War Memorial Logo
  • Go to AWM Facebook
  • Go to AWM Trip Advisor
  • Go to AWM Instagram
  • Go to AWM Youtube

Footer

  • About
  • Contact
  • Venue Hire
  • Media
  • WM Magazine
  • Donate Today
  • VG Portal

The Australian War Memorial

Fairbairn Avenue

Campbell ACT 2612

Australia


Opening Hours

10 am to 4 pm daily (except Christmas Day)


In preparation for the daily Last Post Ceremony,

galleries are progressively closed from 3:40 pm.


Public entrance via Fairbairn Avenue, Campbell ACT 2612

Sign up to our newsletter

Subscribe

Legal

  • Copyright
  • Disclaimer
  • Privacy Policy
  • Accessibility
  • Freedom of information

Copyright 2025 Australian War Memorial, Canberra. All rights reserved