Australian War Memorial Logo
Search

Donate Today

  • Collection Open Information Close Information
    • Official Histories & Unit Diaries
    • Understanding the Collection
    • Research at the Memorial
    • Donating to the Collection
    • National Collection Loans
    • Projects
  • People
  • Visit
  • Commemorate Open Information Close Information
    • Last Post Ceremony
    • Honour Rolls
    • Anzac Day
    • Remembrance Day
    • Customs & Ceremony
    • Speeches
  • Learn Open Information Close Information
    • Schools & Teachers
    • Memorial Articles
    • Encyclopedia
    • Understanding Military Structure
    • Podcasts
    • Glossary
    • Magazine
  • Get Involved Open Information Close Information
    • Donations & Bequests
    • Corporate Partnership
    • Employment Opportunities
    • Volunteer at the Memorial
    • Friends of the Memorial
    • eMemorial Newsletter
    • Grants, Scholarships & Residencies
    • Research Papers
  • Shop Open Information Close Information
    • Memorial Shop
    • Images, film and sound
    • Lone Pine Seedlings

Breadcrumb

  1. Home
  2. Visit
  3. Exhibitions
  4. striking
  5. Striking by Night -Crew
  6. Striking by Night - Wireless Operator (WOP)

Main navigation

  • Other Exhibitions
  • Current Exhibitions
  • Past Exhibitions
  • Touring Exhibitions
  • Online Exhibitions

Striking by Night - Wireless Operator (WOP)

  • Introduction
  • History
  • Planes
  • Crew
  • Weapons

Crew

Personal particulars

Height - 5 ft 2in min and no taller than 6 ft
Weight - not over 175lbs

Physical position in plane

Location of wireless operator

Location of wireless operator

He sat behind and faced the the navigator station, facing him. Had a table and light.

Equipment

According to the Kings’ Regulations, which governed Air Force law, a multi–engined aircraft was not permitted to take off without a wireless operator.

The standard wireless was the T1154/R1155 “Marconi” or “Rainbow set” named for the yellow, blue and red knobs. It had both voice and Morse capabilities. Voice was rarely used.

The batteries were stored underneath all this. A code book was updated and carried on each flight. WOP had a bag of spare valves, pliers and a screwdriver. Behind his seat was a Verey signal flare pistol for use, by the navigator, if the plane crashed in friendly territory.

Responsibilities

He was the crews’ link with base.

  • Taking bearings and fixed position reports from ground transmitters, using a direction finding (DF) loop behind the cockpit. He had to turn this until he got a steady Morse code identification coming through.
  • Mostly the plane was on radio silence
  • Half hour wind readings were sent to base
  • Transmissions were made in an emergency
  • Kept a log of all messages received
  • In some planes, it was also WOP’s job to “drop window”
  • Adjust the planes heating outlet which was situated just next to him. However, when he was comfortable it usually meant the rest of the crew were cold! It was often down to -40 degrees!
  • From early 1943, WOP’s also jammed German fighter control transmissions

Dress

A typical uniform consisted of a helmet, oxygen mask, parachute, boots, shirt, trousers, tie, gloves, a whistle and an escape kit.

Collection Item C36462

Accession Number: UK2052

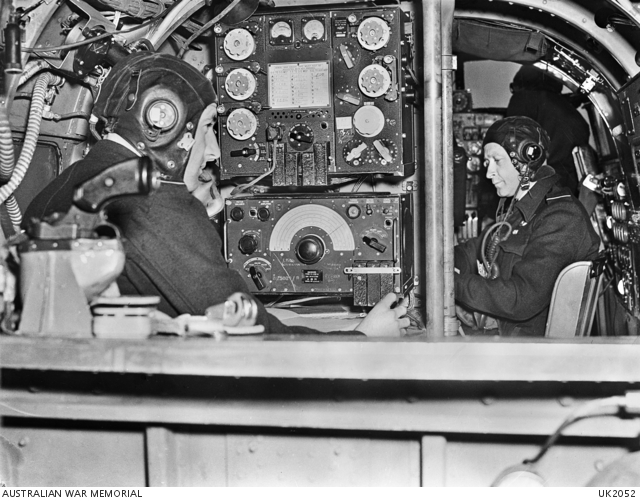
Wireless operator Flying Officer C. H. Tindale DFM, of Cremorne, NSW (left), tuning while the navigator, Flying Officer W. C. Gordon DFC, of Raleigh, NSW, studies his charts just before take off in the Lancaster "G for George".

Crew

  • About bomber crew
  • Pilot
  • Navigator
  • Bomb aimer
  • Flight engineer
  • Mid upper gunner
  • Rear gunner
  • Wireless Operator
  • German night-fighter pilot
  • Uniforms

Last updated: 4 February 2020

1 The Donations and bequests

Donations & Bequests

Your generous donation will be used to ensure the memory of our Defence Forces and what they have done for us, and what they continue to do for our freedom remains – today and into the future.

Find out more
2 Visit Transcribe.awm.gov.au

Transcribe

Help preserve Australia's history by transcribing records from the National Collection. Enhance accessibility and discoverability for all Australians.

Find out more
The placesofpride

Places of Pride

Places of Pride, the National Register of War Memorials, is a new initiative designed to record the locations and photographs of every publicly accessible memorial across Australia.

Find out more
Visit the Australian War Memorial

Visit the Australian War Memorial

The Australian War Memorial is open for visitors as we work to expand our galleries. Entry is free and tickets are not required.

Find out more
Canberra Highlands in Grayscale

ACKNOWLEDGEMENT OF
TRADITIONAL CUSTODIANS

The Australian War Memorial acknowledges the traditional custodians of country throughout Australia. We recognise their continuing connection to land, sea and waters. We pay our respects to elders past and present.
Location map of The Australian War Memorial
The Australian War Memorial building

The Australian War Memorial

Fairbairn Avenue
Campbell ACT 2612
Australia
View on Google Maps (opens in new window)
Google Map data ©2025 Google
Australian War Memorial Logo
  • Go to AWM Facebook
  • Go to AWM Trip Advisor
  • Go to AWM Instagram
  • Go to AWM Youtube

Footer

  • About
  • Contact
  • Venue Hire
  • Media
  • WM Magazine
  • Donate Today
  • Careers
  • VG Portal

The Australian War Memorial

Fairbairn Avenue

Campbell ACT 2612

Australia


Opening Hours

10 am to 4 pm daily (except Christmas Day)


In preparation for the daily Last Post Ceremony,

galleries are progressively closed from 3:40 pm.


Public entrance via Fairbairn Avenue, Campbell ACT 2612

Sign up to our newsletter

Subscribe

Legal

  • Copyright
  • Disclaimer
  • Privacy Policy
  • Accessibility
  • Freedom of information

Copyright 2025 Australian War Memorial, Canberra. All rights reserved