Meysey Hammond: an inspiration and a marvel

Portrait of George Meysey Hammond, also known as Meysey George Hammond, taken in uniform before his departure for Egypt. June 1915.
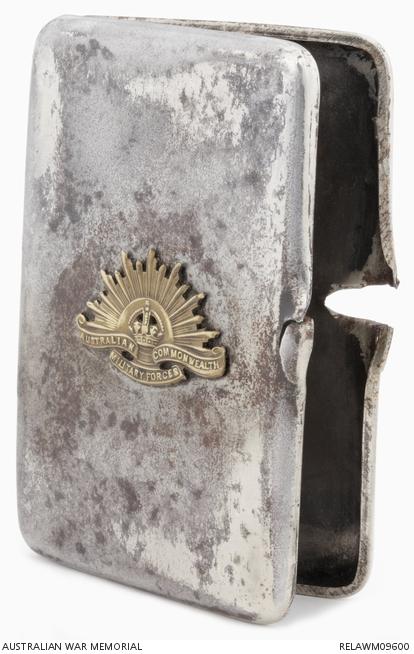
On Christmas Day 1917, Meysey George Hammond narrowly escaped death near Ploegsteert when a sniper’s bullet tore through his breast pocket, damaging a field notebook and cigarette case, but leaving him unscathed.
It was not the first time Hammond had put himself in the line of enemy fire, and it would not be the last.
“I am quite sure that that Hammond did not know what fear meant,” a fellow officer wrote at the time.
“On one occasion I was with him and a party looking over the ground before the attack on Passchendaele. Without any warning about 20 whizzbangs arrived all around us, and every one of us dived for cover except Hammond, who walked straight on without altering his pace or even nodding his head. I never once saw him duck for either a shell or a bullet.”

Today, Hammond’s damaged cigarette case and notebook are part of the National Collection at the Australian War Memorial in Canberra.
Nick Fletcher, the Memorial’s Head of Military Heraldry and Technology, knows Hammond’s story well.
“Captain Meysey Hammond was a living stereotype of the Anzac legend,” he said.
“His courage made him the best known figures in the 28th Battalion, and one of the best known soldiers in the entire 2nd Division.
“He quickly established himself as a popular and dependable leader.”
Meysey Hammond was born in Staffordshire, England, in July 1892 and emigrated to Perth, Western Australia, in February 1911, aged 18.
“He was an intelligent and observant young man, and like many his age, he sought a roving life of adventure,” Fletcher said. “He determined to become a mariner, but failed to obtain a coveted cadetship … so, in disgust, he packed up and sailed for Australia, refusing to accept financial assistance from his father.”
When the First World War broke out a few years later, Hammond was keen to enlist. He joined the Australian Imperial Force on 25 February 1915 and served with the 28th Battalion on Gallipoli and the Western Front.
“Hammond quickly earned distinction for his coolness under fire,” Fletcher said. “He had said that he ‘didn’t want to go up for the NCO’s exam, [but] the old Captain was so damned persistent’ that he ‘really had to,’ and by the time the battalion sailed from Fremantle, Hammond was already a corporal.”
In France, he was awarded the Military Medal as a sergeant for his bravery near Bois Grenier, on 2 June 1916, when he went forward under heavy shellfire to gather important information about enemy activity.
He was wounded in the leg during the heavy fighting at Pozières on 29 July, leaving him with an enduring limp. On the same day he was commissioned as a second lieutenant.
“As part of the battalion nucleus, he was to remain out of the fighting. But, unwilling to miss his first big ‘stunt’ in France, Hammond disobeyed orders and went to the front,” Fletcher said.
“When the 28th Battalion began their attack at midnight, they found themselves against uncut barbed wire and a well-entrenched enemy.
“The battalion suffered 470 casualties in less than two hours and Hammond was fortunate to suffer only a leg wound.”

NCOs of 7th Brigade comprising 25, 26, 27 & 28th Battalions prior to their amalgamation with 6th Brigade, 21, 22, 23, 24th Battalions.
He was hospitalised for more than a month, before rejoining his unit at Ypres in September and accompanying it to the Somme the following month. He suffered a second, more serious wound on 5 November, shortly before a major attack on the German trenches at Flers.
“Despite his injury, he wanted to participate in the attack,” Fletcher said. “But his left elbow was shattered by shrapnel or gunfire.”
His company commander finally convinced him to go down to the dressing station.
“Though not life-threatening, the wound required surgical attention, and Hammond was evacuated to England. He would be out of action for many months, his fighting career perhaps at an abrupt end.”
Hammond wrote a letter to his sister from hospital. He admitted that he did “not really know” how his arm was, but insisted he was “feeling a bit washed out but all OK”.
“In truth, his left arm was not okay,” Fletcher said. “The elbow would not mend; both the lower arm and hand withered, and for the rest of his life, Hammond carried his useless arm in a sling, a glove concealing the discoloured hand.
“A medical board recommended Hammond return to Australia, but he refused to countenance the idea, pleading with senior officers, including the AIF commander, General Birdwood, to stay. He demonstrated the hook attached to his Sam Browne belt, which enabled him to use grenades, and showed his ability to adjust his gas mask single-handed.”
He had been promoted to lieutenant in the January, and finally received permission to return to his beloved battalion in May 1917. He was appointed battalion intelligence officer, in an attempt to keep him from further harm.
“This attempt to keep Hammond out of the fighting failed,” Fletcher said. “He would not be protected. Instead, he used his new role to ensure he was at the forefront of every attack and first into enemy trenches.”
He was awarded the Military Cross for his actions near Westhoek a few months later. Armed with his pistol and hand grenades, he had single-handedly captured 20 Germans during the fighting near Polygon Wood on 20 September.
“He was fearless in the extreme, and cheered everyone on,” the citation read. “He volunteered for any dangerous work and made a number of reconnaisances of the front line, securing much useful information.”

In the attack on Broodseinde Ridge the following month, Hammond and the unit’s signals officer were spotted well ahead of the advancing infantry, exuberantly charging enemy pillboxes.
“If his courage caused him to stand out in any company, Hammond’s outlandish appearance contributed to this growing fame,” Fletcher said. “Always a tall, thin man, now walking with a limp, Hammond was also noted for his untidy dress.”
His speech was studded with nautical expressions – often ordering his men to ‘make fast’ instead of ‘halt’.
“He always had his old pipe in his mouth, and he turned his officer caps into ‘freaks’ by removing the wire that normally held the crown rigid,” Fletcher said. “He would not discard his slovenly trench coat and disreputable cap when out of the firing line, or even when on leave in London. Apparently he regarded his combat-stained clothing as a mark of honour, as well as a means of provoking the more conservatively dressed authorities in the rear areas, most of whom he regarded dismissively as ‘cold-footed loafers’.”
In early 1918, Hammond joined the Australian War Records Section with obvious reluctance.
“Characteristically, Hammond did not want to leave his unit, particularly with a major German offensive just underway,” Fletcher said. “He delayed his departure with a variety of excuses, but in early April he was finally ordered to proceed immediately to London.
“Men from the 28th Battalion wrote him a parting note, headed by a drawing of a frightened German officer leaping in the air and exclaiming, ‘Donner and Blitzen!!! Here comes Meysey von Hammond.’”
When letters began arriving from his mates at the front, he begged to be allowed to return to his unit.
“He became more and more unhappy and he began to push for a return to his battalion,” Fletcher said. “After pleading with anybody prepared to listen, he finally gained a hearing … and got what he wanted.”

In mid-May, he returned to his battalion as a company commander with the rank of captain.
On the evening of 10 June 1918, the battalion attacked the German lines at Morlancourt. Knowing that the troops were in danger of advancing too quickly and being caught in the supporting British shell-fire, Hammond walked across No Man’s Land, ten metres in front of his men, checking the bounds of the barrage, often with his back to the enemy, straightening out the line with the occasional motion of his walking stick, halting it and ordering it to ground whenever it moved too close to the bursting shells.
“As usual, Hammond was the first man into the trenches when they reached the enemy lines,” Fletcher said. “He carried a watch in his right hand, his sleeve rolled up to the elbow, his trademark walking stick hooked over his shattered left arm in its sling.”
By the time the rest of his troops arrived, Hammond had already captured a dozen or so German prisoners.
He was wounded the following day by a sniper’s bullet.
“Although he cheerfully told his battalion commander to ‘Keep the old flag flying, Sir!’ as he was carried past, nobody doubted the seriousness of his wound,” Fletcher said. “Shot through the liver, he lingered, partially conscious, for several days.”
He died on the 14th of June, aged 25, and was buried at Vignacourt Cemetery. For his actions at Morlancourt, he was awarded a Bar to his Military Cross.
His first battalion commander later wrote, “His courage and endurance were a marvel and an inspiration to others far outside the ranks of his battalion.”
Soon after the Armistice, his devastated mother donated the cigarette case and notebook that had saved his life on Christmas Day 1917 to the Memorial. His adoring family never came to terms with the death of their ‘laddie’.
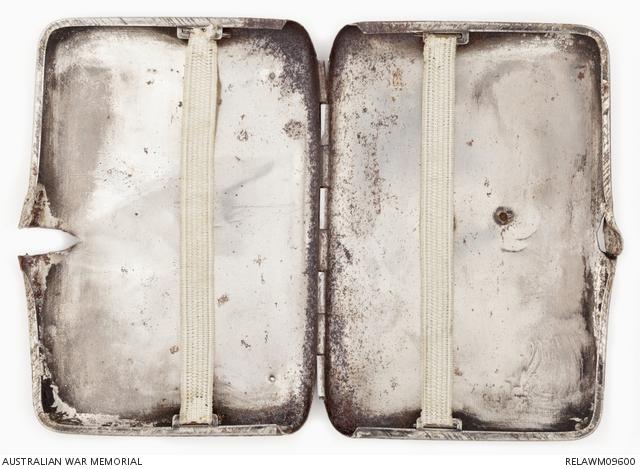
Bullet damaged cigarette case donated by George's mother.