'I thought it an excellent moment to escape'

A portrait of Captain Thomas White, of the Australian Flying Corps, dressed in his disguise as a Turk, in which he escaped from Turkey during a railway collision.
Thomas White was a 28-year-old pilot in the fledgling Australian Flying Corps when he was captured by the Turks in November 1915.
Of the 232 Australians taken prisoner by the Turks during the First World War, White was the only one to escape successfully.
He recorded it all in a remarkable series of diaries, letters and notes, which he kept hidden while imprisoned at Afion Kara Hissar, the main prisoner-of-war camp in Turkey. He would remember the moment he left the camp for the rest of his life.
“It was 4.15am before the train started,” he wrote. “And I felt as I leaned out of the window and watched the town and the castellated rock of Afion disappearing in the blue haze of the dawn, almost as happy in spite of the hour, as if I knew that I was leaving for home. I had spent two years and four months there and I sincerely hoped that I should not have to return to spend any further days of captivity there.”

An informal portrait of White at the controls of a Bristol Boxkite at the Central Flying School, Point Cook, Victoria, while training to become a pilot.
A captain in the Flying Corps, Thomas Walter White was born in Hotham (North Melbourne) on 26 April 1888.
Even from a young age, White was determined to serve his country. A keen athlete, he had competed in running, cycling and boxing events, and played cricket and football with his brothers, while helping out at the family store in Melbourne. He was only 11 when the first contingent of Australians left for the Boer War in the South Africa. He joined the Citizens Military Forces as a bugler, hoping to join the war effort, but the conflict ended just as he turned 14. He went on to serve with artillery and engineering units, and in 1911 was commissioned as an officer in the 5th Australian Regiment.
By the time the First World War broke out in 1914, White had developed a keen interest in the new field of aviation. Within weeks, he was selected for the Australian Flying Corps, becoming one of the first four students to train as a pilot at the newly established Central Flying School at Point Cook. Military aviation was in its infancy, and there were just two flying instructors, a few mechanics, and a small collection of rickety aircraft, which would eventually pave the way for the establishment of the Royal Australian Air Force in March 1921.

Basra, July 1915: An informal group portrait of, from left: Captain Henry Alloysius Petre, of the Australian Flying Corps, Captain Thomas Walter White, of the Australian Flying Corps, Lieutenant H. Christian of the 119th Infantry Indian Army and Lieutenant George Pinnock Merz, of the Australian Flying Corps, Officers of the Half Flight, and a local boy. In May 1915, at the request of the Indian Government, the first Half Flight of the Australian Flying Corps was despatched to Basra where, combining with a similar unit from India, it formed for some time the sole flying force of the expedition. Nearly half of the skilled personnel of this small contingent, officers and mechanics, lost their lives in fighting or as prisoners in Turkey.

Unidentified members of the Half Flight standing in front of a Maurice Farman Shorthorn aircraft.
White would go on to become one of the first Australian airmen to go into action. In April 1915, he was promoted to captain and sent to the Middle East with three other officers and a small group of men. Known as the Mesopotamia Half Flight, the unit was based in Basra, conducting bombing and reconnaissance missions against Turkish forces to assist the Indian Army in the British push towards Baghdad. It was no easy task. As White later noted, most of the planes were unfit for any sort of war service. They were made of wood, wire and canvas, and did not carry machine-guns. They used two-pound infantry bombs, which were thrown out by hand. In many cases, the only way larger bombs could be dropped was through a hole cut out in the floor. The engines also “gave considerable trouble, and forced landings in country overrun with hostile Arabs, were frequent”. White’s engine failed five times within a month, and he and his observer – Captain Francis Yeats-Brown, of the Royal Flying Corps – were lucky to survive.
On Friday, 13 November, their luck ran out. They were captured and beaten when their plane was damaged during a mission to destroy telegraph lines along the main road from Fallujah to Baghdad.
“I thought that the day selected for the stunt was a rather ominous one,” White wrote. “But [I] let duty override superstition … We thought it possible to land and blow up the telegraph lines before the Arabs quite realised our intention. But a Turkish horseman, who suddenly appeared beneath me, disconcerted my landing and, in trying to land as close as possible to the objective, I swerved after landing and struck a telegraph pole … knocking it down and badly smashing the plane.”

Outdoor portrait of four Australian prisoners of war in Turkey. From left to right: Lieutenant Claude Henry Vautin, of the Australian Flying Corps; Lieutenant Stanley Rubert Jordan, 9th Battalion; Captain Thomas Walter White; and Lieutenant Leslie Henry Luscombe, 14th Battalion.

Two unidentified members of the Half Flight seated in a Maurice Farman Shorthorn aircraft.

Four unidentified members of the Half Flight at the crash site of a Maurice Farman Shorthorn aircraft.
When nearby Arabs opened fire, White tried to keep them at bay with a rifle he kept in the aircraft.
“We were 60 miles from home, and could only either put up a fight or… give ourselves up to the Turks,” he wrote.
Yeats-Brown managed to place a charge around a telegraph pole and successfully blew up the telegraph wires, but White was not able to keep the enemy away long enough to take off. Though they managed to start the engine, the aircraft became entangled in the broken telegraph wires and the two were taken prisoner.
“I filled my petrol tank … while Captain Yeats-Brown blew up a telegraph pole with a gun cotton necklace,” he wrote.
“I found the aeroplane unflyable, so replied to the fire of the Arabs … as well as I was able with the rifle that we carried in the aeroplane…
“Miraculously neither of us was hit…

Turkey, 1915: Two children standing in a street in Afion Kara Hissar, where British, Russian and French officer prisoners were housed. The house with the lattice on the gable, centre left, was dubbed 'Australia House' as most of the Australians were quartered here.
“The Turks had come from what we supposed to be a deserted building close by, but it was really a gendarmerie barracks and its inmates had been quickly brought out by the cavalryman I had seen whilst landing.
“My fire was of little use against so many men ... [and] although we started the engine after the lines had been demolished by a second charge, [and] an attempt was made to taxi the machine, we were quickly taken prisoners.
“The Arabs struck us with riflebutts, and wanted to shoot us, and but for the interference of the Turks, would have done so.
“I warded off blows as well as I could with my arms… When my helmet was knocked off, one of them struck me … on the head with an adze, which left a bad wound, and another struck me several times with … an ancient sword, which was fortunately so blunt that it did not cut through my … flying coat.”

Turkey, 1915: A group of Australian and British prisoners at Afion Kara Hissar. In the group but not identified are three Australian prisoners, Captain R.T.A. MacDonald, of the 16th Battalion, who was captured at Gallipoli in May 1915, Lieutenant G. Haggard, of the Royal Navy submarine AE2 who was captured in the Sea of Marmona in April 1915, and Captain Thomas White of the Australian Flying Corps. Most of the prisoners are wearing beards due to the scarcity of soap and the cold weather. Note the dogs with the men in the foreground.

Turkey, 1915: A view of Afion Kara Hissar, the main prisoner of war camp in Turkey.
White and Yeats-Brown were taken to Baghdad, where they spent three weeks in hospital, including a week's solitary confinement, before being sent to Mosul, where they were imprisoned before being moved to Afion Kara Hissar. They arrived in March 1916, tired, hungry and weak from illness, after a gruelling journey across enemy controlled territory.
The Allied prisoners were held in houses in the town where they were closely watched and could receive severe punishments at any time. Letters and diaries were censored, and their rooms were often searched. White secretly bought a small pocketbook, pen, and ink in order to keep a diary. By the end of the war, he had filled seven notebooks with his tiny writing. He kept them hidden, first in the bottom of a cigarette box, and later in his puttees, a hat, the backs of the knees of his breeches, and in the soles of his boots.
Like many, his thoughts soon turned to escape. He already spoke French, and had begun to acquire some Turkish, but decided to devote a good deal of time to learning Russian, obtaining a tiny French/Russian dictionary, which he studied in the hope that it would aid him in an escape.

As prisoners were frequently searched, diaries and any secret correspondence had to be carefully concealed and some ingenious hiding places were devised. White concealed his diaries in the sole of his boots.
In mid-1918, White heard that there was a chance of escape through Constantinople and that the city could be reached through a prisoner exchange, but priority was given to sick or wounded prisoners.
“I had already made the necessary preparations,” he said. “I convinced the Turkish Medical Board that an old injury to my foot, which I had kept tightly bandaged for some days, and a scar on my ankle, the result of a burn, were evidence of tuberculosis.”
He began walking with a limp and was eventually sent to Constantinople for treatment in July 1918. Taking advantage of the freedom to move around, White and Captain Allan Bott of the Royal Air Force quickly made arrangements for their escape through the black market.
“On August 24, we got our opportunity,” White wrote. “By the strangest bit of good fortune I have ever known … our train collided with another on a viaduct … shortly after leaving the station …
“I thought it an excellent moment to escape … Pushing along the carriage I quickly changed my cap for a grey felt hat that I kept rolled up in my inside pocket …
“The posta [guard] realised my intention … As I jumped from the second carriage he was just behind me. I then jumped down on to one of the pillars that supported the viaduct and dropped the remaining 10 feet or so to the street. This gave me a short start and I made the most of it”.
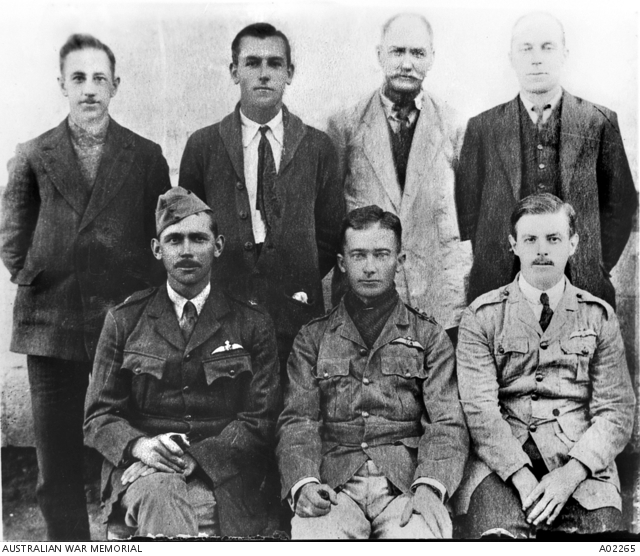
Group portrait of Australian prisoners at Afion Kara Hissar. In the back row from left to right; Lieutenant L.H. Luscombe, of the 14th Battalion, captured on Gallipoli in August 1915; Lieutenant S.R. Jordan, of the 9th Battalion, captured on Gallipoli in June 1915; Lieutenant W.E. Elston, of the 16th Battalion, captured on Gallipoli in April 1915; and Captain J.A. Brown, a Sydney doctor serving as a Medical Officer with the Gloucestershire Yeomanry, captured on the Palestine front in 1916. Front row, from left to right: Lieutenant C.H. Vautin, of the Australian Flying Corps, captured on the Palestine front in July 1917; Captain Thomas White, captured on the Mesopotamian front in November 1915; and Lieutenant W.H. Treloar, of the AFC, captured on the Mesopotamian front in September 1915.
White evaded capture and hid for several days with a sympathetic Greek family.
“Visions for much longed for liberty made me move at my utmost speed,” he wrote.
“I rushed into a house that had its front door open. Two old women who were washing clothes screamed as I entered, but I put my finger on my lips and rushed through the back. After the posta had passed, one of the women came through and I pointed to a small cupboard there. She opened it so as to block the doorway and I quickly went into this hiding place. It was hot and stuffy but was very welcome. A young Greek woman who spoke French appeared shortly afterwards. I told her why I had entered her house so unceremoniously and hoped she would forgive me. She said she would do everything in her power to help me and asked what she could do.
“I thanked my good fortune … and decided to buy a disguise … From the husband of the young woman, I bought a fez and a rather dilapidated chesterfield coat. I also clipped my moustache and covered the scars on my head with some black boot polish and set off with the small boy of the house as my guide ... I felt at first that everyone was looking at me. But I found afterwards that the disguise was excellent and certainly did not arouse any suspicion.”

White evaded capture by dodging into a house occupied by a sympathetic Greek family. The family fitted White out with Turkish clothing and gave White this worn tobacco tin as a parting gift.

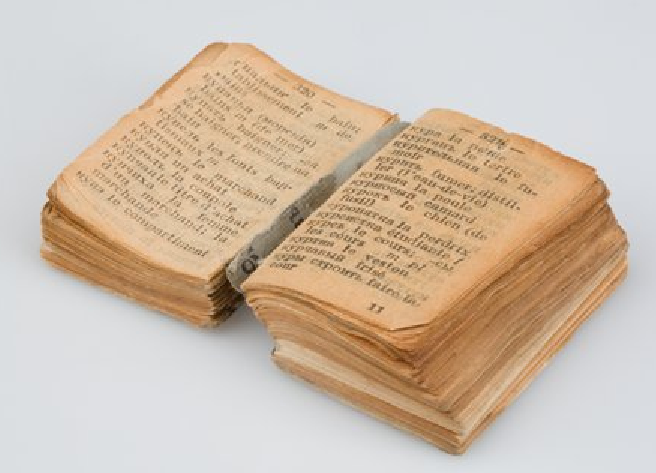
The tiny dictionary White used to teach himself Russian.
White travelled by tram to Galata, where he and Bott eventually found each other. They decided to stow away in a Ukrainian steamer, but the vessel remained at anchor for the next 33 days, and the men spent an uncomfortable time hiding below deck, sometimes in the ship's ballast tanks.
“It was impossible to sit erect, the air was foul, and we found it exceedingly uncomfortable in our scanty clothes lying on the quickly saturated piece of sacking that we had dragged along with us to lie upon,” he wrote. “Not a ray of light penetrated anywhere, the walls were caked with mud and slime and we could hear the constant lapping of water at either end where bilge water and the drippings from the pumps leaked in.”
Eventually, the steamer reached Odessa. Armed with false Russian passports, White and Bott made arrangements to join the anti-Bolshevik army, but stowed away in a Ukrainian hospital ship bound for Varna when they heard of the impending armistice with Bulgaria. Making their way through Bulgaria, they reached Salonika in northern Greece, and were waiting for transport back to London when the Armistice was signed on 11 November 1918.
It had been almost three years since White was first captured. He was awarded a Distinguished Flying Cross “in recognition of distinguished service rendered during the war” and was Mentioned in Despatches twice.

During his captivity, White had also written letters to Vera Deakin – the founder of the Australian Red Cross Wounded and Missing Inquiry Bureau and the daughter of former Australian Prime Minister Alfred Deakin. White had provided her with invaluable information on the welfare of Australian prisoners of war. The pair finally met in London in December 1918. Within three weeks, they were engaged.
White later published an account of his experiences during the war in Guests of the Unspeakable, which he dedicated it to his wife.
Having witnessed the horror of the war first-hand, White determined to enter federal politics to ensure that what he had seen would not happen again. In 1929, he won the federal seat of Balaclava, which he held for 22 years. He devoted his maiden speech to a subject he considered “almost sacred”, the building of the Australian War Memorial in Canberra.
Today, the boot White used to conceal one of his diaries is part of the national collection at the Memorial. It is displayed in the First World War galleries alongside a tobacco tin, given to White as a parting gift by the Greek family who helped him in Constantinople. A collection of his letters and diaries is held in the Memorial’s Research Centre, along with the tiny French/Russian dictionary he used to teach himself Russian to aid his escape.

London, 1918: Studio portrait of Vera Deakin, of the Australian Red Cross. Deakin, daughter of the former Australian Prime Minister Alfred Deakin, established the Wounded and Missing Bureau in Cairo, Egypt, in 1915.

Informal portrait of Flight Lieutenant the Honourable Thomas Walter White DFC VD MP, seated, in uniform and Flying Officer F.A. Sewell conferring over a paper. White was Minister for Air and Civil Aviation from 1949 to 1951. In 1952, he was awarded the Knight Commander of the Order of the British Empire while Australian High Commissioner in the United Kingdom.
Research Centre curator Jennie Norberry said the collection was a powerful reminder of one man’s determination to escape.
“It’s a really interesting story,” she said.
“White’s managed to get hold of diaries during the war and keep them hidden for almost three years. Then when he had the idea of escaping, he decided he probably needed to know some Russian to get away. The dictionary he used to teach himself is only tiny – it’s only about an inch square, almost the shape of a cube – and he writes about it in his diaries, how he was in hiding, trying to study his French/Russian dictionary to learn Russian, when he turned around and saw a Turkish soldier looking in the window at him.
“He was very lucky not to get caught, but he was also very determined, and very driven.”
White went on to serve in Australia and England during the Second World War and was awarded the Knight Commander of the Order of the British Empire (KBE) in 1952. He died five years later, on 13 October 1957, at his home in South Yarra. He was given a state funeral at St Paul’s Cathedral and was buried in Point Lonsdale cemetery.
Sir Edward “Weary” Dunlop described him as “perhaps the best loved man of his generation”.
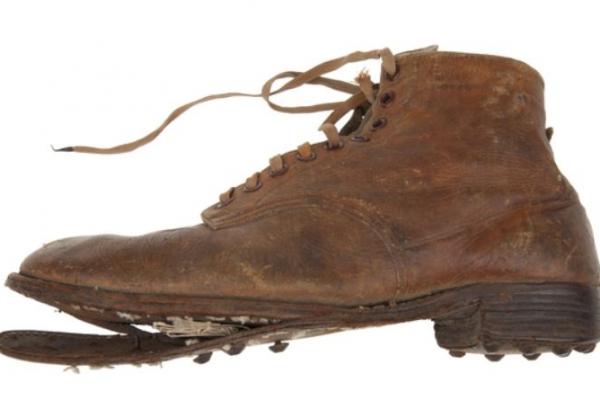
Captain Thomas White's Boot
Captain Thomas Walter White concealed a small diary of his experiences as a prisoner of war in this boot.
3D Treasures allows you a closer view of this object than ever before.