Courage at Lone Pine
The brave but futile charge at the Nek was made famous by the movie Gallipoli. Yet the day before, the Australians attacking Lone Pine had a rare success in some of the fiercest fighting they ever experienced.
The battle of Lone Pine is the only Gallipoli action represented by a diorama in the Memorial’s First World War galleries. The Lone Pine diorama depicts the opening assault by Australians from the 1st Brigade as they rush across no man’s land to attack the heavily fortified Turkish trenches. As with all the large-scale dioramas at the Memorial, Lone Pine offers the viewer a frozen moment in time, placing the battle in a geographic setting and against a human scale. But of necessity a diorama can tell only a small part of the story and in this case, unfortunately, it also reinforces some of the misconceptions surrounding the battle.
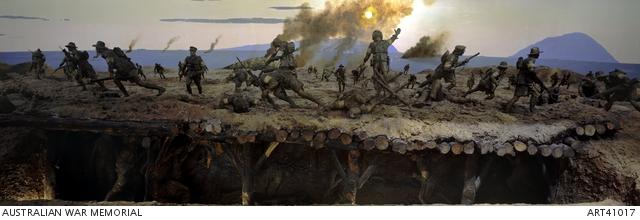
Wallace Anderson and Louis McCubbin, Lone Pine diorama. C251409
The attack at Lone Pine signalled the start of the allied August offensive in the ANZAC area. At 4.30 pm on 6 August 1915, an intensive artillery bombardment, from both land and naval guns, pounded the Turkish positions at 400 Plateau – Lone Pine, Johnston’s Jolly and German Officers’ Trench. The bombardment was the climax of a slow but constant shelling of the ANZAC front line over the previous three days.
As soon as the bombardment ceased at 5.30 pm, Australian soldiers of the 1st Brigade leapt from trenches and underground firing positions to rush the Turkish front line at Lone Pine. They were met by a withering fire from rifles, machine-guns and artillery and many hundreds were killed or wounded as they crossed no man’s land. However, unlike the tragic charge at the Nek next morning, on this occasion the timing and coordination of artillery and infantry worked, with many Turks in the front-line trenches either killed or still sheltering in tunnels and dugouts from the bombardment. The Australians of the 2nd, 3rd and 4th Battalions who led the charge also had the advantage of advancing across a wider front, compared to the narrow confines at the Nek.

Fred Leist, The taking of Lone Pine C176495
Once the Turkish front line was reached, the Australian troops were confronted with what official historian Charles Bean described as “an unforeseen check ”. The trenches were roofed with logs and timbers piled with earth. The Lone Pine diorama suggests that the Australians either had to drop, almost suicidally, feet first through holes in the roof presumably made by artillery shells, or else create their own openings by lifting off the logs. However, instances of men entering the trenches by either of these methods would appear to have been fairly isolated incidents.
In fact, many Australians entered the front-line trenches through gaps in the covering, as the Turks had not roofed the entire run of these trenches. This was particularly the case for the men of the 3rd Battalion who advanced on the central front, where large sections of roof were open. Most of the soldiers who reached the front line, however, did not stop long at the covered trenches. Instead, they rushed over them and gained access through the uncovered rear trenches. Once in the trench system they worked their way back toward the front line or set up barricades to defend their new forward posts. In this way, fighting through a maze of trenches, the Australians reached their objectives within the first half-hour of the opening assault.
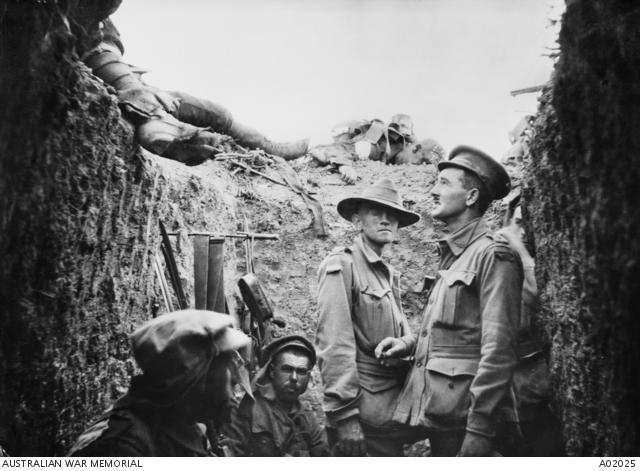
A trench at Lone Pine after the battle, showing Australian and Turkish dead on the parapet. In the foreground is Captain (later Lieutenant General Sir) Leslie Morshead of the 2nd Battalion C53533
The attack at Lone Pine was a diversion, or “demonstration”, but one with a clear objective. The Australians were to take and hold the third and fourth lines of the trench system, in the hope of drawing Turkish reinforcements to the battle. The plan was for the Turks to be fooled into regarding the area around Lone Pine as the objective of the main ANZAC assault, while the real offensive was carried out by troops from the New Zealand and Australian Division on the heights to the north, at Chunuk Bair and Baby 700, as well as a new landing by British troops at Suvla. Aerial photographs of the Turkish positions at Lone Pine made clear the general run of the trench system. Based on this information, each attacking battalion was given specific points to reach; having done so, they would establish defensive posts there.
The Lone Pine diorama depicts the opening infantry assault as the Australians who had rushed the Turkish line entered the elaborate maze of their trenches. What it does not show is the main battle that ensued within the system over the following three days, a battle which Bean described as “the heaviest of its kind in which Australian troops ever took part”. The fighting was brutal and bloody, and often confused, as soldiers from both sides attacked with bayonets, bombs, rifles, even their fists. Seven Australians were awarded the Victoria Cross during the battle, the most in any single Australian action.
Turkish counter-attacks on the Australian positions were almost continuous. Bombing, sniping, and artillery bombardments were used to drive back troops and destroy barricades, followed by a rush of infantry. The Turks used the half-light of evening and dawn to launch concerted attacks, and during the night maintained almost constant bombing raids. By the end of the battle they had managed to drive the Australians back from some of their more advanced positions. On the evening of 9 August the counter-attacks ended after the Turks became aware that the attack was a diversion and that the main allied assault at ANZAC was occurring in the hills to the north.
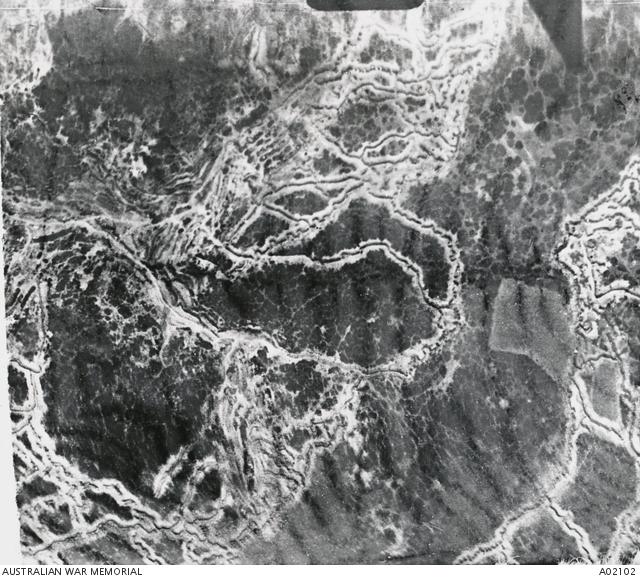
Aerial view of the trenches at Lone Pine taken in June 1915, only weeks before the battle. C53535
Lone Pine produced some of the highest numbers of casualties (both dead and wounded) of the Gallipoli campaign. The diversionary attack cost the Australian Division more than 2,000 men; the Turkish 16th Division was said to have lost 6,390 men in five days. The bodies of dead soldiers from both sides crowded the trenches and the open ground of the battlefield. Soldiers could not move through the trenches without walking on the bodies, sometimes several men deep. Bean noted that “the only respect which could be paid them was to avoid treading on their faces”.
For the rest of the war, the battle of Lone Pine became a touchstone for Australian troops, as they compared the intensity and brutality of the combat there with subsequent battles at the Western Front. Fittingly, the Lone Pine diorama is a graphic visual reminder of the courage and sacrifice of Australian troops in one of the earliest successful battles of the First World War.