From Borneo to Russia: The remarkable missions of Arthur Bond and his Australian crew
Today we celebrate the 110th anniversary of the Commonwealth Naval Force receiving the title of “Royal Australian Navy” (RAN). To commemorate this anniversary, the Memorial has digitised select archival collections reflecting the 110 year service of the RAN. One extraordinary collection is the memoir of Arthur George Hayes Bond.

Officers from the HMAS Swan at the port in the mouth of the Adriatic Sea. Commander Arthur George Hayes Bond is in the centre.
Arthur Bond was born on 10 February 1881 in Westminster, London. He joined the Royal Navy as a cadet in 1895 and was promoted to lieutenant in 1902. During the First World War, Bond was loaned to the Commonwealth Government and appointed Acting Commander of the Australian Destroyer Flotilla in 1916. The flotilla consisted of HMAS Warrego, Parramatta and Yarra.
Bond and the flotilla were ordered to Borneo to conduct patrols with the aim of intercepting enemy agents. These enemy agents travelled on neutral and civilian ships carrying letters, information, and money to fund various organisations and aid mutinies. Bond recalls “some of the ships would never stop until a shot had been fired across their bows”.

A sailor on board HMAS Swan shaking the paw of Ching, the ship's mascot cat.
On this deployment, Bond paid an official visit to the Sultan of Brunei, Muhammad Jamalul Alam II. He was welcomed with tea, cigars, and gifts, and discussed the missions with the Sultan through an interpreter.
The patrols were effective and Bond decided to expand the flotilla’s reach to Singapore, Malaysia, and the Philippines. In August 1916, Bond was relieved of his position as Acting Commander of the Australian Destroyer Flotilla and was appointed Commander of HMAS Swan.

Informal group portrait of unidentified crew members on board HMAS Swan, 1918.
In October 1917, the Swan joined the British Adriatic Force at Brindisi in Italy as part of the Otranto Barrage, which aimed “to prevent the passage of enemy submarines into the Mediterranean from Austrian ports”. By April 1918, the barrage consisted of over 200 vessels and Bond again accepted command of the Australian Destroyer Flotilla.

Throughout the barrage, HMAS Huon, Parramatta and Yarra were fitted with observer balloons. Trained observers would view the water for shadows indicating submarines. Only two submarines were spotted and Bond remarked that the “information gathered … gives a good idea of the intense strain their crews were subjected to while diving through the barrage”.

The Australian Destroyer Flotilla anchored in the harbour of Brindisi, Italy, 1917. The destroyers from left to right: HMAS Parramatta, Yarra, Huon, Swan, Warrego, and a British Royal Navy destroyer.
The Swan left Brindisi in October 1918 to help protect the transport of British and Japanese destroyers from Port Said to Salonika. With the signing of the Armistice on 11 November 1918, “all movements were immediately stopped and the whole town started in to celebrate the occasion with much noise and rejoicing”. However, the Armistice did not mean the end of service for Bond and the Australian sailors of the Swan.
Bond and his crew were despatched to Sevastopol in Crimea, to inspect the Russian Black Sea Fleet. Much of the fleet was in ruins following the revolution. A Russian officer escorted Bond around one of the destroyers and provided a graphic description of the Bolshevik mutiny. “[He] took me on board a large drill and depot hulk, where he showed me the bloodstained covered deck where he and a large number of other officers had been taken by … mutinous sailors.” This officer had been left lying wounded alongside the bodies of his comrades. Only under the cover of darkness was he able to crawl into a small boat and escape.

Group portrait of members of the allied mission to the Don Republic, Russia, with the officers and crew aboard the destroyer HMAS Swan. Bond is seated in the second row from the front, second from the right.
In December 1918, the Swan travelled to the Ukraine and Russia to report on “the military, civil and economic position in the Region of the Don”. Bond and other delegates were invited to Novocherkassk and were welcomed with guards of honour as they “drove to the Cathedral in open carriages through apparently the whole population who kept up a continuous roar of cheering, and threw flowers into our carriages”. Mass was held, followed by a banquet of more than 200 guests.
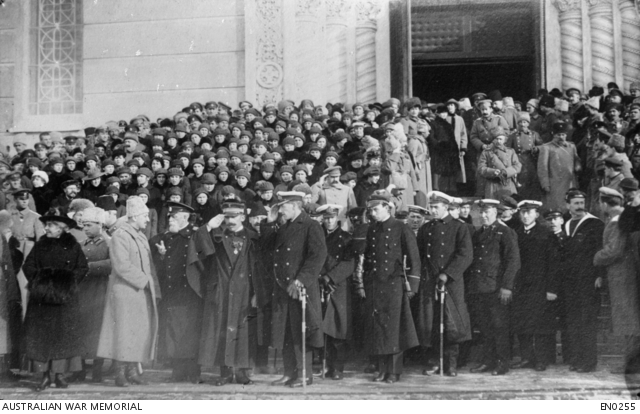
Members of the Allied Mission to Russia alongside General Pyotr Krasnov, the Ataman of the Don Cossacks; the wife of General Pyotr Krasnov; and Cossacks (in fur hats) outside the Cathedral in the capital of the Don Republic, 1918. Bond is in the front row, fifth from the left.
Bond then travelled to Kalatsch, near the front line of the civil war between Bolshevik forces and the Don Cossacks. He recalled the penetrating cold of the journey, “I slept wearing all the clothes that would go on, and covered with every available blanket and coat I could find, but shivered through them all”. Before Bond departed the Don, the Ataman of the Don Cossacks, General Pyotr Krasnov, presented him with the Order of St. Vladimir, fourth class, and a sword as tokens of his appreciation for the commander and his mission.
Following the mission in Russia, Bond submitted a report on the state of the White Russian forces and returned to the Swan. Bond was diagnosed with influenza and pneumonia which ended his “personal connection with the flotilla”. He returned to England, where he was awarded the Order of the British Empire in 1919 and was promoted to captain (retd) in 1922.
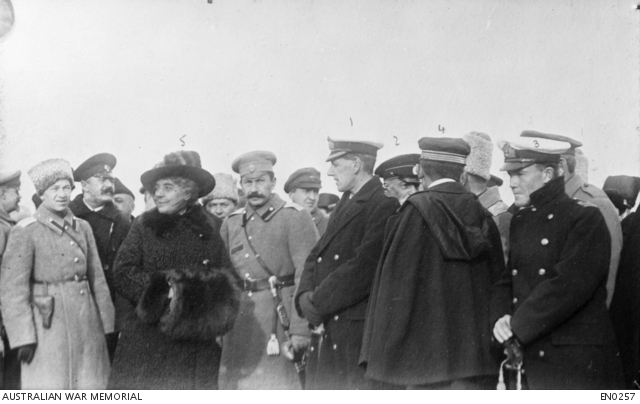
Members of the Allied Mission to Russia alongside the wife of General Pyotr Krasnov, 1918. Bond is in the front row, fourth from the left.
Bond recalled that living on the Swan came with its challenges for himself and the Australian sailors. However, he had nothing but praise for the Australian sailors, writing “the whole spirit of the [Australian] men seemed to be centred on a desire to be at sea in case they might miss anything”. He went on to state that the Australians “never failed to give me loyal support throughout the whole time in which I was in command. They never failed to carry out the best traditions of the great service which they belonged, and I shall always count it as an honour to have commanded the Australian Flotilla in time of war.”

Bond’s extraordinary memoir is available to read in full here: 1DRL/0133. The following collections have been digitised and are available online as part of the Memorial’s Digitisation Project. These collections reflect the varied service of the RAN across Australia’s military and peacekeeping history:
First World War:
Second World War:
- PR03966 - Sprod, Thomas Daniel
- AWM2017.99.1 - Woodgate, George Ireland
Korea:
Vietnam:
- AWM2019.753.11 - Supple, Thomas Francis