Operation Hammersley

After establishing Fire Support Base Isa, soldiers of C Company 8RAR began searching for enemy units in and around the adjacent Long Hai hills. Photo: Peter McCann. P05278.020.
Operation Hammersley began on 10 February 1970 as a routine security operation when C Company, 8RAR, along with a troop of M113A1 Armoured Personnel Carriers (APC) from 3 Cavalry Regiment, a troop of Centurion tanks from 1 Armoured Regiment and a mortar section from 8RAR’s Support Company were deployed to protect 17 Construction Squadron, Royal Australian Engineers at a quarry on the western foothills of the Long Hai hills.

The Long Hai hills looking west towards Vung Tau in the distance. Photo: Donald Gazzard P01980.012
Fire Support Base (FSB) Isa was established near the quarry from where C Company undertook reconnaissance-and-ambush operations. With the known mine danger in the area, the men were ordered to wear their flak jackets and helmets as an added precaution while on operations. They also travelled in the APCs which were buttoned down, to minimise casualties from the mines.

Second Lieutenant (later Captain) Peter Lauder led 9 Platoon, C Company 8RAR, in a successful ambush of a company-sized Viet Cong group in the evening of 15 February. He was later awarded the Military Cross for his courageous leadership. The following day, B and D Companies of 8RAR were committed to the operation. Patrols were sent into the Long Hais to locate enemy survivors of the ambush. P01002.020
The first major contact took place in the evening of 15 February when 9 Platoon, led by Second Lieutenant Peter Lauder ambushed a large force from D445 Battalion. The initial ambush was successful, but the enemy conducted counter-ambush drills. Lauder and his men fought a 45 minute engagement supported by mortar and artillery fire. The enemy withdrew when the Centurion tanks based at FSB Isa arrived and swept the area. Lauder was awarded a Military Cross for his courage and leadership.
The following day, B Company, 8RAR set up ambush positions while C and D Companies searched south east and south west respectively in an attempt to drive the enemy into B Company’s positions.
The men on the ground were ordered to pull back to allow B-52 bombers to conduct a bombing run, known as an Arclight strike, on the Long Hais. It took nearly two days for the bombers to appear, while much of D445 Battalion was able to escape. Photo: Ron West c. 19 Feb 1970 AWM P06021.018
After a brief contact on 18 February, an enemy prisoner was captured. He provided intelligence to O’Neill and accompanied the CO on an aerial reconnaissance of the area, pointing out bunker systems in what was known as the ‘Minh Dam Secret Zone.’
The men on the ground could do nothing but wait for the B-52s. Though this did give them a chance to repair and test equipment, the wait also allowed D445 Battalion to escape from the trap in which they had found themselves. There was great frustration among the Australians that an opportunity to destroy a large enemy unit had been denied them. Photo: Rod Simpson, c. 19–20 February 1970.
C Company, 8RAR, mounted in M113 Armoured Personnel Carriers (APCs & colloquially known as buckets) led the advance on the bunker system. After one APC became hung up on a tree stump, the enemy opened fire from well-concealed bunkers. All the APCs took fire and an armoured mortar carrier to the right of the hung up APC was hit by a blast from a claymore mine which had been mounted in a tree. The shrapnel badly wounded the driver, Trooper Hugh Carlyle and crew commander Lance Corporal Barry Whiston, both of whom collapsed back into their vehicle. Five members of C Company were also wounded. Members of 8RAR and 3 Cavalry Regiment ran to the APC under heavy fire and after forcing the rear door of the vehicle, rescued the 8RAR men. However the two APC crewmen were killed during the recovery of their vehicle when the enemy threw a satchel charge into the APC, which detonated, killing both men instantly and burnt out the APC. An image of the vehicle burning can be found in the Memorial’s collection P01381.028.
During the wait, fire support was provided by Australian and US helicopters, US jets, and naval gunfire from HMAS Vendetta. US and Australian artillery batteries also fired on the Long Hais from the Horseshoe feature near Dat Do. But D445 Battalion escaped after the Australians withdrew. Those on the ground were frustrated that an opportunity to deal with an old foe had been lost. Photo: Tony Blake.
After three unsuccessful attacks against the D445 Battalion bunker positions the Australians withdrew. Airstrikes were called for and after a delay of two days, the use of B-52 bombers was authorised, but the Australians had to withdraw a further 3,000 metres. This gave the enemy, who were vulnerable, time to escape. The men of 8RAR regretted that an opportunity to eliminate an enemy battalion had been allowed to pass. Over the following days 8RAR patrols located many weapons, caches of food, medical equipment and supplies but D445 Battalion was gone.
The B-52s finally arrived in the morning of 21 February. During the bombing, the soldiers of 8RAR and their supporting arms prepared to resume the advance. Photo: Rod Simpson.
A black day in the Long Hais
The Australians were bitterly disappointed that their quarry had escaped, however, the operation still continued. During the morning of 25 February there were three separate mine incidents within two hours in the Long Hais. One APC was destroyed by a contact mine and the two crewmen were injured. Shortly after, 8RAR’s Sergeant Douglas Baker a member of A Company Headquarters was killed and two other men wounded when a mine was detonated. A further incident occurred when a Centurion tank detonated a mine, which wounded a crew member and blew off a track. The explosion also caused an electrical fire inside the tank that burnt out the tank’s fighting and driving compartments.

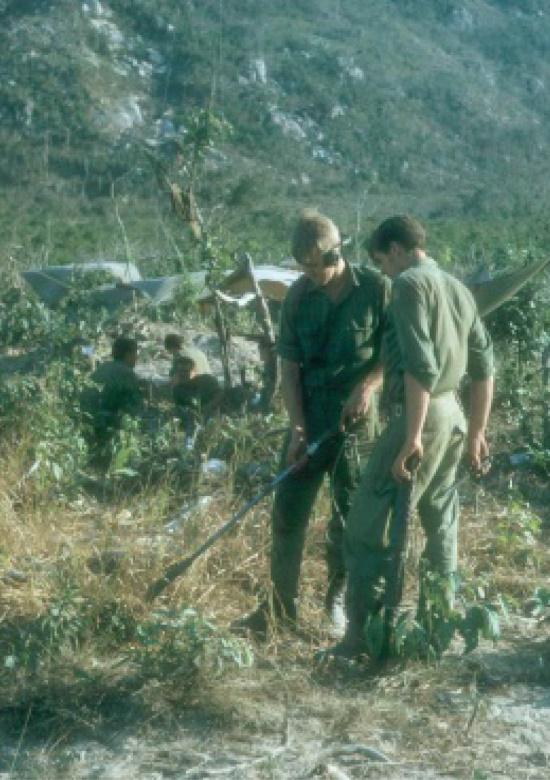
The men carried a variety of weapons and equipment, including flak vests and helmets to minimise wounds if they triggered a mine. They used weapons such as the M72 66 mm rocket launcher, carried by the soldier in the foreground, to destroy enemy bunkers and strong points. EKN/70/0038A/VN
Worse was to come however. During the morning of 28 February, Sergeant Bill Hoban, acting platoon commander of 1 Platoon, A Company moved cautiously into an ambush position that he and his men had been ordered to occupy. With the mine threat still a major threat, two engineers with mine detecting equipment helped the infantrymen into position near a creek line. Once in position, Hoban radioed his company HQ to advise he was in position and to request permission for the engineers to detonate a mine they had discovered.
After the B-52 Arclight strike 8RAR went back into the Long Hais, mounted in APCs and with tank support. Photo: Rod Simpson.
As the platoon had stopped, men removed their flak jackets in the heat. Around 11am, a water collecting party moved down to the creek and a concentration of soldiers occurred around the platoon headquarters. A moment later, one of the engineers triggered an M16 mine. As the men were bunched in a natural hollow, the effects of the blast were concentrated and seven men, including Sergeant Hoban were killed and 13 others were wounded, one of whom died after being evacuated.
Nearing the Long Hais, the soldiers of 8RAR dismounted from the APCs and advanced in artillery formation with the tanks. The continuing threat of mines meant each soldier wore a flak vest and helmet. Photo: Rod Simpson.
Lance Corporal Bob D’Arcy used his bayonet to prod towards the radio whereupon he called in a dustoff. He and two other men then prodded towards the wounded and began to assist them.
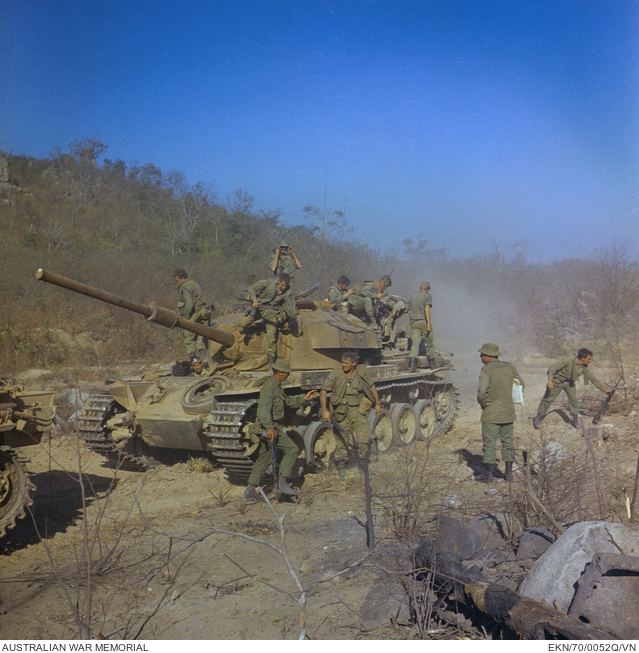
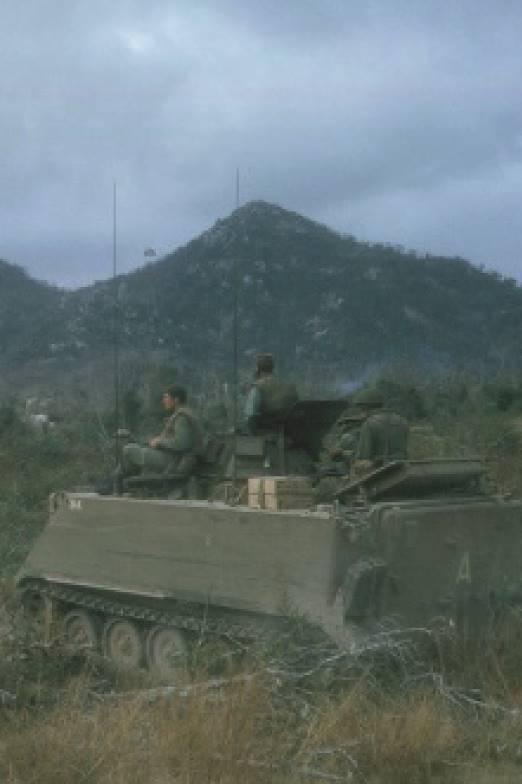
Centurion tanks of 1 Armoured Regiment provided vital fire support was provided throughout Operation Hammersley. The tanks’ main guns were particularly useful in dealing with enemy bunkers. EKN/70/0052Q/VN
Others used a mine detector to clear a path to a landing zone. Disaster struck again when a RAAF Iroquois helicopter was lowering an engineer by winch. Corporal Jim Barrett, directing the helicopter, accidentally stepped outside the cleared area and triggered another mine, which killed him instantly. Three more soldiers were wounded.

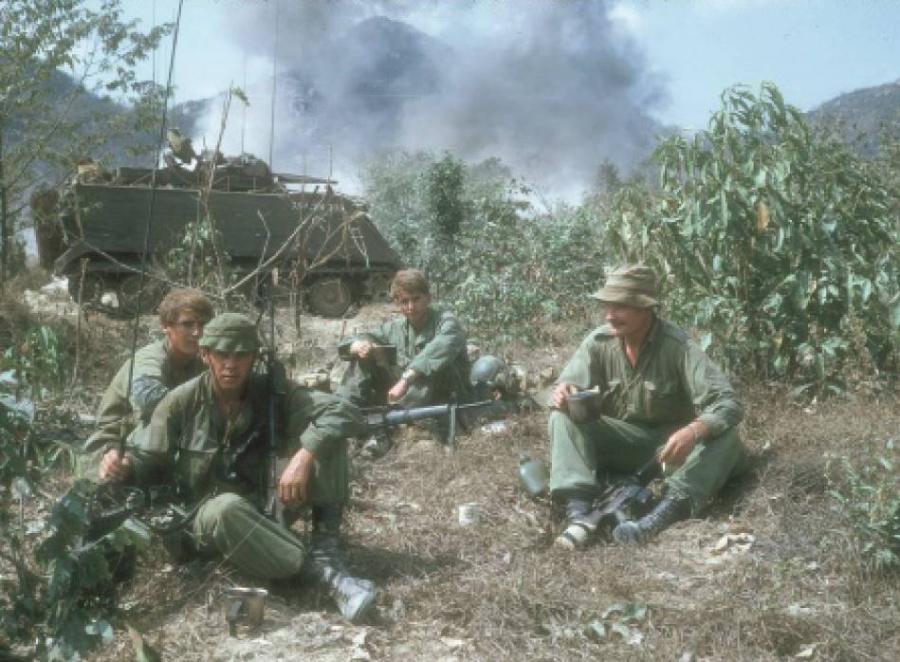
During a break in operations, Private Dick Bligh and Corporal Joe Danyluk of B Company 8RAR take the chance to remove their kit and have a smoke. With the enemy’s whereabouts unknown, their weapons are never out of reach. Photo: Peter Ward. WAR/70/0106/VN
The men of 8RAR were angry and frustrated that there was no enemy nearby to strike back against and what made things worse was that the M16 mines almost certainly came from the Australian-laid barrier minefield.
Major David Rankine, Officer Commanding C Company 8RAR (standing centre), and soldiers of company headquarters take stock after assessing the damage done by the B-52 strike. A large bomb crater is in the foreground. Photo: Rod Simpson.
The Long Hais had still not finished with 8RAR. At around noon on 6 March members of B Company located an abandoned bunker system. During a reconnaissance of the bunkers a booby trap was triggered which wounded seven Australians, two of whom died from their wounds.
When C Company 8RAR took a break, the attached New Zealand artillery forward observer party made a brew. From left to right, Gunners Wayne Radavanovich, Michael “Brutus” Brunton, Rodney Simpson and Lieutenant Angus Rivers surround a liberated tin of condensed milk found in an enemy cache. The milk had come from New Zealand and the Kiwis wasted no time in using it. Photo: Rod Simpson.
Operation Hammersley concluded on 9 March. It had been a costly operation for for the 1st Australian Task Force which suffered 12 men killed or died of wounds and 59 wounded. However, they had inflicted heavy losses on their enemy, with 42 enemy bodies counted with estimates of as many as 100 enemy killed. One prisoner was taken, along with a large amount of weapons, ammunition and other materiel. Operation Hammersley was the last time 1ATF entered the Long Hais in force.
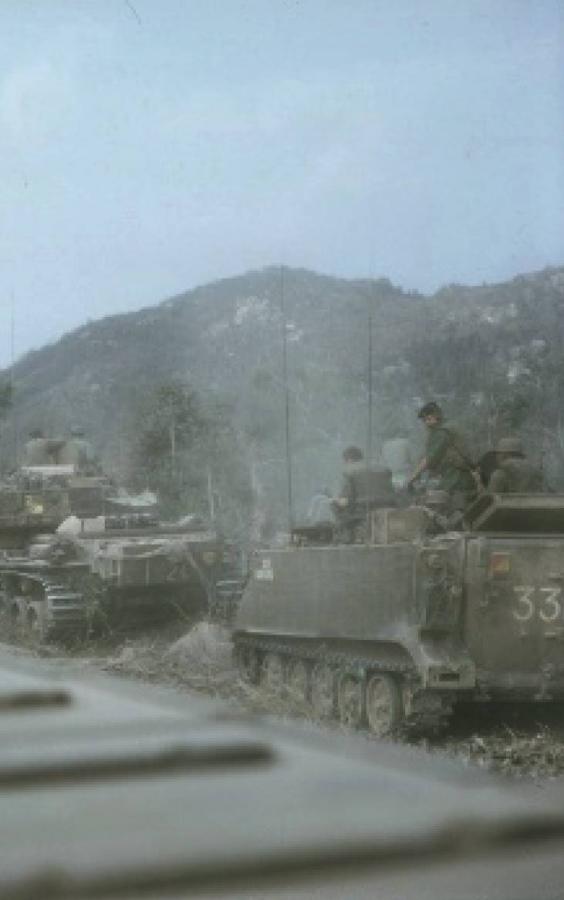
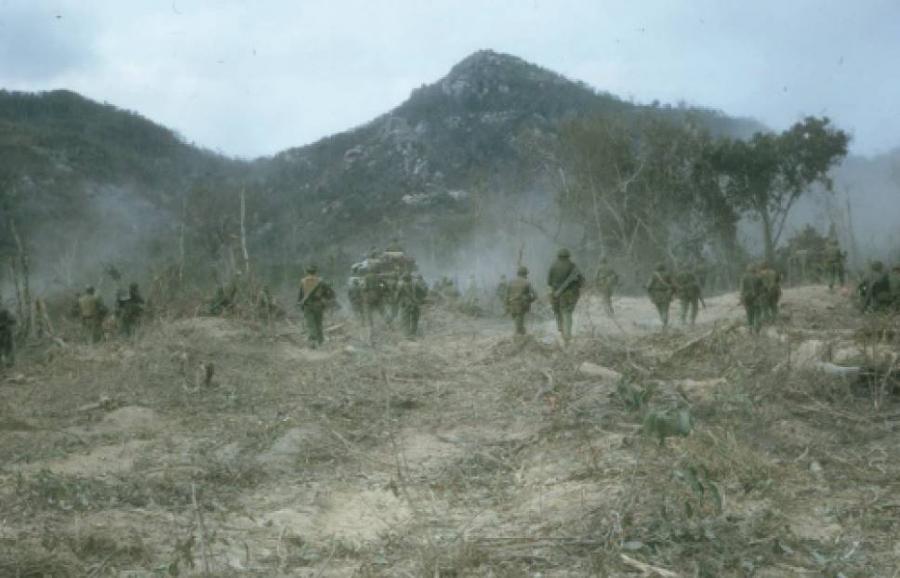
Supported by tanks and APCs, soldiers from 8RAR continue the advance towards the Long Hais. Photo: John Fairley. FAI/70/112/VN

Wearing flak vests and helmets in the tropical heat took a physical toll on the men. Here soldiers from 8RAR pause during the ascent into the Long Hai hills. Though D445 Battalion had escaped, the threat of mines remained all too real. Photo: John Fairley. FAI/70/0114/VN
Operation Hammersley Roll of Honour:
1 Field Troop, Royal Australian Engineers
|
Service No. |
Rank |
Name |
Date of Death |
|
55566 |
Sapper |
R.N. Hubble |
28 February 1970 |
B Squadron, 3 Cavalry Regiment
|
Service No. |
Rank |
Name |
Date of Death |
|
43941 |
Tpr |
H. Carlyle |
18 February 1970 |
|
1202024 |
L/Cpl |
B.J. Whiston |
18 February 1970 |
8th Battalion, Royal Australian Regiment
|
Service No. |
Rank |
Name |
Date of death |
|
43555 |
Sgt |
D.A. Baker |
25 February 1970 |
|
1200097 |
Cpl |
J.J. Barrett |
28 February 1970 |
|
218583 |
Pte |
J. Bressington |
6 March 1970 |
|
15400 |
Sgt |
W.J. Hoban |
28 February 1970 |
|
2783512 |
Cpl |
R.J. Jackson |
28 February 1970 |
|
3795935 |
Pte |
L.J. MacLennan |
28 February 1970 |
|
3795712 |
Pte |
B.J. Munday |
28 February 1970 |
|
39016 |
Pte |
S.J. O’Dal |
6 March 1970 |
|
7154 |
Pte |
T.E.A. Pesonen |
28 February 1970 |
|
3796110 |
Pte |
P.M. Richter |
28 February 1970 |
|
61912 |
Pte |
G.M. West |
28 February 1970 |

Even infantrymen were sent underground – usually the realm of sappers. Private Darrell Hook of C Company 8RAR passes out a Mosin Nagant rifle taken from an enemy weapons cache in a cave system in the Long Hais. Photo: John Fairley. FAI/70/0116/VN

Mines continued to take a toll on Australian soldiers. APC callsign 20 (Two Zero) Alpha was destroyed when it struck a mine in the Long Hais. The driver, Lance Corporal John Graham, suffered severe burns to his upper body and arms. Sergeant David Baker of 8RAR was killed in a separate mine incident on the same day. Photo: Walter Turner. P11969.001

28 February 1970 became known as the Black Day in the Long Hais. Corporal Jim Barrett (left) was killed by a mine when he inadvertently stepped outside a cleared zone while waving in a helicopter. Two other mine incidents claimed the lives of an engineer from 1 Field Squadron and 8 men from 8RAR, with a further 16 men wounded. The heavy casualties brought about the cancellation of offensive operations. P07427.001

Men from 8RAR examine part of the large cache of weapons and ammunition captured during Operation Hammersley. Photo John Fairley, FAI/70/0123/VN

When Operation Hammersley ended on 3 March 1970, most of the Australian units involved returned briefly to Nui Dat. Here men from A Squadron, 1 Armoured Regiment, prepare to leave the Long Hais. The man waving is believed to be Lieutenant John Brennan, who led 2 Troop throughout the operation. P04409.002