Final stage of the evacuation from Anzac Cove: narrative from battalion war diaries
Part 3 in a series of three blog posts about the evacuation from Gallipoli
The evacuation of Gallipoli began on 22 November 1915, when a plan was adopted during a conference at General Headquarters, Mudros. This was after Lord Kitchener's visit to Gallipoli in early November, during which he told General Birdwood to start thinking about how to evacuate, and before the recommendation was approved by British Parliament. Charles Bean, the official Australian historian of the First World War, wrote that this was the reason behind the evacuation plan being divided into three stages.
The evacuation from Anzac Cove and Suvla Bay occurred simultaneously, with the final evacuation of Helles coming later, on 9 January 1916. The operation from Anzac Cove, beginning on 22 November and ending on 20 December, consisted of the preliminary, intermediary, and final stages. To mark the centenary of the evacuation from Anzac Cove, a narrative blog post will be released to coincide with the dates that each of these stages commenced in 1915.
The idea was that the preliminary stage (sixteen days) could begin immediately, regardless of the decision made by the British Parliament, and would involve reducing the number of men required to defend positions during winter. In the official history Bean described the intermediary stage (ten days) as one where "the force and material would be reduced until there remained only a bare sufficiency to enable the positions to be held for a week against attack". During the final stage all remaining men were to be withdrawn over a period of two days. The following table, taken from the second volume of the Official history of Australia in the war of 1914–1918, provides an overview of the numbers of men, guns, and animals that needed to leave Anzac during each stage of the evacuation.
|
Force before evacuation commenced |
41,218 men |
2,368 animals |
105 guns |
|
End of the preliminary stage |
35,786 men |
||
|
End of the intermediate stage |
26,195 men |
500 animals |
40 guns |
The final stage of the evacuation
The intermediate stage of the evacuation ended during the early morning of 18 December 1915. Over the preceding 10 days, approximately 15, 168 men had been withdrawn from Anzac Cove.
Bean recounts that the final stage of the evacuation from Anzac Cove began at daybreak on 18 December 1915. Extending over two days and into the early hours of 20 December 1915, the operation required the evacuation of some 20, 200 troops. Only 10, 000 of these men were to be remaining at Anzac Cove when the second day of the operation began on 19 December 1915. A map showing the locations of each unit and the route that was to be followed to reach the beaches for re-embarkation is shown below.
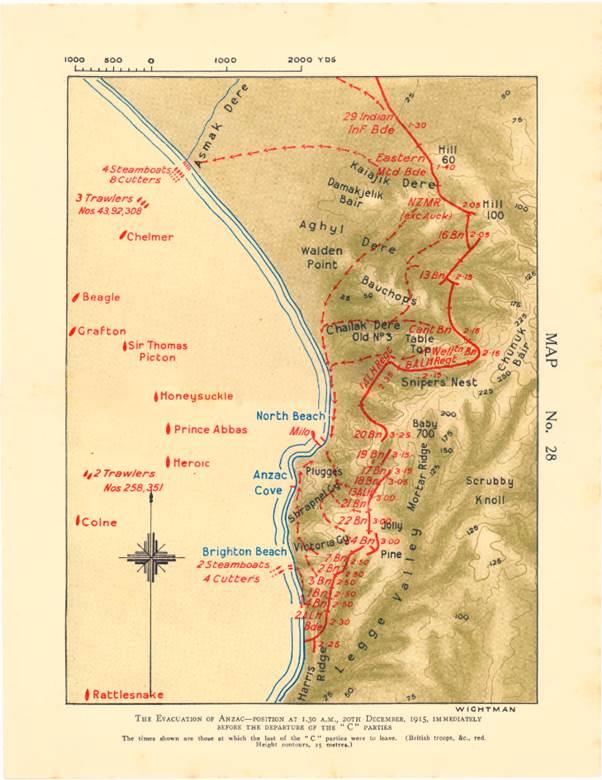
The evacuation of Anzac – position at 1.30am, 20th December 1915, immediately before the departure of the “C” parties
The preparations for the departure had been carefully planned down to the finest details. Embarkation points were set up at Watson's Pier at Anzac Cove and Walker's, Williams, and Milo's piers at North Beach. The remaining units were to be divided into A, B, and C parties where the C party would be the last to leave. The composition and responsibilities of these parties, as detailed for the 2nd Battalion, is given below:
C Class was to be absolutely the best men as regard steadiness, discipline & shooting.
B class will be next best 15 and A class will be the least active members of the 45.
Each leader must know his men personally and he must have a nominal roll of them and the men of each party must know one another and to which party they belong.
The operation was not without some trepidation as to how successful it would be. General Birdwood, entrusted with completing the task, wrote to his wife on 18 December:
We may have an awful time of it – as bad as any army has ever had, for we shall be carrying out one of the most difficult operations in warfare…But I am confident that things will go well. Providence has helped us so far & I have every trust that we shall be helped to the end.
In this same letter, Birdwood reflected on the time that he had spent at Anzac:
Tomorrow I go to Anzac for a final look round at the position & trenches of which I have been so proud & for which I have so much lived during all these last months. I really feel like abandoning a child in leaving here, it makes me nearly cry!
But Birdwood was only one of many pondering the coming evacuation.
The narrative below tells the story of the final stage of the evacuation of Australian troops from Anzac Cove between 18 December and 20 December 1915, based on reports contained within official unit war diaries kept by the Australian battalions that were there:
- 2nd Battalion
- 3rd Battalion
- 4th Battalion
- 7th Battalion
- 13th Battalion
- 17th Battalion
- 18th Battalion
- 19th Battalion
- 20th Battalion
- 21st Battalion
- 22nd Battalion
- 24th Battalion
Interspersed among the official reports are personal stories taken from a selection of diaries digitised as part of the Anzac Connections project, including:
- Sergeant Richard Gardiner
- Major Geoffrey McCrae
- Captain Clarence Wallach
- Second Lieutenant Cyril Pryor
- Craftsman Apcar De Vine
- Corporal Vivian Noble
- Corporal Henry Wyatt
- Lieutenant John Adams
- Sergeant Wilbert Berg
Where possible, names of people mentioned in the diaries have been identified and links provided to their profiles on the Australian War Memorial website. The war diaries for the units mentioned above have also been completely transcribed in the course of compiling this blog post and can be read here.
Note: Not all battalions kept a unit war diary during December 1915, nor did all battalions record daily entries. The 1st and 16th Battalions did not keep diaries, although men from these battalions were among the last to leave.
Daily narrative taken from unit war diaries and personal accounts – December 1915
The first day: 18/19 December 1915
A couple of hours before the final stage of the evacuation officially began, there were reports of a fire on the beach at 12.25am on 18 December. Division Headquarters sent a message to the 21st Battalion requesting assistance to help extinguish the blaze that had engulfed surplus stores. Three companies from the 21st Battalion were despatched to respond.
At 6.30am, the men selected to form the 2nd Battalion's C Party for the final night returned from a rehearsal of the march from Shell Green to the beach, wearing muffled boots. At the time, it was reported that a heavy fog covered everything. Even though the sun was shining later, the fog remained in the valleys.
During the morning, the garrison at Lone Pine was completely taken over by the 24th Battalion so that the parties of men from the 21st and 23rd Battalions, who had been assisting them, could carry out evacuation orders. A Company, 21st Battalion, had re-joined the rest of the battalion in Shrapnel Gully at 6pm the evening before. At 10.45am, the 21st Battalion took over the lines held by 13th Light Horse. Early in the afternoon the 21st Battalion also took over the lines held by the 22nd Battalion. This included Wire Gully.
Most battalions reported activities during the day to be normal. Artillery fire was reported to be quiet behind Australian lines, sniping continued as normal, and Turkish soldiers were observed digging in the vicinity of Boomerang Trench. Heavy shelling was reported at Russell's Top where the 20th Battalion were located. Preparations for the evacuation were also underway, with a focus on cleaning up trenches and reducing stores by means of destruction, burial, or packing to send away or return to the QM.
Sometime during the day an order direct from the Army Corps Commander was read to the men. The order can be read in full here [insert link]. This excerpt illustrates the context of the events that were about to begin:
In case by any chance we are attacked on either day, the Army Corps Commander is confident that the men who have to their credit such deeds as the original landing at Anzac, the repulse of the big Turkish attack on May 18th, the capture of Lone Pine, the Apex, and Hill 60, will hold their ground with the same valour and steadfastness as heretofore, however small in numbers they may be, and he wishes all men to understand that it is impossible for the Turk to know or tell what our numbers are, even up to the last portion of "C" party on the last night, as long as we stand our ground.
At 11.30am, the 7th Battalion received the 1st Infantry Brigade Order No 5, which detailed the plans for the evacuation:
The principle upon which withdrawal will be effected will be a gradual reduction from our present fire trenches. The times of withdrawal being determined by the times at which troops will be required to embark, and the distance from the place of embarkation.
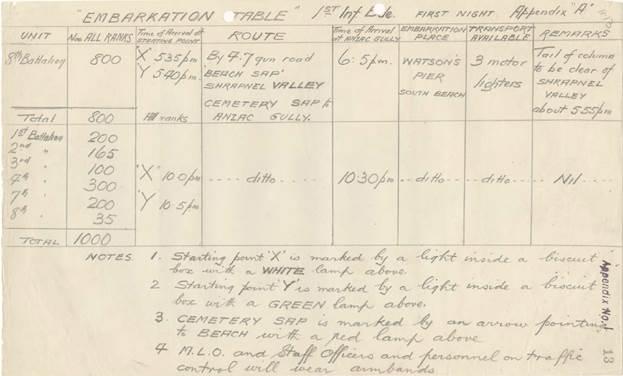
This order detailed that 800 men of all ranks from the 1st Infantry Brigade were to re-embark during the night of 18/19 December 1915. During the final two days time was to be set by the 1st Brigade Signal Section at 8am, 4pm and other intervals during the night. The procedures for the disposal of equipment and stores during the first day and night were also described in detail:

7th Battalion war diary, December 1915
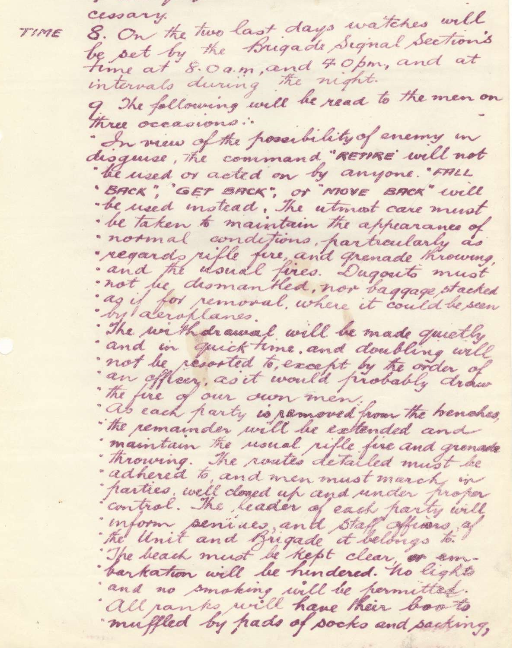
At 12pm, the 2nd Battalion received the final arrangements for the evacuation at a conference attended by commanding officers and the Brigadier. Procedures were to be read to the men on three separate occasions and included the following points:
- Changes to the commands that were normally used
- The necessity to maintain normal appearances with no lights and no smoking
- The beach to be kept clean so as not to hamper re-embarkation
- The wearing of muffled boots, adhering to set routes and quiet during the withdrawal
- Completing loading and offloading of lighters quickly
7th Battalion war diary, December 1915
Three hours later, further instructions for the following day were issued to company commanders of the 2nd Battalion. Some of these were identical to orders previously issued in regards to tasks and activities that had to be completed before the final departure of troops. Others were very specific and pointed in their detail, with some that appear unique to the 2nd Battalion:
5. All cooking pots will be destroyed by having holes punched in them with a pick or trenching tool near QM store at 1800 with the exception of 4 per company to be used for OXO for “B” party at 2100 and for “C” party at 2400. Company commanders will be responsible that the OXO is prepared for these parties and that these cooking pots are destroyed after the OXO has been served..
11. Lines must be left absolutely clean. Some men unfortunately are not instinctively sanitary in their habits and care must be taken to see that they do not leave lines filthy or otherwise than clean…
12. During the day men will run about normally and on approach of an aircraft they will expire themselves to view and NOT hide out of sight.
During the afternoon, the first men began to leave the trenches in accordance with the planned timetables and routes.. This followed confirmation at 4.30pm by the 3rd Battalion, that the evacuation of Anzac would begin that night and be completed during the following night. Wallach also commented that it was on this day that he was informed officially of the evacuation. In total, 1000 men from the 1st Brigade left on the night of 18/19 December 1915 with the details shown in this table taken from the 7th Battalion war diary.
7th Battalion war diary, December 1915
The table below provides a timeline of activities and the units involved from 4.30pm, 18 December 1915, through to the early hours of 19 December 1915.
|
Time/Date |
Activity & Unit |
|---|---|
|
4.30pm, 18 December 1915 |
300 men from the 4th Battalion left the trenches at Poppy Valley and moved to the Reserve Camp under the command of Captain Frederick Fanning. |
|
5pm, 18 December 1915 |
Adams reported that the last blanket and waterproof sheet belonging to the men leaving on the second night were collected. |
|
5.15pm, 18 December 1915 |
Six officers and 166 other ranks from the 2nd Battalion departed Shell Green under the command of Major Arthur Stevens. Remaining baggage was taken away with this party of men. They also took machine gun number 21 with them. |
|
5.20pm, 18 December 1915 |
Ten officers and 345 other ranks from the 17th Battalion left Quinn's Post under the command of Major Edward Martin. |
|
5.30pm, 18 December 1915 |
A party of 159 men from the 18th Battalion left Courtney's Post with Captain William Hinton, and Second Lieutenants Thomas Picot, Samuel Beddie, Harold Congdon, Frederick Ranson, and Berrol Mendelsohn. These men took with them all of their own equipment as well as a blanket that belonged to each of the men that would be leaving the following night. Wallach reported that 463 men from the 19th Battalion, “with their feet padded, slipped away down the Gully to the beach and moved off.” Heavy howitzer shells were fired at the sector held by the 2nd Battalion with Adams going on to report that “things point to us leaving to-night”. |
|
5.35pm, 18 December 1915 |
800 men from the 8th Battalion left the starting point, referred to as “Point X”, and a further 35 men left the same location later at 10pm. |
|
5.40pm, 18 December 1915 |
250 men from the 20th Battalion left Russell's Top under the command of Captain Arthur Ferguson. |
|
6pm, 18 December 1915 |
A captured Turkish machine gun and its six man crew left the 3rd Battalion lines at Shell Green. |
|
6.30pm, 18 December 1915 |
Under the command of Captain William Craig, 22nd Battalion, a party of 171 men left the support trenches. This group arrived at the “Rendezvous Point” at 6.50pm. Three officers and 137 Other Ranks, 24th Battalion, left Lone Pine under the command of Captain Thomas Godfrey and Lieutenants George Harriott and William Ellwood. This group reached the Rendezvous point at 7pm and arrived at Watson's Pier at 8pm. |
|
8pm, 18 December 1915 |
Adams reported that 28 men from the 2nd Battalion left the firing line under the command of Lieutenant Downing and Sergeant Peisley. |
|
8.40pm, 18 December 1915 |
Three Other Ranks from A Company, 13th Battalion, formed up with the first party of the 14th Battalion to re-embark. |
|
9pm, 18 December 1915 |
14th Battalion (with three men from the 13th Battalion), passed the starting point at the junction of Chalac Dere and Hotchkiss Valley. |
|
9.30pm, 18 December 1915 |
A party from the 3rd Battalion composed of three officers, 82 other ranks and machine gun number 10 left Shell Green. 300 men from the 4th Battalion left the Reserve Camp and moved towards Watson's Pier on South Beach under the command of Captain Frederick Fanning. They were accompanied by machine gun number 6.
13th Battalion observed a Turkish working party, silhouetted against the skyline.
Four officers and 199 Other Ranks from the 7th Battalion left the firing line under the command of Major Herbert Layh. |
|
10pm, 18 December 1915 |
14th Battalion moved towards Williams Pier for re-embarkation. Wyatt reported that the party from the 2nd Battalion had “got on the barge. We were taken round to Suvla Bay to get on the boat. We are going to Lemnos”. He also mentioned that by the time he reached the beach, he was staggering as a result of the number of items that he had to carry. |
|
10.30pm, 18 December 1915 |
The embarkation table indicated that men from the 1st, 2nd, 3rd, 4th, 7th, and 8th Battalions who were re-embarking were scheduled to have arrived at Anzac Gully before moving towards Watson's Pier, South Beach. |
|
2am – 2.15am, 19 December 1915 |
A silent ruse failed to attract the attention of the enemy, with no exchanges of rifle fire by either side during this time. |
|
2.30am, 19 December 1915 |
A party of three officers (Lieutenant John Fletcher, Lieutenant Anderson, and Lieutenant Timothy Ahern) and 118 Other Ranks from the 24th Battalion left Lone Pine and arrived at Watson's Pier at 4am. A party of six officers and 246 Other Ranks from the 22nd Battalion left the support trenches under the command of Major Murdoch Mackay. This group arrived at the “Rendezvous Point” at 2.50am. |
Three officers and 124 Other Ranks under the command of Lieutenant Hugh Pulling, 13th Battalion, also left Durrant's Post during the night. Pryor reported in his diary:
Beach almost deserted. Nearly all units away safely. So far every thing successful.
It was reported by De Vine that stores had been thrown open to the men, who were permitted to take what they liked. Adams reported that as a consequence, jam and Machonachie rations were available “by the ton” with the result that “most of us are sick, owing to being on short rations so long”.
Wallach reported that the 5th Brigade had the honour of being the last to leave and that after the departure of men on the first night, the remaining men had to “hold our post [Pope's Post] with 100 men.”
Over the course of the day, six men were sent to hospital. three men were wounded and two men had been killed. Reported strength for the 22nd Battalion was given as ten officers and 406 Other Ranks. At 6.30am, the 7th Battalion reported their strength to be 24 officers and 607 Other Ranks.
The Second Day: 19/20 December 1915
The second day of the final stage of the evacuation dawned fine but cold, according to the 2nd Battalion. It was reported that the Turkish forces did not appear to have realised that there was an evacuation scheme underway. During the night, both sides had placed barbed wire in front of their trenches. Sniping was also kept up by both sides.
At Russell's Top, heavy shelling was experienced throughout the day. An enemy aeroplane was observed circling overhead and fired a machine gun at a party of men on Walker's Ridge. There were no casualties reported. Shelling also occurred at Lone Pine at intervals during the day and it was believed that the parties of men ordered to stand and move about on Gun Road, in full view of Gaba Tepe, may have attracted this attention.
Lieutenant Colonel Harold “Pompey” Elliott was sent to hospital in the morning, suffering from a sprained ankle, and Major Alfred Jackson took over command of the 7th Battalion. During the afternoon, men from the 18th Battalion left Courtney's Post in groups of two or three to form a garrison at Plugge's Plateau. General Birdwood visited the 3rd Battalion at Shell Green at 1pm to inspect the trenches.
Preparations continued for the final evacuation of Anzac Cove. The 22nd Battalion reported dumping 70,000 rounds of ammunition and 1400 grenades. Likewise, the 7th Battalion reported parties of men were employed during the day to bury 20,000 rounds of ammunition and 3,000 grenades. Blankets were torn up to carpet the trenches in order to deaden the sound of marching men. Pieces were also wrapped around boots to soften the sounds of footfalls during the marches to the beach that commenced at dusk. Cooking fires were kept burning, surplus stores were destroyed, and equipment rendered useless.
Captain Bernard Duggan, a member of the rear-guard party for the 21st Battalion, gave a detailed account of the afternoon's activities that was appended to the war diary. He reported that on “taking over the show” he organised a timetable of when each party was to relieve the departing party. Regarding the destruction of equipment and establishment of ruses for the Turkish forces, he explains:
During the afternoon I got 6 rifles removed and destroyed the back pegs and dial sights, safety catches and magazines and threw them away. Then I fixed the rifles on the parapet of certain rest posts and with a piece of string, a fuse and a weight adjusted these so that they would each fire one round after we left.
The 13th Battalion reported setting up rifles in such a way that lighting a candle would cause them to fire five, ten, or fifteen minutes later. Wallach was also employed to set up self-firing rifles, as well as mining tunnels with barbed wire, and describes these processes in detail:
A very busy day for me...wiring up the tunnels with barbed wire with bombs attached, so that if they touched the wires, up they would go, a fairly risky job that you did not touch the wires yourself, also fixing rifles to fire at intervals up to six minutes after the last party had left, an ingenious invention, a fuse burning a string through with a brick attached to the end of it, which when the fuse burnt down through it would drop and so jerk the trigger.
The intention was always to continue activities that would encourage the Turkish troops to believe that everything was normal. Adams, 2nd Battalion, writes:
During the day men were detailed to walk along tracks that came under the Turks observation, the same men walked to & fro smoking cigarettes, some carried empty boxes & dumped them out of sight; mules were equipped carrying empty boxes etc.
Opportunities for the men to take what they wished from surplus stores continued during the afternoon and many took advantage, filling their packs with as much of these delicacies as they could, as explained by Adams:
To our surprise we found Butter, Strawberry jam & other delicacies things we never saw before on the Peninsula. We had the feed of our life & most of us became sick after such luxuries. Later the dump was burnt. It was awful to see these stores being destroyed & us being on ½ rations for so long. Most of us have packed our Kit with delicacies as we leave tonight
Orders received by the 2nd Battalion at 3pm on 18 December, provide details the procedures to be followed during the march from the trenches down to the beach and the embarkation points. Across the board, X point was marked by a white light, Y by a green light, and Cemetery Sap was marked by a red light. The first parties, A, B1, and B2, were to depart at five minute intervals and men were ordered to keep close together during the subsequent march. Officers and men in these parties would carry two grenades each. Those men making up the C1, C2, and C3 parties would carry three grenades each, generally to be cricket ball grenades. The packs of the C parties were to be carried by those in the A and B parties.
A Party
The A parties of each battalion began preparations to depart the trenches at 3pm, with departures of these groups of men continuing through to approximately 7pm.
One of these men was Gardiner, who described the march to the beach afterwards:
we left, with our feet padded, our bayonets wrapped up & not making a sound we sneaked away down the saps to the beach just after dark, with a bomb in each pocket, which we threw into the sea on embarking.
At 6 o'clock when we left we got straight onto barges & embarked on the SS Abbassia & there put in a very chilly night sleeping on the deck.
In the words of Wallach, after the departure of these parties “things became very strenuous from this on, only a few men in the firing line and all have been on duty for the past 24 hours”.
Others continued with the destruction and burial of stores as detailed by Duggan, 21st Battalion:
At about 8pm, all ammunition more than I judged the remaining men could use in repelling an attack and also all the jam tins and ordinary fused grenades were dumped in the latrines. Captain Crowther had charge of this part of the show and did exceptionally good work. We were only supposed to have taken over between 60 and 70 thousand rounds of SAA but found there were over 120,000 when we had to dump it.
A timeline of the activities and departures of the A parties is shown below.
|
Time/Date |
Unit/Activity |
|---|---|
|
3pm, 19 December 1915 |
A Party, 21st Battalion, was relieved in the trenches by B1 Party and formed up in one of the rear saps in preparation for moving off at 5pm. B2 Party started a systematic destruction of items that would be of use to the enemy. Blankets were torn up, excess bully beef was buried, sandbags were ripped, and the catapault was burnt. |
|
5pm, 19 December 1915 |
A party consisting of one machine gun, ten officers and 238 Other Ranks from the 3rd Battalion left Shell Green and arrived at Anzac Gully at 6pm. By 7pm, this party had boarded HMT Abbassieh. Men from the B Parties, 2nd Battalion, moved into the firing lines to relieve the A Party men. A Party moved out of the firing line and marched to the beach. |
|
5.15pm, 19 December 1915 |
A party consisting of 150 men from the 4th Battalion left the trenches at Poppy Valley under the command of Lieutenant Gould and headed to Watson's Pier for embarkation. A party of 83 men from the 2nd Battalion moved off from Shell Green. Feet were muffled and some of these men carried the packs of men who had been selected for the C Party, as well as stretchers and grenades. A Party, 13th Battalion, left Durrant’s Post under command of Lieutenant Francis Barton. Party consisted of three officers and 169 Other Ranks. A Party, 17th Battalion left Quinn's Post under the command of Major L Griffiths. This party consisted of five officers and 126 Other Ranks. |
|
5.15pm – 5.45pm, 19 December 1915 |
Small parties of men left at five minute intervals under the command of Major Arthur Hart. A total of six officers and 224 Other Ranks made up these parties from the 7th Battalion. The last party left at 1745. |
|
5.20pm, 19 December 1915 |
A Party, 18th Battalion, left Courtney's Post. This party consisted of 174 men including Major Michael Fitzgerald, Captain Francis Coen, Second Lieutenant Albert Bolton Wood, Second Lieutenant Bruce Monie, Second Lieutenant Wilfred Appleby and Lieutenant Arthur Witham. |
|
5.30pm, 19 December 1915 |
A party, 17th Battalion, consisting of five officers and 126 Other Ranks left Quinn's Post under the command of Major L Griffiths. A party of six officers and 240 Other Ranks from the 2nd Battalion left Gun Road under the command of Major A F Ross. Lieutenant Colonel Herring left Durrant’s Post to take over command of C Party, 4th Brigade, at Brigade Headquarters. He handed over command to Captain Edward Twynam of the 13th Battalion. A party of about fifty men from the 19th Battalion departed Pope's Post, leaving about fifty men remaining. |
|
5.40pm, 19 December 1915 |
A party of men from the 20th Battalion left Russell's Top under the command of Captain G H Howard and embarked on lighters at 6pm before boarding HMS Mars. |
|
6.00pm, 19 December 1915 |
Major Arthur Hart, 7th Battalion, left the trenches with a party of 200 men. 200 remained behind. |
|
7.00pm, 19 December 1915 |
First party of 21st Battalion, three officers and 147 Other Ranks under command of Captain Nelson Wellington, moved off to the “Rendezvous Point” and then to the beach to embark. The first party of 3rd Battalion had boarded HMT Abbassieh. |
B Party
The B parties of each battalion, B1 and B2 as they were generally known, began to prepare to leave the trenches from 8.45pm. The departures of these men continued until about midnight. For the 3rd Battalion, this left five officers, 61 Other Ranks and a machine gun in the trenches they held at Shell Green. It was reported that the enemy was very quiet but the men who remained kept up a vigorous sniping.
As had occurred with the departure of the A Party, the remaining members of the 21st Battalion continued with the reduction of grenades and ammunition. Captain Henry Crowther and Sergeant Hardwick, together with other members of the C2 and C3 parties, reduced the total amount of ammunition to 2,000 rounds, by dumping the surplus ammunition into latrines and filling them in.
Amongst the orders and instructions handed down by the 2nd Battalion was one concerning the packs belonging to the men of C Party, which were left with the men of A and B Parties: “Men to whom packs are handed are responsible for them until owners claim them, and must take every care of them.” Adams definitely followed this order; after they had successfully made it aboard Elkahwa, he discovered that one of the men in his party had dropped a pack. Adams boarded a lighter returning to Anzac Cove and went in search of the missing pack at Brighton Beach. Having successfully located it, he re-boarded the Elkahwa at midnight.
Wallach had described the period after the departure of A Party as strenuous, but the leave-taking of B2 Party at 11.30pm was even more so:
…then the nerve racking part started! If Abdul came now it was good-night, only 30 of us left on the Post. During the afternoon our OC called we thirty to-gether and asked us if anyone wanted to pull out, he would not think anything the less of him, but not one dropped out. He told us that if anything went wrong, we just had to hang on and fight it out to the last man, we were the men to be sacrificed if anything went wrong
Wallach goes on to report that four men remained in a trench that had previously been manned by an entire company when they received a report of 100 Turkish soldiers coming down Malone Gully. Much later, they learnt that the enemy party had stopped halfway down Malone Gully and started digging in but in the meantime, the whereabouts of the group continued to trouble them.
A timeline of the activities and departures of the B Parties is shown below.
|
Time/Date |
Unit/Activity |
|---|---|
|
8.45pm 19 December 1915 |
B2 Party relieved B1 Party. B1 Party, with their boots wrapped up in blankets, marched into their packs which were placed in the rear trenches in several sections and marched off about 9.30pm. |
|
9.15pm, 19 December 1915 |
B Party, 13th Battalion, consisting of three officers and 97 Other Ranks, left Durrant’s Post. Party was commanded by Captain Douglas Marks and followed by the attached New Zealand Medical Corps. |
|
9.30pm, 19 December 1915 |
B1 Party, consisting of three officers and 200 Other Ranks including Captains Frawley, Kerr, and Marchant, left Lone Pine. They arrived at the “Rendezvous Point” at 10pm and then Watson’s Pier at 11pm.
C2 and C3 Parties, 21st Battalion, went into the line to relieve B2 Party.
B Parties, 2nd Battalion, were relieved by C Party men. Lieutenant Herbert Youden, Adams and six others moved off to the beach, boarded a lighter and then Elkahwa. |
|
9.35pm, 19 December 1915 |
A party of 47 men from the 4th Battalion left the trenches at Poppy Valley under the command of Lieutenant Cecil Judge and headed to Watson's Pier for embarkation. B1 Party, 22nd Battalion, were withdrawn from the firing line and left for the “Rendezvous Point” under Major Henry Conway with six officers and 146 Other Ranks. |
|
9.35-10.05pm, 19 December 1915 |
A party of four officers and 50 Other Ranks from the 7th Battalion left in small parties at five minute intervals. The last party left at 10.05pm. These parties were under the command of Major Geoffrey McCrae. |
|
9.40pm, 19 December 1915 |
A party of seven officers, 49 Other Ranks and one machine gun from the 3rd Battalion left their position at Shell Green and boarded motor lighters forty minutes later. A party of five officers and 41 Other Ranks under the command of Second Lieutenant Bowden left the 2nd Battalion position at Shell Green. |
|
10.15pm, 19 December 1915 |
McCrae and 112 other men left the trenches and boarded Alcaperich by 11.15pm. |
|
11.20pm, 19 December 1915 |
B2 Party, 21st Battalion, marched off to pick up their packs near Wire Gully. This party left at 11.40pm. |
|
11.30pm, 19 December 1915 |
B2 Party, 24th Battalion, composed of eight officers and 186 Other Ranks including Major Frederick Parkes, and Lieutenants Ackroyd, Vincent Hyndes, Roy Jones, Drummond, and John Clark, left Lone Pine. The party arrived at the “Rendezvous Point” at 12am and Watson’s Pier at 1am. B2 party, 19th Battalion, consisting of twenty men left Pope's Post. Only thirty men remained at this location. |
|
11.45pm, 19 December 1915 |
B2 party, 17th Battalion, consisting of one officer and eight Other Ranks left Quinn's Post under the command of Second Lieutenant Keith Mackenzie. B2 Party, 22nd Battalion, were withdrawn from the firing line and left for the “Rendezvous Point” under Captain Robert Andrew. This party consisted of six officers and 112 Other Ranks. |
|
11.50pm, 19 December 1915 |
B2 Party, 18th Battalion, left Courtney’s Post, composed of 140 men including Captain Harold Roberts, Second Lieutenants Francis Cheadle, George Lowther, Alfred Paine and Brewster. Major George Murphy and Captain Herbert Bruce also left for Plugge’s Plateau with this party. |
|
12am, 20 December 1915 |
A party of men from the 20th Battalion, under Lieutenant Francis, left Russell's Top and embarked at 1am on 20 December 1915. |
|
About 12am, 20 December 1915 |
Lieutenant Colonel MacNaghten left for hospital with Lieutenant Woolf. Sergeant Robinson and Private Edwards also left Poppy Valley around this time and took a machine gun with them. |
C Party
The C Parties of each battalion, C1, C2, and C3 as they were generally known, began to leave the trenches from 1.55am with departures continuing until about 3.31am. For the 18th Battalion, the composition of these C Parties was as follows:
- C1 Party consisted of Major Sydney Goodsell, Captain Plant, Second Lieutenant Harry Gribben, Second Lieutenant Doyle and Second Lieutenant Fawcett with a party totalling sixteen in number.
- C2 Party consisted of Second Lieutenant Charles Walklate and all machine gunners. The party totalled seventeen in all.
- C3 Party consisted of seventeen men including Captain Rupert Sadler, Lieutenant Ronald McNiven, and Second Lieutenant Robert Reid.
The 18th Battalion also sent a party of fifty men together with Major George Murphy, Captain Errol Kirke, Captain Herbert Bruce, and Lieutenant John Lane to Plugges Plateau. This party was “told off” for helping with covering the retirement of the remaining men.
Duggan reported on the final actions that he undertook with the self-firing rifles before leaving the trenches with the 21st Battalion:
The fuse supplied by the Engineers burnt too quickly so I fastened a piece of old web equipment to act as a fuse. At about 0215 I loaded three rifles and noticed that there was an extra heavy dew and the bits of web equipment were very damp and on trying them I found that they were very difficult to light and when lit would smoulder out, I therefore got some cords of Manilla rope which I tried and found very good. I put pieces of this latter on the rifles and got each man of my party to light the one nearest him at 2040. On leaving I tried one of the rifles by pulling on the weight and found it worked very satisfactorily. We, the C3 Party left at 0245 it taking five minutes to light the fuses and assembly at the old HQ 21 Batt where our packs were stack, the rifles would go off at odd times from 20 minutes to an hour after we left.
Of the final march to the beach, Wallach writes:
…we had to carry our packs and rifles and ammunition as well as two machine guns and parts and 2000 rounds for the guns, which necessitated our resting six times on the way to the beach, a distance of nearly two miles.
A timeline of the activities and departures of the C parties is shown below.
|
Time/Date |
Unit/Activity |
|---|---|
|
1.55am, 20 December 1915 |
C1 Party, 13th Battalion, consisting of 38 men and three machine guns, left Durrant's Post, under the command of Second Lieutenant Henry Murray. |
|
2am, 20 December 1915 |
Telephone communication with the 4th Battalion at Poppy Valley was disconnected. Major Allan Scott, Lieutenant Rupert Matthews, Signaller Campe, Sergeant Allen, Private Gilbert Hill and Private George Plowes, all of the 4th Battalion, left the trenches and embarked at North Beach. C1 Party, 17th Battalion, consisting of three officers and nine Other Ranks left Quinn's Post under the command of Second Lieutenant William Millard. C Party, 2nd Battalion, commenced leaving Shell Green in small groups at ten minute intervals until 2.30am. C1 Party, 19th Battalion, left Pope’s Post with only twenty men. Seven of these were in the firing line. |
|
2.05am, 20 December 1915 |
C2 Party, 13th Battalion, consisting of 21 men, as well as Captain Edward Twynam, and Captain George Gardiner, left Durrant's Post. |
|
2.05am – 2.30am, 20 December 1915 |
C Parties, 7th Battalion, departed the trenches with Lieutenant David Crooks, Lieutenant Hamilton, Lieutenant Robert Nicholson, and Captain Charles Denehy. |
|
2.15am, 20 December 1915 |
Lieutenant Alexander Mackenzie, Sergeant Harry Dean, Corporal Wilfred McCann, Lance Corporal John Jenkinson, Lance Corporal Stephen Stapleton and Private Sydney Bartle, all of 4th Battalion, left the trenches and embarked at North Beach. C3 Party, 13th Battalion, consisting of ten men, left Durrant's Post under the command of Captain Hubert Ford. C1 Party, 22nd Battalion, together with ten machine guns, left the trenches under command of Major Robert Smith. C1 Party, 24th Battalion, consisting of twenty machine gunners, one warrant officer, four men from A Company and one AMC, with Major Wilfred Fethers, Cole, Carr, and Needham, left trenches and embarked at Williams Pier, North Beach, at 2.45am. C1 Party, 21st Battalion, left the trenches via Wire Gully. |
|
2.20am, 20 December 1915 |
Two officers and twenty Other Ranks, 2nd Battalion, left Shell Green for Anzac Gully. |
|
2.30am, 20 December 1915 |
Captain Bertie Stacy, Lieutenant Allan Chappell, Sergeant Thomas Keary, Corporal Thomas Newstead, Corporal Green, Lance Corporal Arthur Atkinson, Private Joseph Carr, and Private John Regan, all of 4th Battalion, left the trenches and embarked at North Beach. Only twenty men and five officers, including two signallers, remained in the 2nd Battalion's position at Shell Green to continue sniping. These men fired rounds from each post to suggest the entire line remained manned. |
|
2.32am, 20 December 1915 |
C2 Party, 17th Battalion, consisting of one officer and fourteen Other Ranks, left Quinn's Post, under the command of Second Lieutenant Frederick Moulsdale. |
|
2.35am, 20 December 1915 |
C2 Party, 22nd Battalion, consisting of one officer and twenty Other Ranks, left the trenches, under command of Captain Aubrey Wiltshire. C2 Party, 24th Battalion, consisting of 33 men, one AMC and Lieutenants William Tatnall and Bennett, left trenches and embarked at Williams Pier, North Beach, at 3.15am. C2 Party, 21st Battalion, consisting of five other ranks, Captain Crowther and one sergeant, left the trenches via old HQ 21st Battalion and Monash Gully. C2 Party, 19th Battalion, composed of Wallach and nine machine gunners left Pope’s Post. This left ten men at Pope’s Post. |
|
2.40am, 20 December 1915 |
Two officers and 29 Other Ranks, 2nd Battalion, left Shell Green. Lieutenants Harold Woodman, John Watt, Ernest Stone, Sergeant Herbert Mullarkey, Sergeant Hawkervill, Sergeant Harold Law, Corporal John Collins and Lance Corporal Leslie Skinner, all of 4th Battalion, left the trenches and embarked at North Beach. C3 Party, 22nd Battalion, left trenches under command of Captain Lowell Pedlar. C3 Party, 24th Battalion, consisting of 31 men, three signallers, Lieutenants Horace Brinsmead, George McIlroy, and Stanley Savige, left the trenches and embarked at Williams Pier, North Beach, 3.30am. The final party of the 7th Battalion left the firing line under the command of Major Alfred Jackson and Lieutenant James Bowtell-Harris. Six self-firing rifles, using the invention of Lance Corporal William Scurry, were left behind to fire at intervals for up to thirty minutes after departure. |
|
2.45am, 20 December 1915 |
C1 Party, 20th Battalion, left Russell's Top under command of Captain Albert Roper. C3 Party, 21st Battalion, including Duggan, assembled at old HQ 21st Battalion. |
|
About 2.50am, 20 December 1915 |
Major O G Howell-Price and twelve Other Ranks, the last of the 2nd Battalion, left Shell Green and moved to Anzac Gully. |
|
2.55am, 20 December 1915 |
C3 Party, 19th Battalion, left Pope’s Post. |
|
2.56am, 20 December 1915 |
C3 Party, 17th Battalion, consisting of two officers and 21 Other Ranks, left Quinn's Post under command of Captain Cecil Lucas. |
|
2.58am, 20 December 1915 |
C2 Party, 20th Battalion, left Russell's Top under command of Captain Harold Paul. |
|
3.14am, 20 December 1915 |
C3 Party, 20th Battalion, left Russell's Top under command of Captain Ross. |
|
3.15am, 20 December 1915 |
Rear Party (a), 20th Battalion, left Walker's Ridge |
|
3.20am, 20 December 1915 |
Rear Party (b), 20th Battalion, left Walker's Ridge under command of Lieutenant Connor. |
|
3.24am, 20 December 1915 |
Signallers, 20th Battalion, under command of Sergeant Dougal Rentoul left trenches. |
|
3.25am, 20 December 1915 |
Lieutenant John Broadbent and Captain Hutchinson, 20th Battalion, left trenches. |
|
3.30am, 20 December 1915 |
Mines under The Nek exploded followed by explosion of deep level drive. |
|
3.31am, 20 December 1915 |
Major Michael Fitzgerald and Engineer officer left Walker's Ridge and embarked on SS Prince Abbas with C and rear parties of 20th Battalion. |
|
4am, 20 December 1915 |
A Party, 20th Battalion, arrived at Mudros |
|
About 4.30am, 20 December 1915 |
C Parties, 4th Battalion and 2nd Battalion, aboard HMS Heroic, left Anzac for Mudros. |
Last words on departure from Anzac
The unit war diaries, official history of Australia in the First World War and selected personal diaries and letters provide an insight into the activities and emotions of the final days at Anzac Cove. There are also many more stories, reflections and accounts of the final hours at Anzac than can be accommodated here.
Diary entries and letters from this period in particular reveal myriad emotions and opinions on the departure from the peninsula. Some simply accepted it as their lot as a soldier and trusted that there was a good reason behind the decision. Others were noticeably upset. Many had mixed emotions.
The final word on this event is best left to those who were there:
To conclude, I don’t think any one was sorry to leave the Peninsula, although when I passed the cemetery on the way to the beach I thought of the chaps who had fallen & I think I would rather have stuck it, than sneak away like that, but in this game orders are orders which have to be obeyed.
- Richard Job Gardiner
I shall never forget passing the graves of our boys who had fallen, we just looked at each other, but no one spoke, some were too exhausted and some on account of their feelings….Our transport steamed away and soon all that could be seen was the dull red glare in the sky of the Suvla Bay fire.
- Clarence Wallach