Australian War Memorial Logo
Search

Donate Today

  • Collection Open Information Close Information
    • Official Histories & Unit Diaries
    • Understanding the Collection
    • Research at the Memorial
    • Donating to the Collection
    • National Collection Loans
    • Projects
  • People
  • Visit
  • Commemorate Open Information Close Information
    • Last Post Ceremony
    • Honour Rolls
    • Anzac Day
    • Remembrance Day
    • Customs & Ceremony
    • Speeches
  • Learn Open Information Close Information
    • Schools & Teachers
    • Memorial Articles
    • Encyclopedia
    • Understanding Military Structure
    • Podcasts
    • Glossary
    • Magazine
  • Get Involved Open Information Close Information
    • Donations & Bequests
    • Corporate Partnership
    • Employment Opportunities
    • Volunteer at the Memorial
    • Friends of the Memorial
    • eMemorial Newsletter
    • Grants, Scholarships & Residencies
    • Research Papers
  • Shop Open Information Close Information
    • Memorial Shop
    • Images, film and sound
    • Lone Pine Seedlings

Breadcrumb

  1. Home
  2. Visit
  3. Exhibitions
  4. Anzac voices
  5. Turning the tide

Main navigation

  • Other Exhibitions
  • Current Exhibitions
  • Past Exhibitions
  • Touring Exhibitions
  • Online Exhibitions

Turning the tide

Anzac Voices logo
1914
1915
1916
1917
1918
Remembering them

"Great secrecy had been preserved as the idea was to make the attack a complete surprise to the enemy … The preliminary bombardment was a success and on the second at 3.10 down came our barrage. It was a most thrilling and awe inspiring sight to see along [a] continuous line one sheet of flame and as the time proceeded completely developed into a pandemonium terrible."

   Lieutenant Lindsay Turner, 53rd Field Artillery Battery, 4 July 1918

In the summer of 1918, the allies launched their own devastating offensives against the Germans. At Le Hamel, on 4 July, the Australian Corps commander Sir John Monash orchestrated a decisive blow against the Germans in order to straighten the line south of Villers-Bretonneux. A French victory south of the River Marne showed that the tide of war was turning in the allies’ favour.

Then on 8 August a combined British, Canadian, and Australian assault succeeded in breaking through the German positions around Amiens. The Germans were pushed back to the Hindenburg Line – their last line of resistance on the Western Front. In his postwar memoirs, General Erich Ludendorff described 8 August as “the black day of the German army in the history of this war”. With an entire sector of the German front destroyed and losses as high as 30,000, it was a truly crushing defeat and led to a sharp collapse of morale.


Collection Item C55031

Accession Number: E03139

Troops of the 2nd Australian Division work their way along a communication trench towards Mont St Quentin on 1 September 1918. Despite many units being less than half strength, these veteran troops proved too much for the Germans, and Péronne and Mont St Quentin were captured.

"We attacked at 3.10 this morning and captured Hamel."

   Lieutenant General Sir John Monash, Australian Corps, 4 July 1918

John Monash's map of Hamel

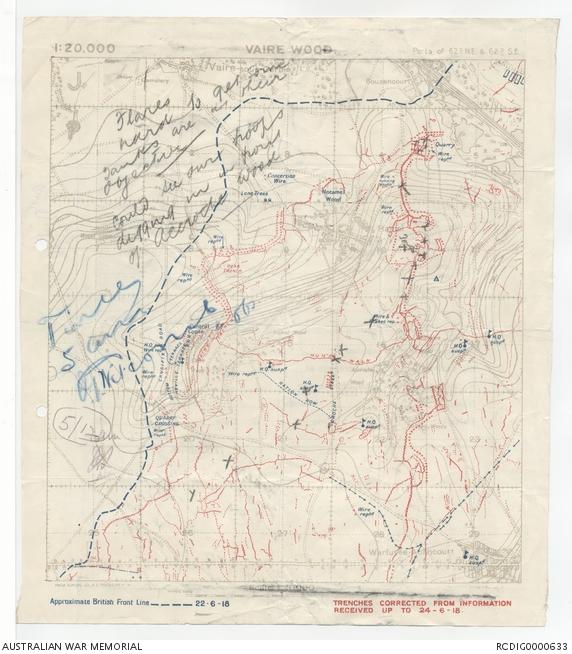
One of Monash’s Hamel maps with a handwritten note that reads, “Flares hard to get…Some tanks are at their objective…Could see our troops digging in in front of Accroche Wood.” The village of Le Hamel is just south of Notamel Wood. Immediately south of Pear Trench are Vaire Wood and Vaire Trench. From there, Hun’s Walk leads east to Accroche Wood.

"During the present series of operations the captures made by the Australian Corps exceed everything in the previous records of war. Our total prisoners closely approaches 10,000 and among them are represented more than seventy five different units of the German Army."

    Lieutenant General Sir John Monash, 21 August 1918

Collection Item C286157

Accession Number: RELAWM15049.004

Mounted German regimental shoulder straps. RELAWM15049.004

Shoulder straps were collected from German prisoners to identify the enemy units the Australians were encountering. Monash had these examples mounted on boards to be sent home.

Last updated: 17 October 2019

1 The Donations and bequests

Donations & Bequests

Your generous donation will be used to ensure the memory of our Defence Forces and what they have done for us, and what they continue to do for our freedom remains – today and into the future.

Find out more
2 Visit Transcribe.awm.gov.au

Transcribe

Help preserve Australia's history by transcribing records from the National Collection. Enhance accessibility and discoverability for all Australians.

Find out more
The placesofpride

Places of Pride

Places of Pride, the National Register of War Memorials, is a new initiative designed to record the locations and photographs of every publicly accessible memorial across Australia.

Find out more
Visit the Australian War Memorial

Visit the Australian War Memorial

The Australian War Memorial is open for visitors as we work to expand our galleries. Entry is free and tickets are not required.

Find out more
Canberra Highlands in Grayscale

ACKNOWLEDGEMENT OF
TRADITIONAL CUSTODIANS

The Australian War Memorial acknowledges the traditional custodians of country throughout Australia. We recognise their continuing connection to land, sea and waters. We pay our respects to elders past and present.
Location map of The Australian War Memorial
The Australian War Memorial building

The Australian War Memorial

Fairbairn Avenue
Campbell ACT 2612
Australia
View on Google Maps (opens in new window)
Google Map data ©2025 Google
Australian War Memorial Logo
  • Go to AWM Facebook
  • Go to AWM Trip Advisor
  • Go to AWM Instagram
  • Go to AWM Youtube

Footer

  • About
  • Contact
  • Venue Hire
  • Media
  • WM Magazine
  • Donate Today

The Australian War Memorial

Fairbairn Avenue

Campbell ACT 2612

Australia


Opening Hours

10 am to 4 pm daily (except Christmas Day)


In preparation for the daily Last Post Ceremony,

galleries are progressively closed from 3:40 pm.


Public entrance via Fairbairn Avenue, Campbell ACT 2612

Sign up to our newsletter

Subscribe

Legal

  • Copyright
  • Disclaimer
  • Privacy Policy
  • Accessibility
  • Freedom of information

Copyright 2025 Australian War Memorial, Canberra. All rights reserved