The August Offensive

With the opposing forces deadlocked, a new offensive was launched in early August. The plan called for allied troops to capture the Sari Bair range north of Anzac, while the British made another effort to break out at Helles. Simultaneously, British troops would land further north at Suvla Bay. It was an overly ambitious plan, but something had to be done to break the stalemate.
On 6 August the Australians launched a diversionary attack at Lone Pine. The main Turkish trenches were captured, but bitter hand-to-hand fighting lasted four days. This terrible battle cost 2,277 Australian casualties. An attack at The Nek early next morning was intended to coincide with the capture of Chunuk Bair. Four waves of Australian light horsemen were ordered to rush this narrow strip of ground. But plans went awry and coordination was lost. They were mown down by machine-gun fire in a futile affair: of the 600 men who went forward, almost 400 became casualties.
The offensive had failed, and the stalemate resumed. The campaign on Gallipoli was eventually abandoned, and the troops withdrawn from the peninsula in December 1915.

Two 1st Brigade soldiers in a captured trench at Lone Pine use a periscope to keep a sharp eye out for enemy counter-attacks. A03771
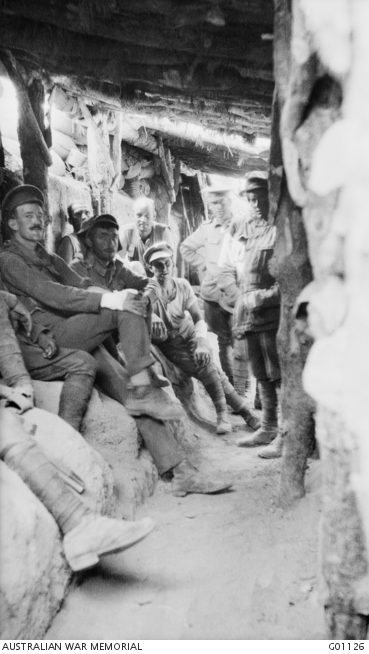
Australians take a break in a Turkish trench at Lone Pine just a few days after its capture. Desperate hand-to-hand fighting took place in this confined space. G01126
Recovered from Lone Pine
Battlefield relics from Lone Pine recovered after the war. War correspondent Charles Bean was in the front line when the attack began, noting in his diary: “Officer took whistle from wrist – ‘Prepare to jump out,’ he said … presently he blew the whistle.”


Frederick Tubb VC
Frederick Harold Tubb was a 32-year-old grazier from Longwood, Victoria, when he joined the AIF in August 1914. Tubb was in charge of the 7th Battalion’s transport, and did not land on Gallipoli until mid-July.
Lone Pine was Captain Tubb’s first battle, and he was soon in the thick of the fighting. He and a group of men desperately fended off Turkish counter-attacks. Although wounded in the head and arm, Tubb fought courageously to hold his post. He and two of his men, Corporals Alexander Burton and William Dunstan, were awarded the Victoria Cross. Burton’s award was made posthumously.
"We went in 670 strong and we came out 320. All the officers except the CO and Capt Layh were hit … I was extremely lucky and feel gratified for being alive and able to write ... My luck was in all the time. It is miraculous that I am alive, three different times I was blown yards away from bombs ... Burton of Euroa deserved the highest award for his gallant action for three times filling a breach in the parapet till they killed him … By Jove it was some scrap and a lot more of our good old 7th are gone … Anyway the CO is very pleased with me and so is the Brigadier so I feel happy as Larry."

The Nek
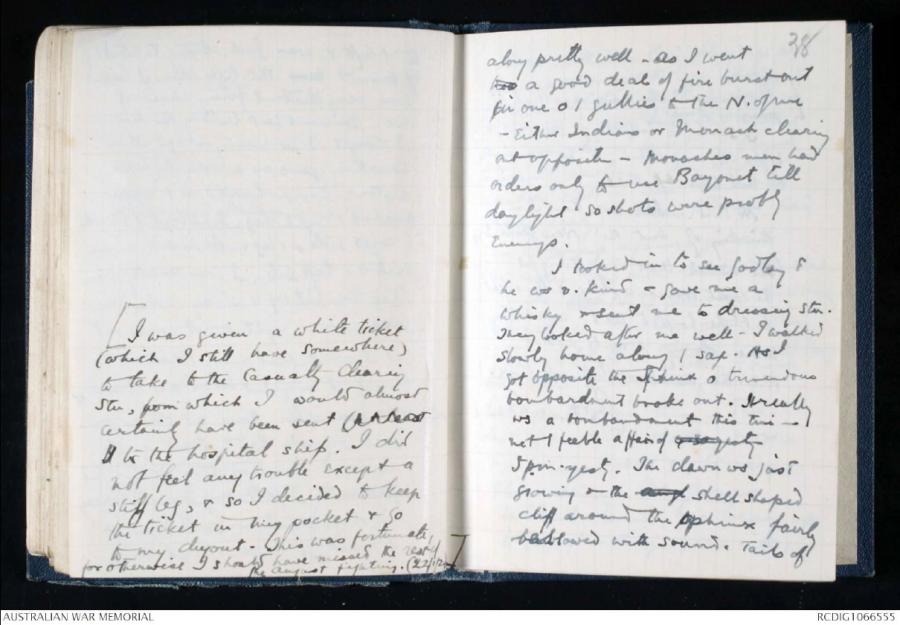
Charles Bean was wounded in the leg shortly before dawn on 7 August. Hobbling back for medical attention, he was just below Russell’s Top and The Nek as the light horsemen began their fateful attack.
"As I got opposite the Sphinx a tremendous bombardment broke out. It really was a bombardment this time and not the feeble affair of 5 pm yesterday. The dawn was just growing on the shell shaped cliff around the Sphinx."
Bean was operated on, but the bullet was too close to his femoral artery to be removed. He took it to his grave in 1968.
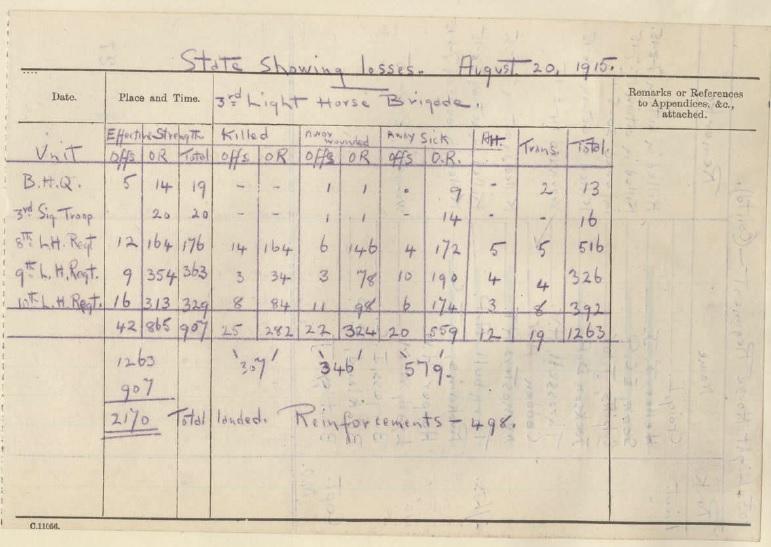
"Probably those marked missing were all killed."
This table, compiled soon after the charge at The Nek, attempts to calculate the devastating Australian casualties sustained during the attack. The figure of 355 casualties for the brigade is now believed to be 372.
“This is only suicide boys”
“We were right out in the open and all the Turkish machine guns and rifle seemed to be playing on us and shrapnel bursting right over us. I yelled out to the other 4 chaps, 'This is only suicide boys, I’m going to make a jump for it. I thought they said alright we’ll follow. I sprang to my feet in one jump.'”
These were the last words McAnulty wrote in his makeshift diary. He was killed the following day.

The Nek, Walker's Ridge, site of the charge of the light horse; verso; Rest Gully, pack mule and the draught horse
View of The Nek from the lower slopes with bones littering no man’s land. This painting was made in 1919 during a visit to the peninsula by the Australian Historical Mission. ART02856

We took the hill – come and help us keep it!
Weston’s recruiting poster dates from around the time of the August offensive. In fact, few hills of consequence were won and retained by the allies. ARTV01121