Sinai Palestine, 1916-17

While most of the Australian Imperial Force went to France in 1916, the bulk of Australia’s mounted forces remained in Egypt to fight the Turks threatening the Suez Canal. After 1916 the threat to the canal was over, and with victory at Romani in August 1916, the Light Horse advanced into Turkish territory. In 1917 they entered Palestine and in 1918 advanced into Jordan and Syria. The campaign ended on 31 October 1918, a few weeks after the capture of Damascus.
With the main focus on the Western Front, the Middle East campaign was regarded as a sideshow. Despite this, the campaign had an air of romance and created the legend of the Australian Light Horse.
Kangaroo feathers and wallaby fur
The slouch hat with its emu plume, jokingly called “kangaroo feathers”, became a symbol of the style and romance of the Light Horse. The plume was originally used by the Queensland regiments, but was gradually adopted by most other regiments as well. Among the units that did not wear the emu plume was the 6th Light Horse Regiment, which wore a band of wallaby fur.


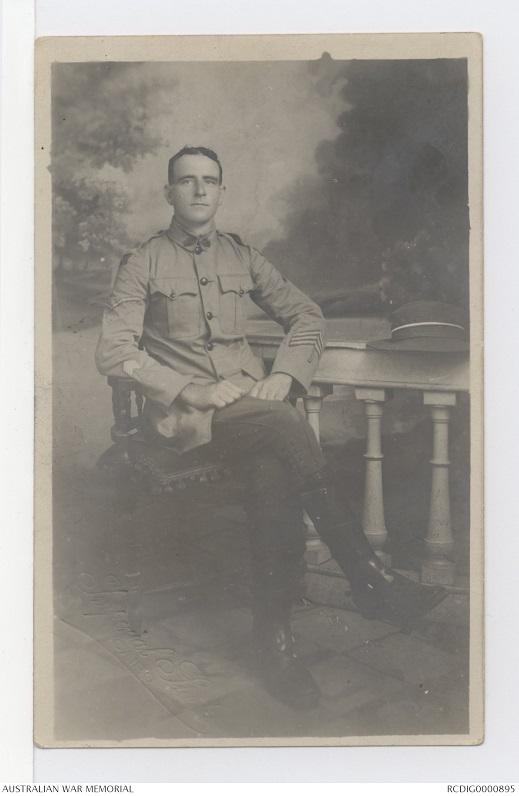
Trooper Ralph Douglas McKnight, 6th Light Horse Regiment, c. 1918. P10890.001

Reinforcements for the 6th Light Horse Regiment in 1917. Most are wearing the wallaby fur puggaree. PB0271
Life as a light horseman
"A squadron of our fellows went out last night, with one water bottle each, and will be away all day. Poor devils … Not a drop of water to drink in camp. We are going away and drinking from the horses’ well. The water is forbidden and brackish but a man must drink something."
Trooper Ion Idriess, 5th Light Horse Regiment, 1917
"The flies are in millions they fly flop onto your food whether you like it or not, & as I am writing this note I have to keep them off with one hand & write with the other. Our horses suffer worse than we do. They have to stand in the sun & hot sand, for there is no shelter. We have to scrape the top sand away before we can sit down during a short stop but nothing troubles us now we take things as they come whether it is bully & biscuits, or a drop of tea and no sugar or a nice stew full of sand & flies...."
Trooper Albany Varney, 12th Light Horse Regiment, 22 May 1916
Fighting in the desert brought many challenges. Being able to find water was essential for the well-being of both the men and their animals. Troops travelled long distances in extremes of heat and cold, not always getting their full rations. They slept in the open, or in tents or blanket shelters that provided little to no protection from scorching winds or driving rains.
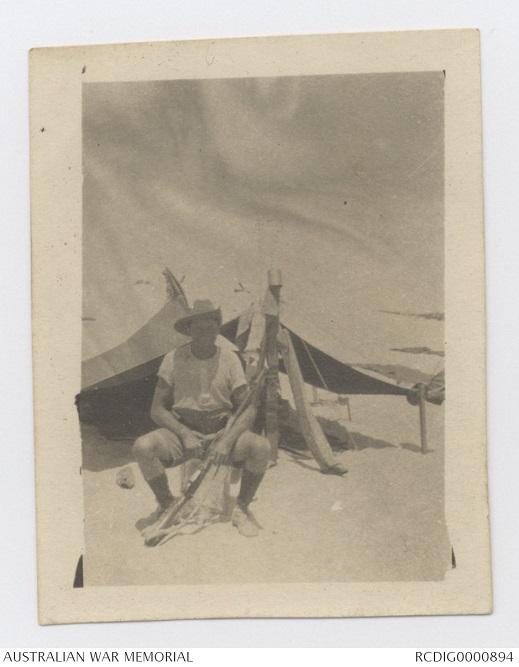
"Enclosed you will see what has been my home for months, but it won’t be any good when the rain comes … at present the dust is awful … I laid down one night to sleep and had to dig myself out in the morning..."
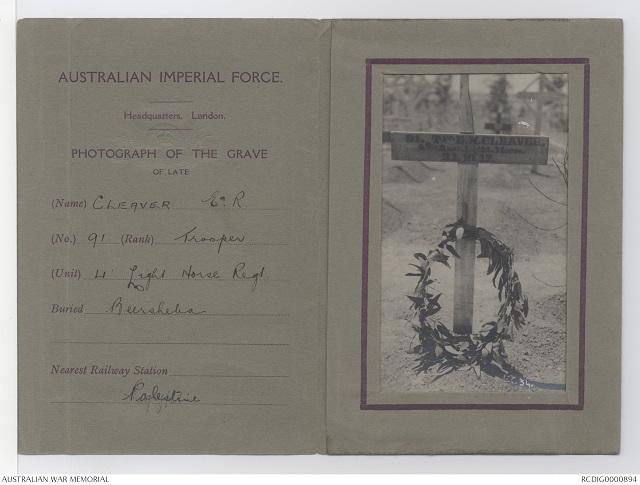
Trooper Edward Cleaver, 4th Light Horse Regiment, 10 October 1917
The soldiers in Palestine lived and fought in difficult conditions and some felt anger towards those that stayed home, living a comfortable life, especially those who were eligible to enlist but failed to do so.
"He ought to look well as he is out of all weathers and plenty [to] eat not like us [that] go to bed with empty stomachs very often."
Trooper Edward Cleaver, 4th Light Horse Regiment, 10 October 1917
It could take months to receive mail. In October 1917, one light horseman received two letters reporting his mother’s death. They had taken almost three months to reach him, and it was a further month later before he could reply.
"I am sorry I could not write to you sooner but when I received the sad news about Mother, we were working hard & expecting to be hard at it at any moment."
Trooper Albany Varney, 12th Light Horse Regiment, 23 November 1917

Horses and camels were crucial to the advance. There were times they were ridden for more than 30 hours without water. B00237

Waiting for Anzac leave
"We are all waiting for the furlough to Australia what was so much talked about for a while but it died out again and only the other day they took the names & number of the originals in the Regiment … the tale came through this morning that we were going in a month’s time … we have not got it officially yet but it seems too good to be true, it would be grand to have six months’ spell and I think we deserve it after three years’ service without a spell and roughing it as we have to do."
Trooper Edward Cleaver, 4th Light Horse Regiment, 27 August 1917
Australian Imperial Force “originals” were those who first joined the unit in 1914; those who arrived later were classed as reinforcements (or “slow thinkers”). Throughout the war rumours circulated about the opportunity for “home leave” to Australia, especially for the “originals”. Unfortunately, their special six months’ leave was not granted until late 1918.
Gaza and Beersheba
At the heart of the main Turkish defensive position in southern Palestine, Gaza was the scene of three battles in 1917. During the first battle on 26–27 March, troops from the ANZAC Mounted Division entered Gaza, but as it neared nightfall and it was learned that the Turks were being reinforced they were ordered to withdraw. A second attack three weeks later also failed, despite using tanks and gas bombs.
At the end of October a decision was made to capture Beersheba, on the far end of the Turkish defensive line, then roll back the line to Gaza. A diversionary attack was made on Gaza, while the main force attacked Beersheba.
The Turks initially held out at Beersheba, but at 4.30 pm desperate for water, with the light fading and little chance of making it back to another water supply, the 4th and 12th Light Horse Regiments made a desperate charge and captured the town. Gaza was captured a week later.

An aircraft from No. 1 Squadron, Australian Flying Corps (AFC), flying over Gaza. The squadron contained a high number of light horsemen who transferred to this new form of warfare. These men performed a number of roles, including aerial reconnaissance. They attacked ground forces and took part in dog fights against German aircraft. B01997

First battle of Gaza
"We have been all around Gaza, also a number of our mounted men were in the heart of the town and brought away three of their big guns and a lot of prisoners. However the Turks still hold the Town altho[ugh] we had a fair fight for it the other day."
Lieutenant Colonel Leslie Maygar, 8th Light Horse Regiment, 8 April 1917
"Our infantry failed in their attacks, but only the English generals are to blame. No doubt they have their reasons for their different movements, but those reasons lost the day, for the time being at least. And now many more men must die before we take Gaza."
Trooper Ion Idriess, 5th Light Horse Regiment, March 1917
Despite its ultimate failure, the first attack on Gaza was declared a success at the time because of the number of guns captured and the high Turkish casualties.
Second battle of Gaza
Tanks were used for the first time in the Middle East during the second attempt to take Gaza. They proved ineffective and even dangerous because they drew enemy fire.
"We had a tank just ahead of us & although she was very interesting – it was really a death trap – as it drew the fire of every battery – machine guns & rifles of the enemy within a radius of about two miles – it was a terrific fire."
Captain Arthur Mackenzie, Imperial Camel Corps, 10 June 1917
Beersheba
"We rode all night to get right around Beersheba … It was a terrible ride in heavy dust all the way. The horses have still got the saddles on & I don’t know when they will get them off. The attack started at 4.30 PM & within half an hour the first trenches were cleared & then they never stop till they got Beersheba. Our casualties were fairly light considering the ground was as level as a table."
Trooper Harry Langtip, 4th Light Horse Regiment, 31 October 1917
Trooper Langtip charged at Beersheba with General William Grant’s 4th Light Horse Brigade. Riding 50 kilometres through the night, they pulled up several kilometres from Beersheba. There they waited until called upon to charge. By 6 pm the town had been taken.
The charge of Beersheba
"At Beersheba, on 31st Oct. a determined resistance was being put up by the enemy about 2 miles from the town, so our Brigade was ordered to take the trenches mounted. Your brother was in the first Squadron that charged (led by myself) & after galloping over two trenches, full of Turks, we dismounted at the third & got in with the bayonet. Your poor brother was killed in the act of dismounting by machine gun fire as were also his Troop Leader (Lieut Burton) and three others in the troop. His death was practically instantaneous & he with the others were buried next day within a few yards of where they fell.."
Major James Lawson, 4th Light Horse Regiment, 14 January 1918
Two months after Trooper Edward Cleaver’s death at Beersheba, his commanding officer wrote to Cleaver’s sister. The family later received a photograph of his grave.